SendGrid
Using Sendgrid email API
Introduction
This section explains how you can integrate SendGrid with a Cloud Code function. After completing this guide with step-by-step instructions, you will be ready to use your function in your App and call it at your iOS or Android App.
Prerequisites
To complete this tutorial, you will need:
- An app created at Back4App.
- Back4App Command Line Configured with the project.
Let’s get started!
We will write a function using SendGrid that you will be able to work with a lot from possibilities as Delivering messages to our customers and configuring parameters to use the SendGrid v3 REST API.
To learn how to create or access an Account in SendGrid, check the links given below:
1 - Create a SendGrid API Key
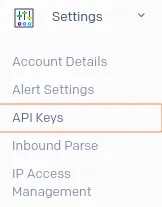
The most important step before start to code is create the correct keys to setup your environment. After accessing your account, locate in the Settings drop-down menu, the API Keys option as in the picture below:
After that, at the top right locate and choose an identification to theAPI Key Name, like as shown below:
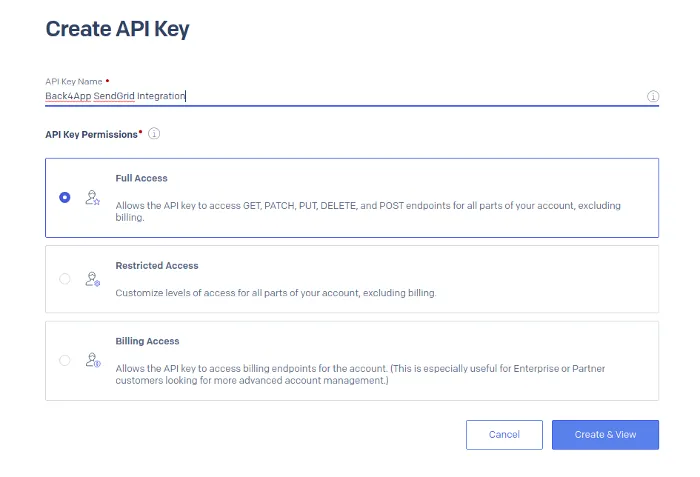
As you can see at the image above, it’s necessary to select one option to allow the Full Access to the API Key.
After click on the Create & View to proceed with creating of the key, you will be able to see the screen below:

Hint: Be careful to write it down, as there is no way to retrieve it. Click on the text to copy it.
2 - Add a function to the Cloud Code
The main strategy to this way of using SendGrid’s API is to create a function on the Cloud Code named sendgridEmail and call it from the App.
2.1 - Install module from Sendgrid
Create a file called package.json, and inside this file, you need to install the Twilio module, like:
1   {
2	   "dependencies": {
3		   "@sendgrid/mail": "*"
4	   }
5   }
2.2 - Implement Cloud Code
You should note that every email field has to be send by the App – from the subject to the content – as a parameters. The code is as follows:
1   Parse.Cloud.define("sendgridEmail", (request, response) => {
2       const sgMail = require('@sendgrid/mail');
3
4       // Import SendGrid module and call with your SendGrid API Key
5       sgMail.setApiKey("your SendGrid API key here");
6
7       const msg = {
8           to: request.params.toEmail,
9           replyTo: '[email protected]',
10          from: '[email protected]',
11           subject: request.params.subject,
12          text: request.params.body
13      };
14
15      sgMail.send(msg).then(() => {
16         response.success("The message was sent!");
17      })
18      .catch(error => {
19          //Log friendly error
20          response.error(error.toString());
21      });
22 });Hint: Remember to change the fields from and reply_to to your personal information.
Then it is necessary to implement a call to the Cloud Code function on the app.
3 - Call Cloud Code function
In this current step, we can work with two possibilities to call our function, they’re: Android and iOS (Swift and Objective-C).
1   PFCloud.callFunctionInBackground("sendgridEmail", withParameters: [
2       // These fields have to be defined earlier
3       "toEmail": toEmail,
4       "subject": subject,
5       "body": body
6   ]) { (response, error) in
7       if error == nil {
8           // The function executed, but still has to check the response
9       } else {
10          // The function returned an error
11      }
12  }
4 - It’s done!
And that’s it for the SendGrid usage. Note that you might want to use some sort of authentication before allowing anyone to use your SendGrid API to send emails.
In case you need any help or a function/link doesn’t work, please contact our team via chat!