User Registration
Sign up page in React using Parse
Introduction
At the core of many apps, user accounts have a notion that lets users securely access their information. Parse provides a specialized user class called Parse.User that automatically handles much of the functionality required for user account management.
In this guide, you will learn how the Parse.User class works by creating a user registration feature for your React App using Parse JS SDK.
Prerequisites
To complete this tutorial, you will need:
- If you want to test/use the screen layout provided by this guide, you should set up the Ant Design library.
Goal
To build a User Registration feature using Parse for a React App.
1 - Understanding the SignUp method
Parse User management uses the Parse.User object type, which extends the default ParseObject type while containing unique helper methods, such as current and getUsername, that will help you retrieve user data throughout your app. You can read more about the Parse.User object here at the official documentation.
In this guide, you will learn how to use the signUp method that creates a new valid and unique Parse.User object both locally and on the server, taking as arguments valid username and password values.
2 - Create the user registration component
Let’s now build the functional component, which will call the signUp method in our App. First, create a new file in your src directory called UserRegistration.js (UserRegistration.tsx if you are using TypeScript) and also add the needed input elements (username and password inputs), using state hooks via useState to manage their data:
1	import React, { useState, FC, ReactElement } from 'react';
2	import './App.css';
3	import { Button, Divider, Input } from 'antd';
4	const Parse = require('parse/dist/parse.min.js');
5
6	export const UserRegistration: FC<{}> = (): ReactElement => {
7	  // State variables
8	  const [username, setUsername] = useState('');
9	  const [password, setPassword] = useState('');
10
11	  return (
12	    <div>
13	      <div className="header">
14	        <img
15	          className="header_logo"
16	          alt="Back4App Logo"
17	          src={
18	            'https://blog.back4app.com/wp-content/uploads/2019/05/back4app-white-logo-500px.png'
19	          }
20	        />
21	        <p className="header_text_bold">{'React on Back4App'}</p>
22	        <p className="header_text">{'User Registration'}</p>
23	      </div>
24	      <div className='container'>
25	        <h2 className="heading">{'User Registration'}</h2>
26	        <Divider />
27	        <div className="form_wrapper">
28	          <Input
29	            value={username}
30	            onChange={(event) => setUsername(event.target.value)}
31	            placeholder="Username"
32	            size="large"
33	            className="form_input"
34	          />
35	          <Input
36	            value={password}
37	            onChange={(event) => setPassword(event.target.value)}
38	            placeholder="Password"
39	            size="large"
40	            type="password"
41	            className="form_input"
42	          />
43	        </div>
44	        <div className="form_buttons">
45	          <Button
46	            onClick={() => doUserRegistration()}
47	            type="primary"
48	            className="form_button"
49	            color={'#208AEC'}
50	            size="large"
51	          >
52	            Sign Up
53	          </Button>
54	        </div>
55	      </div>
56	    </div>
57	  );
58	};
3 - Create a Sign Up function
You can now create the sign-up function that will call the signUp method:
1	const doUserRegistration = async function (): Promise<boolean> {
2	  // Note that these values come from state variables that we've declared before
3	  const usernameValue: string = username;
4	  const passwordValue: string = password;
5	  try {
6	    // Since the signUp method returns a Promise, we need to call it using await
7	    const createdUser: Parse.User = await Parse.User.signUp(usernameValue, passwordValue);
8	    alert(
9	      `Success! User ${createdUser.getUsername()} was successfully created!`,
10	    );
11	    return true;
12	  } catch (error: any) {
13	      // signUp can fail if any parameter is blank or failed an uniqueness check on the server
14	      alert(`Error! ${error}`);
15	      return false;
16	  };
17 };Note: Creating a new user using signUp also makes it the currently logged-in user, so there is no need for your user to log in again to continue using your App.
Insert this function inside the UserRegistration component, just before the return call, to be called and tested. Remember to update the form’s sign up button onClick action to () => doUserRegistration(). Your component should now look like this:
1	import React, { useState, FC, ReactElement } from 'react';
2	import './App.css';
3	import { Button, Divider, Input } from 'antd';
4	const Parse = require('parse/dist/parse.min.js');
5
6	export const UserRegistration: FC<{}> = (): ReactElement => {
7	  // State variables
8	  const [username, setUsername] = useState('');
9	  const [password, setPassword] = useState('');
10
11	  // Functions used by the screen components
12	  const doUserRegistration = async function (): Promise<boolean> {
13	    // Note that these values come from state variables that we've declared before
14	    const usernameValue: string = username;
15	    const passwordValue: string = password;
16	    try {
17	      // Since the signUp method returns a Promise, we need to call it using await
18	      const createdUser: Parse.User = await Parse.User.signUp(usernameValue, passwordValue);
19	      alert(
20	        `Success! User ${createdUser.getUsername()} was successfully created!`,
21	      );
22	      return true;
23	    } catch (error: any) {
24	        // signUp can fail if any parameter is blank or failed an uniqueness check on the server
25	        alert(`Error! ${error}`);
26	        return false;
27	    };
28	  };
29
30	  return (
31	    <div>
32	      <div className="header">
33	        <img
34	          className="header_logo"
35	          alt="Back4App Logo"
36	          src={
37	            'https://blog.back4app.com/wp-content/uploads/2019/05/back4app-white-logo-500px.png'
38	          }
39	        />
40	        <p className="header_text_bold">{'React on Back4App'}</p>
41	        <p className="header_text">{'User Registration'}</p>
42	      </div>
43	      <div className='container'>
44	        <h2 className="heading">{'User Registration'}</h2>
45	        <Divider />
46	        <div className="form_wrapper">
47	          <Input
48	            value={username}
49	            onChange={(event) => setUsername(event.target.value)}
50	            placeholder="Username"
51	            size="large"
52	            className="form_input"
53	          />
54	          <Input
55	            value={password}
56	            onChange={(event) => setPassword(event.target.value)}
57	            placeholder="Password"
58	            size="large"
59	            type="password"
60	            className="form_input"
61	          />
62	        </div>
63	        <div className="form_buttons">
64	          <Button
65	            onClick={() => doUserRegistration()}
66	            type="primary"
67	            className="form_button"
68	            color={'#208AEC'}
69	            size="large"
70	          >
71	            Sign Up
72	          </Button>
73	        </div>
74	      </div>
75	    </div>
76	  );
77	};
Also add these classes to your App.css file to fully render the layout styles:
1	html {
2	  box-sizing: border-box;
3	  outline: none;
4	  overflow: auto;
5	}
6
7	*,
8	*:before,
9	*:after {
10	  margin: 0;
11	  padding: 0;
12	  box-sizing: inherit;
13	}
14
15	h1,
16	h2,
17	h3,
18	h4,
19	h5,
20	h6 {
21	  margin: 0;
22	  font-weight: bold;
23	}
24
25	p {
26	  margin: 0;
27	}
28
29	body {
30	  margin: 0;
31	  background-color: #fff;
32	}
33
34	.container {
35	  width: 100%;
36	  max-width: 500px;
37	  margin: auto;
38	  padding: 20px 0;
39	  text-align: left;
40	}
41
42	.header {
43	  align-items: center;
44	  padding: 25px 0;
45	  background-color: #208AEC;
46	}
47
48	.header_logo {
49	  height: 55px;
50	  margin-bottom: 20px;
51	  object-fit: contain;
52	}
53
54	.header_text_bold {
55	  margin-bottom: 3px;
56	  color: rgba(255, 255, 255, 0.9);
57	  font-size: 16px;
58	  font-weight: bold;
59	}
60
61	.header_text {
62	  color: rgba(255, 255, 255, 0.9);
63	  font-size: 15px;
64	}
65
66	.heading {
67	  font-size: 22px;
68	}
69
70	.form_wrapper {
71	  margin-top: 20px;
72	  margin-bottom: 10px;
73	}
74
75	.form_input {
76	  margin-bottom: 20px;
77	}
78
79	.form_button {
80	  width: 100%;
81	}
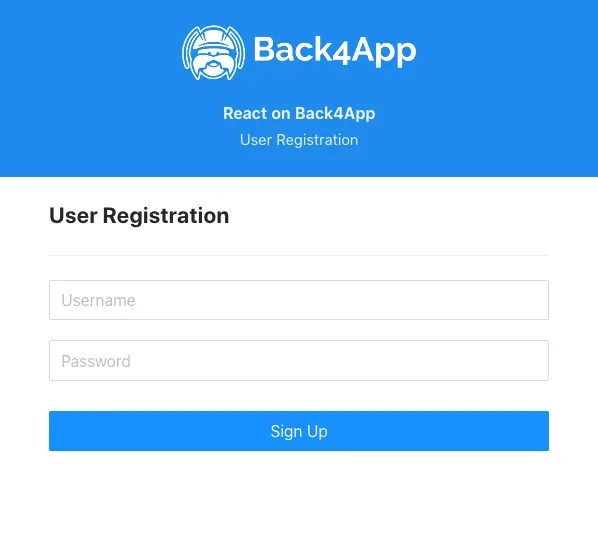
Your app now should look like this:
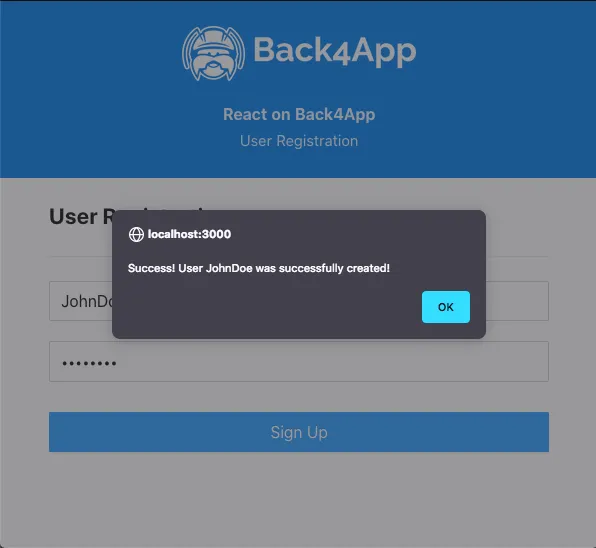
After providing the desired user credentials, you will see this message after pressing on Sign Up if everything was successful:
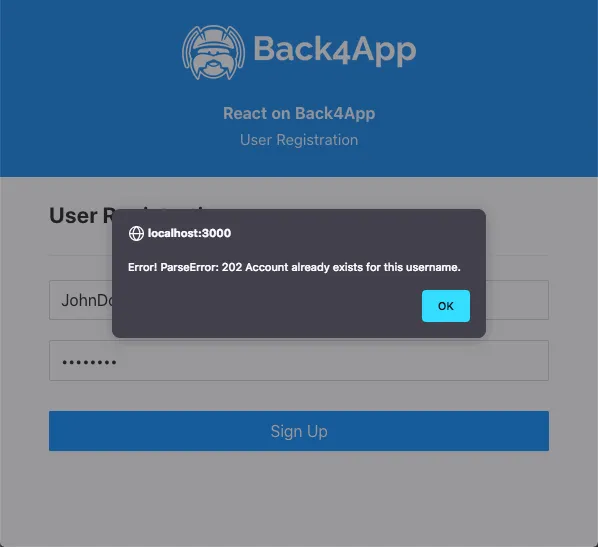
Error handling can be tested if you try to register a user with the same username as before:
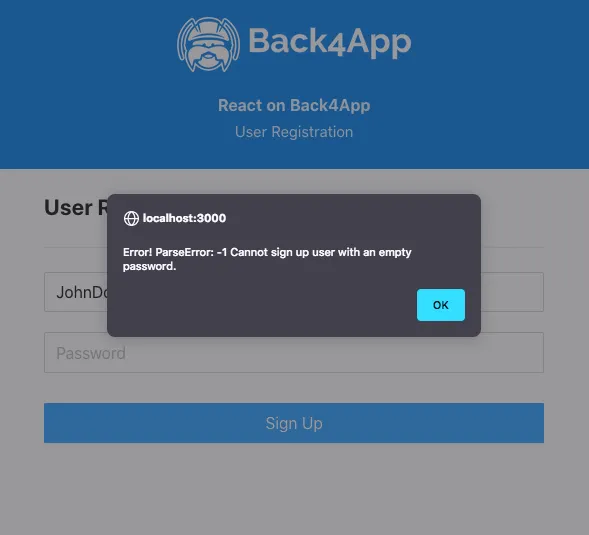
You will get another error if you try to sign up with no password:
Conclusion
At the end of this guide, you learned how to register new Parse users on React. In the next guide, we will show you how to log in and out users.