Basic Operations
React Native CRUD tutorial
Introduction
Storing data on Parse is built around Parse.Object class. Each Parse.Object contains key-value pairs of JSON-compatible data. This data is schemaless, which means that you don’t need to specify ahead of time what keys exist on each Parse.Object. You can simply set whatever key-value pairs you want, and our backend will store it.
You can also specify the datatypes according to your application needs and persist types such as number, boolean, string, DateTime, list, GeoPointers, and Object, encoding them to JSON before saving. Parse also supports store and query relational data by using the types Pointers and Relations.
In this guide, you will learn how to perform basic data operations through a CRUD example app, which will show you how to create, read, update and delete data from your Parse server database in React Native. You will first create your component functions for each CRUD operation, using them later in a complete screen layout, resulting in a to-do list app.
Prerequisites
Goal
To build a basic CRUD application in React Native using Parse.
1 - Creating data objects
The first step to manage your data in your Parse database is to have some on it. Let’s now make a createTodo function that will create a new instance of Parse.Object with the “Todo” subclass. The Todo will have a title(string) describing the task and a done(boolean) field indicating if the task is completed.
1	const createTodo = async function () {
2	  // This value comes from a state variable
3	  const newTodoTitleValue = newTodoTitle;
4	  // Creates a new Todo parse object instance
5	  let Todo = new Parse.Object('Todo');
6	  Todo.set('title', newTodoTitleValue);
7	  Todo.set('done', false);
8	  // After setting the todo values, save it on the server
9	  try {
10	    await Todo.save();
11	    // Success
12	    Alert.alert('Success!', 'Todo created!');
13	    // Refresh todos list to show the new one (you will create this function later)
14	    readTodos();
15	    return true;
16	  } catch (error) {
17	    // Error can be caused by lack of Internet connection
18	    Alert.alert('Error!', error.message);
19	    return false;
20	  };
21	};
Notice that if your database does not have a Todo table (or subclass) in it yet, Parse will create it automatically and also add any columns set inside the Parse.Object instance using the Parse.Object.set() method, which takes two arguments: the field name and the value to be set.
2 - Reading data objects
After creating some data in your database, your application can now be able to read it from the server and show it to your user. Go ahead and create a readTodos function, which will perform a Parse.Query, storing the result inside a state variable.
1	const readTodos = async function (): Promise<boolean> {
2	  // Reading parse objects is done by using Parse.Query
3	  const parseQuery: Parse.Query = new Parse.Query('Todo');
4	  try {
5	    let todos: Parse.Object[] = await parseQuery.find();
6	    // Be aware that empty or invalid queries return as an empty array
7	    // Set results to state variable
8	    setReadResults(todos);
9	    return true;
10	  } catch (error) {
11	    // Error can be caused by lack of Internet connection
12	    Alert.alert('Error!', error.message);
13	    return false;
14	  };
15	};
The Parse.Query class is very powefull, many constraints and orderings can be applied to your queries. For now, we will stick to this simple query, which will retrieve every saved Todo object.
3 - Updating data objects
Updating a Parse.Object instance is very similar to creating a new one, except that in this case, you need to assign the previously created objectId to it and then save, after setting your new values.
1	const updateTodo = async function (todoId, done) {
2	  // Create a new todo parse object instance and set todo id
3	  let Todo = new Parse.Object('Todo');
4	  Todo.set('objectId', todoId);
5	  // Set new done value and save Parse Object changes
6	  Todo.set('done', done);
7	  try {
8	    await Todo.save();
9	    // Success
10	    Alert.alert('Success!', 'Todo updated!');
11	    // Refresh todos list
12	    readTodos();
13	    return true;
14	  } catch (error) {
15	    // Error can be caused by lack of Internet connection
16	    Alert.alert('Error!', error.message);
17	    return false;
18	  };
19	};
Since this example app represents a to-do list, your update function takes an additional argument, the done value, which will represent if the specific task is completed or not.
4 - Deleting data objects
To delete a data object, you need to call the .destroy() method in the Parse.Object instance representing it. Please be careful because this operation is not reversible.
1	const deleteTodo = async function (todoId: string): Promise<boolean> {
2	  // Create a new todo parse object instance and set todo id
3	  let Todo: Parse.Object = new Parse.Object('Todo');
4	  Todo.set('objectId', todoId);
5	  // .destroy should be called to delete a parse object
6	  try {
7	    await Todo.destroy();
8	    Alert.alert('Success!', 'Todo deleted!');
9	    // Refresh todos list to remove this one
10	    readTodos();
11	    return true;
12	  } catch (error) {
13	    // Error can be caused by lack of Internet connection
14	    Alert.alert('Error!', error.message);
15	    return false;
16	  };
17	};
Let´s now use these four functions in a complete component, so you can test it and make sure that every CRUD operation is working properly.
5 - Using CRUD in a React Native component
Here is the complete component code, including styled user interface elements, state variables, and calls to your CRUD functions. You can create a separate component in a file called TodoList.js/TodoList.tsx containing the following code or add it to your main application file (App.js/App.tsx or index.js):
1	import React, {FC, ReactElement, useState} from 'react';
2	import {
3	  Alert,
4	  View,
5	  SafeAreaView,
6	  Image,
7	  ScrollView,
8	  StatusBar,
9	  StyleSheet,
10	  TouchableOpacity,
11	} from 'react-native';
12	import Parse from 'parse/react-native';
13	import {
14	  List,
15	  Title,
16	  IconButton,
17	  Text as PaperText,
18	  Button as PaperButton,
19	  TextInput as PaperTextInput,
20	} from 'react-native-paper';
21
22	export const TodoList: FC<{}> = ({}): ReactElement => {
23	  // State variables
24	  const [readResults, setReadResults] = useState<[Parse.Object]>();
25	  const [newTodoTitle, setNewTodoTitle] = useState('');
26
27	  // Functions used by the screen components
28	  const createTodo = async function (): Promise<boolean> {
29	    // This value comes from a state variable
30	    const newTodoTitleValue: string = newTodoTitle;
31	    // Creates a new Todo parse object instance
32	    let Todo: Parse.Object = new Parse.Object('Todo');
33	    Todo.set('title', newTodoTitleValue);
34	    Todo.set('done', false);
35	    // After setting the todo values, save it on the server
36	    try {
37	      await Todo.save();
38	      // Success
39	      Alert.alert('Success!', 'Todo created!');
40	      // Refresh todos list to show the new one (you will create this function later)
41	      readTodos();
42	      return true;
43	    } catch (error) {
44	      // Error can be caused by lack of Internet connection
45	      Alert.alert('Error!', error.message);
46	      return false;
47	    }
48	  };
49
50	  const readTodos = async function (): Promise<boolean> {
51	    // Reading parse objects is done by using Parse.Query
52	    const parseQuery: Parse.Query = new Parse.Query('Todo');
53	    try {
54	      let todos: Parse.Object[] = await parseQuery.find();
55	      // Be aware that empty or invalid queries return as an empty array
56	      // Set results to state variable
57	      setReadResults(todos);
58	      return true;
59	    } catch (error) {
60	      // Error can be caused by lack of Internet connection
61	      Alert.alert('Error!', error.message);
62	      return false;
63	    }
64	  };
65
66	  const updateTodo = async function (
67	    todoId: string,
68	    done: boolean,
69	  ): Promise<boolean> {
70	    // Create a new todo parse object instance and set todo id
71	    let Todo: Parse.Object = new Parse.Object('Todo');
72	    Todo.set('objectId', todoId);
73	    // Set new done value and save Parse Object changes
74	    Todo.set('done', done);
75	    try {
76	      await Todo.save();
77	      // Success
78	      Alert.alert('Success!', 'Todo updated!');
79	      // Refresh todos list
80	      readTodos();
81	      return true;
82	    } catch (error) {
83	      // Error can be caused by lack of Internet connection
84	      Alert.alert('Error!', error.message);
85	      return false;
86	    }
87	  };
88
89	  const deleteTodo = async function (todoId: string): Promise<boolean> {
90	    // Create a new todo parse object instance and set todo id
91	    let Todo: Parse.Object = new Parse.Object('Todo');
92	    Todo.set('objectId', todoId);
93	    // .destroy should be called to delete a parse object
94	    try {
95	      await Todo.destroy();
96	      Alert.alert('Success!', 'Todo deleted!');
97	      // Refresh todos list to remove this one
98	      readTodos();
99	      return true;
100	    } catch (error) {
101	      // Error can be caused by lack of Internet connection
102	      Alert.alert('Error!', error.message);
103	      return false;
104	    }
105	  };
106
107	  return (
108	    <>
109	      <StatusBar backgroundColor="#208AEC" />
110	      <SafeAreaView style={Styles.container}>
111	        <View style={Styles.header}>
112	          <Image
113	            style={Styles.header_logo}
114	            source={ {
115	              uri:
116	                'https://blog.back4app.com/wp-content/uploads/2019/05/back4app-white-logo-500px.png',
117	            } }
118	          />
119	          <PaperText style={Styles.header_text_bold}>
120	            {'React Native on Back4App'}
121	          </PaperText>
122	          <PaperText style={Styles.header_text}>{'Product Creation'}</PaperText>
123	        </View>
124	        <View style={Styles.wrapper}>
125	          <View style={Styles.flex_between}>
126	            <Title>Todo List</Title>
127	            {/* Todo read (refresh) button */}
128	            <IconButton
129	              icon="refresh"
130	              color={'#208AEC'}
131	              size={24}
132	              onPress={() => readTodos()}
133	            />
134	          </View>
135	          <View style={Styles.create_todo_container}>
136	            {/* Todo create text input */}
137	            <PaperTextInput
138	              value={newTodoTitle}
139	              onChangeText={text => setNewTodoTitle(text)}
140	              label="New Todo"
141	              mode="outlined"
142	              style={Styles.create_todo_input}
143	            />
144	            {/* Todo create button */}
145	            <PaperButton
146	              onPress={() => createTodo()}
147	              mode="contained"
148	              icon="plus"
149	              color={'#208AEC'}
150	              style={Styles.create_todo_button}>
151	              {'Add'}
152	            </PaperButton>
153	          </View>
154	          <ScrollView>
155	            {/* Todo read results list */}
156	            {readResults !== null &&
157	              readResults !== undefined &&
158	              readResults.map((todo: Parse.Object) => (
159	                <List.Item
160	                  key={todo.id}
161	                  title={todo.get('title')}
162	                  titleStyle={
163	                    todo.get('done') === true
164	                      ? Styles.todo_text_done
165	                      : Styles.todo_text
166	                  }
167	                  style={Styles.todo_item}
168	                  right={props => (
169	                    <>
170	                      {/* Todo update button */}
171	                      {todo.get('done') !== true && (
172	                        <TouchableOpacity
173	                          onPress={() => updateTodo(todo.id, true)}>
174	                          <List.Icon
175	                            {...props}
176	                            icon="check"
177	                            color={'#4CAF50'}
178	                          />
179	                        </TouchableOpacity>
180	                      )}
181	                      {/* Todo delete button */}
182	                      <TouchableOpacity onPress={() => deleteTodo(todo.id)}>
183	                        <List.Icon {...props} icon="close" color={'#ef5350'} />
184	                      </TouchableOpacity>
185	                    </>
186	                  )}
187	                />
188	              ))}
189	          </ScrollView>
190	        </View>
191	      </SafeAreaView>
192	    </>
193	  );
194	};
195
196	// These define the screen component styles
197	const Styles = StyleSheet.create({
198	  container: {
199	    flex: 1,
200	    backgroundColor: '#FFF',
201	  },
202	  wrapper: {
203	    width: '90%',
204	    alignSelf: 'center',
205	  },
206	  header: {
207	    alignItems: 'center',
208	    paddingTop: 10,
209	    paddingBottom: 20,
210	    backgroundColor: '#208AEC',
211	  },
212	  header_logo: {
213	    width: 170,
214	    height: 40,
215	    marginBottom: 10,
216	    resizeMode: 'contain',
217	  },
218	  header_text_bold: {
219	    color: '#fff',
220	    fontSize: 14,
221	    fontWeight: 'bold',
222	  },
223	  header_text: {
224	    marginTop: 3,
225	    color: '#fff',
226	    fontSize: 14,
227	  },
228	  flex_between: {
229	    flexDirection: 'row',
230	    alignItems: 'center',
231	    justifyContent: 'space-between',
232	  },
233	  create_todo_container: {
234	    flexDirection: 'row',
235	  },
236	  create_todo_input: {
237	    flex: 1,
238	    height: 38,
239	    marginBottom: 16,
240	    backgroundColor: '#FFF',
241	    fontSize: 14,
242	  },
243	  create_todo_button: {
244	    marginTop: 6,
245	    marginLeft: 15,
246	    height: 40,
247	  },
248	  todo_item: {
249	    borderBottomWidth: 1,
250	    borderBottomColor: 'rgba(0, 0, 0, 0.12)',
251	  },
252	  todo_text: {
253	    fontSize: 15,
254	  },
255	  todo_text_done: {
256	    color: 'rgba(0, 0, 0, 0.3)',
257	    fontSize: 15,
258	    textDecorationLine: 'line-through',
If your component is properly set up, you should see something like this after building and running the app:
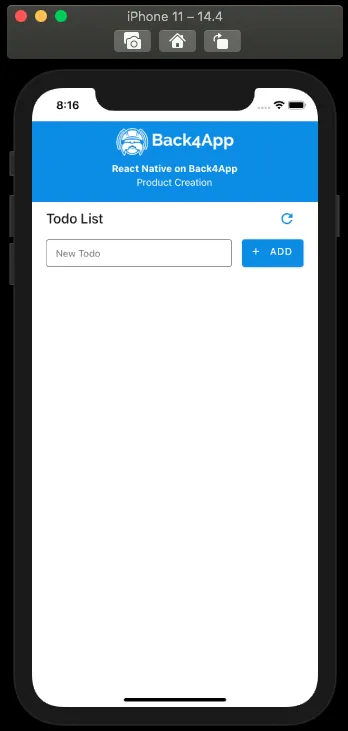
Go ahead and add some to-do’s by typing its titles in the input box one at a time and pressing on the Add button. Note that after every successful creation, the createTodo function triggers the readTodos one, refreshing your task list automatically. You should now have a sizeable to-do list like this:
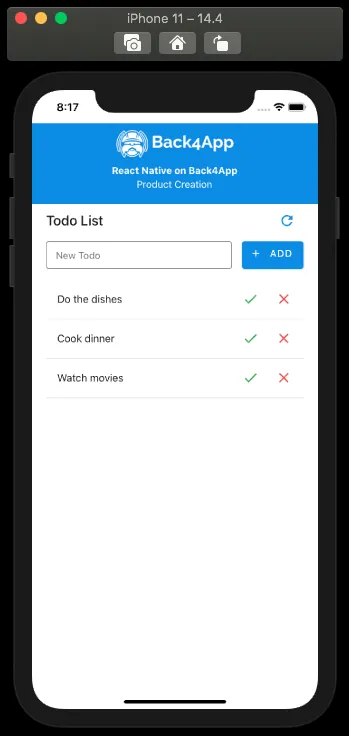
You can now mark your tasks as done by clicking in the checkmark beside it, causing their done value to be updated to true and changing its icon status on the left.
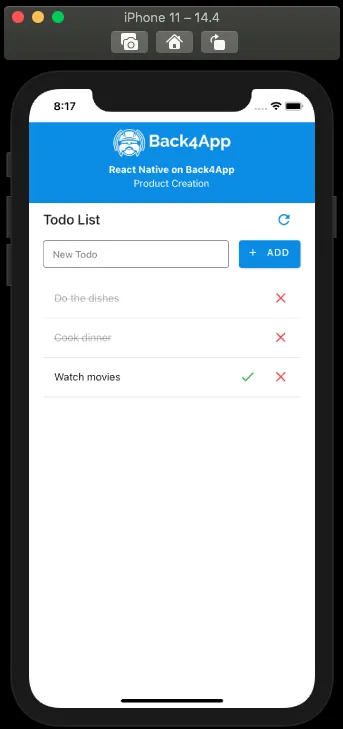
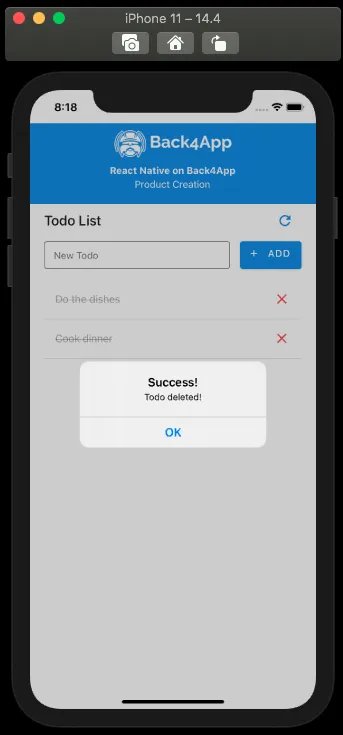
The only remaining data operation is now the delete one, which can be done by pressing on the trash can icon at the far right of your to-do list object. After successfully deleting an object, you should get an alert message like this:
Conclusion
At the end of this guide, you learned how to perform basic data operations (CRUD) in Parse on React Native. In the next guide, we will show you which data types are supported in Parse and how to use them.