Relay Compatibility
Relay Compatibility
Introduction
The Parse Server GraphQL API follows latest standards currently available for highly-scalable APIs and ambitious front-end projects.
The Parse Open Source Team choose to follow the GraphQL Server Relay Specification.
Relay is a JavaScript framework for building data-driven React applications powered by GraphQL, designed from the ground up to be easy to use, extensible and, most of all, performant. Relay accomplishes this with static queries and ahead-of-time code generation.
Starting from Parse 3.10, full compatibility with Relay is implemented. This document will walk you through those implementations
Prerequisites
To begin with this tutorial, you will need:
- An app created at Back4App
1 - Create a New Back4App App
First of all, it’s necessary to make sure that you have an existing app created at Back4App. However, if you are a new user, you can check this tutorial to learn how to create one.
2 - Create a few Classes
In your newly created App, go to the Database Browser and click the Create a class button
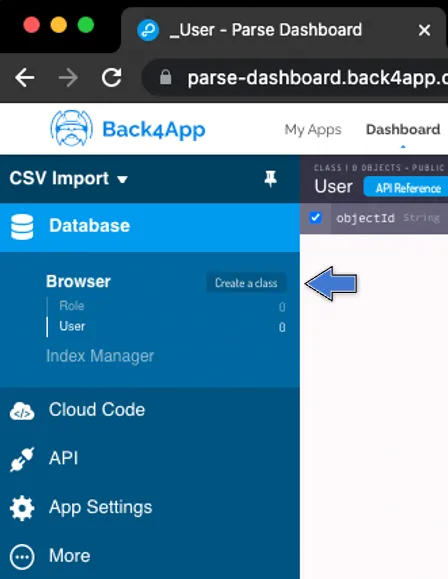
Choose to create a Custom class and give it a name. Following the Relay example schema, I created the classes Faction, Ship, and others as described with matching properties, but you can create your classes to follow this documentation. Just change your queries and mutations accordingly. Remember that by convention classes start with an Uppercase letter, are CamelCase, and do not contain special characters such as spaces and symbols. Click Create class when you’re done.
3 - GraphQL Console
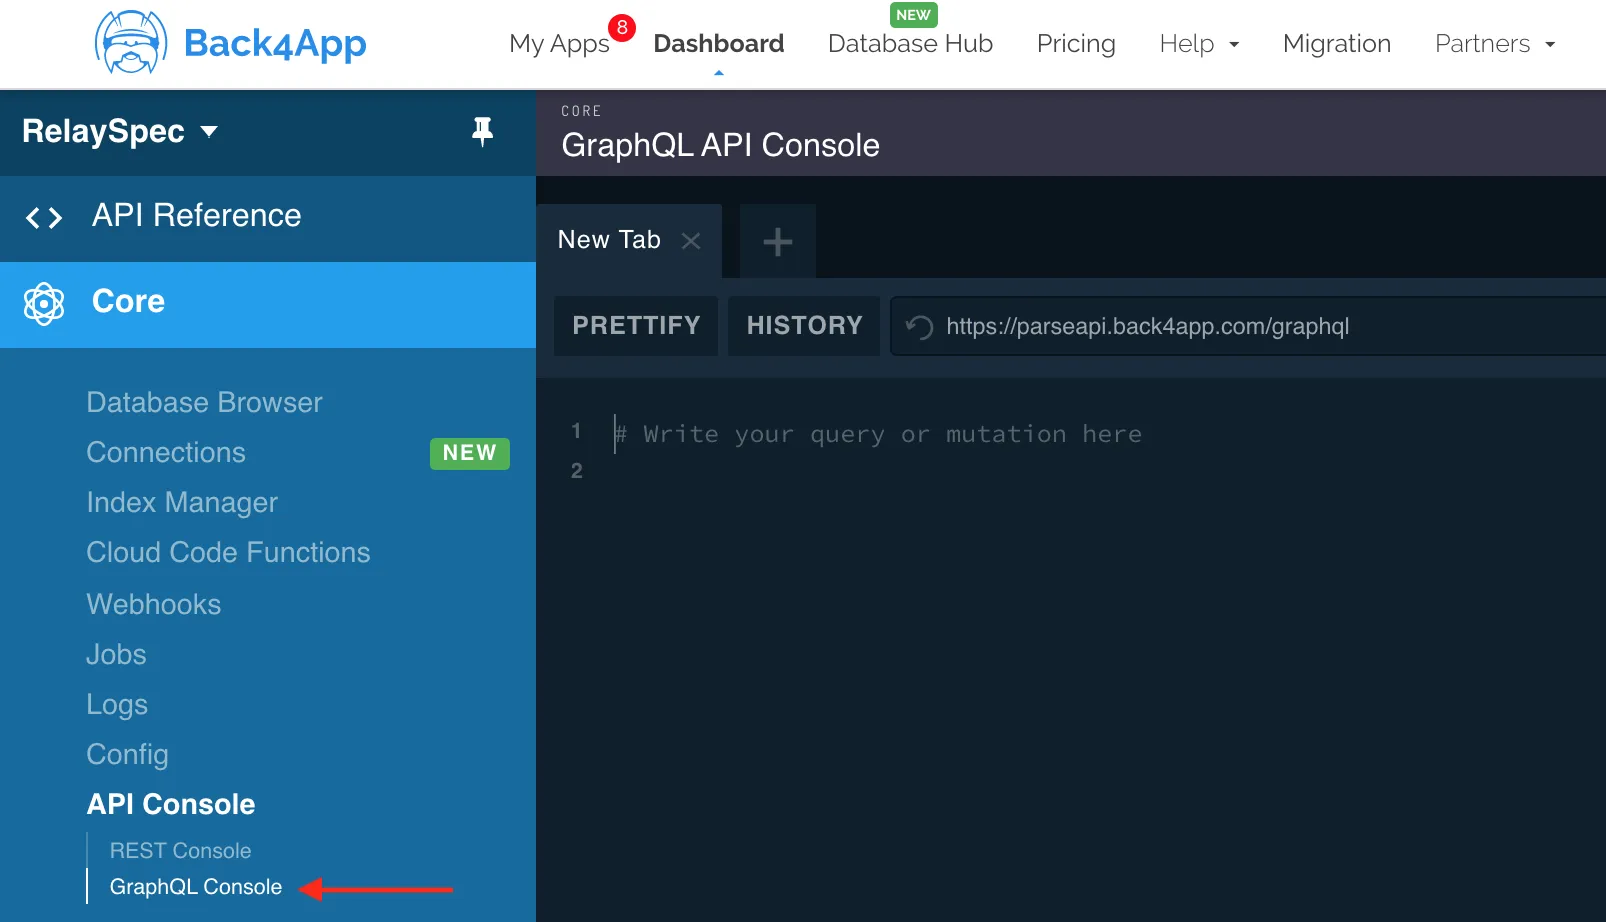
With your Classes and Properties created, you can go to the API Console and then GraphQL Console to execute your queries and mutations.
4 - Queries
Our very first query will retrieve an object based on its objectId (not to confuse with id). Parse has evolved and now queries support both ObjectId, formerly known as id in previous versions, but now also supports Global Id, known as id, which refers to Relay’s global ID and has a longer format as it contains the classname encrypted into it.
Example of ObjectId: EaT0dDk09v Example of id (a.k.a. Global id): RmFjdGlvbjpFYVQwZERrMDl2
Let’s make our very first query retrieving an object by its ObjectId:
1   query RebelsQuery {
2     faction(id:"EaT0dDk09v") {
3       objectId #ObjectId for Parse
4       id #GlobalID for Relay
5       name #n
6     }
7   }
That will output
1   {
2     "data": {
3       "faction": {
4         "objectId": "EaT0dDk09v",
5         "id": "RmFjdGlvbjpFYVQwZERrMDl2",
6         "name": "Galactic Empire"
7       }
8     }
9   }
Now, let’s change that for the GlobalId for Relay:
1   query RebelsQuery {
2     faction(id:"RmFjdGlvbjpFYVQwZERrMDl2") {
3       objectId #ObjectId for Parse
4       id #GlobalID for Relay
5       name #n
6     }
7   }
And notice that the result will be the same:
1   {
2     "data": {
3       "faction": {
4         "objectId": "EaT0dDk09v",
5         "id": "RmFjdGlvbjpFYVQwZERrMDl2",
6         "name": "Galactic Empire"
7       }
8     }
9   }
This happens because the Global Id works, as its name implies, globally, and has the class name encrypted into it, so Parse knows where to search for that ID.
5 - Refetching
Also with the Global Id you can prefetch like Relay’s specification as follows:
1   query RefetchQuery{
2     node(id:"RmFjdGlvbjpFYVQwZERrMDl2"){
3       id ... on Faction{
4         name
5       }
6     }
7   }
which will result in
1   {
2     "data": {
3       "node": {
4         "id": "RmFjdGlvbjpFYVQwZERrMDl2",
5         "name": "Galactic Empire"
6       }
7     }
8   }
6 - Connections
Relay’s connections work the same way in Parse with GraphQL, so, if you need to retrieve the Rebel’s ships:
1   query RebelsShipsQuery {
2     faction(id: "RmFjdGlvbjphcTAzNklSZ2RQ"){
3       objectId
4       name
5       ships{
6         edges{
7           node{
8             name
9           }
10        }
11      }
12    }
13  }
which will result:
1   {
2     "data": {
3       "faction": {
4         "objectId": "aq036IRgdP",
5         "name": "Alliance to Restore the Republic",
6         "ships": {
7           "edges": [
8             {
9               "node": {
10                "name": "Y-Wing"
11              }
12            },
13            {
14              "node": {
15                "name": "X-Wing"
16              }
17            }
18          ]
19        }
20      }
21    }
22  }
You can also retrieve the Nth ships:
1   query RebelsShipsQuery {
2     faction(id: "RmFjdGlvbjphcTAzNklSZ2RQ"){
3       objectId
4       name
5       ships(first: 1){
6         edges{
7           node{
8             name
9           }
10        }
11      }
12    }
13  }
resulting in
1   {
2     "data": {
3       "faction": {
4         "objectId": "aq036IRgdP",
5         "name": "Alliance to Restore the Republic",
6         "ships": {
7           "edges": [
8             {
9               cursor
10              "node": {
11                "name": "Y-Wing"
12              }
13            }
14          ]
15        }
16      }
17    }
18  }
Or retrieve the Nth ship after a specific one, using its cursor value:
1   query RebelsShipsQuery {
2     faction(id: "RmFjdGlvbjphcTAzNklSZ2RQ"){
3       objectId
4       name
5       ships(first: 1 after: "YXJyYXljb25uZWN0aW9uOjA"){ #cursor for the Y-wing ship
6         edges{
7           cursor
8           node{
9             name
10          }
11        }
12      }
13    }
14  }
which will retrieve:
1   {
2     "data": {
3       "faction": {
4         "objectId": "aq036IRgdP",
5         "name": "Alliance to Restore the Republic",
6         "ships": {
7           "edges": [
8             {
9               "cursor": "YXJyYXljb25uZWN0aW9uOjE=",
10              "node": {
11                "name": "X-Wing"
12              }
13            }
14          ]
15        }
16      }
17    }
18  }
7 - Mutations
We can also use Mutations compatible with Relay’s mutations. Let’s create a new Ship:
1   mutation createBWing($input: CreateShipInput!){
2     createShip(input: $input){
3       ship{
4         id
5         name
6       }
7     }
8   }
That needs the following Query Variable:
1   {
2     "input":{
3       "fields": {
4         "name": "B-Wing"
5       }
6     }
7   }
And will return the Global Id and name as specified in the mutation:
1   {
2     "data": {
3       "createShip": {
4         "ship": {
5           "id": "U2hpcDpXb21QZnVzeXVF",
6           "name": "B-Wing"
7         }
8       }
9     }
10   }