React Native Parse SDK로 Android 푸시 알림 전송
안드로이드에서 React Native용 푸시 알림
소개
이 가이드는 Parse를 사용하여 안드로이드의 React Native 애플리케이션에 푸시 알림을 보내는 방법을 가르쳐줍니다. Firebase를 설정하고 대시보드 및 Cloud Code 기능을 통해 푸시 알림을 보내도록 Back4App 앱을 구성합니다.
언제든지 이 튜토리얼로 구축된 전체 안드로이드 프로젝트에 접근할 수 있습니다. 우리의 Github 저장소에서 확인하세요.
전제 조건
이 튜토리얼을 완료하려면 다음이 필요합니다:
- Google Firebase를 사용할 수 있도록 Google에 활성 계정이 필요합니다.
목표
Parse에서 React Native 애플리케이션으로 Android에 푸시 알림을 전송하려면 Back4App의 대시보드와 Cloud Code 기능을 사용하세요.
1 - Firebase 설정하기
Firebase는 Android에서 푸시 알림을 전송하고 수신하는 데 가장 많이 사용되는 서비스 제공업체입니다. 현재 다양한 도구와 함께 많은 회사에서 사용하고 있습니다. 다음 단계 1과 2를 따라 앱을 위한 Firebase 프로젝트를 생성해 보겠습니다 이 문서.
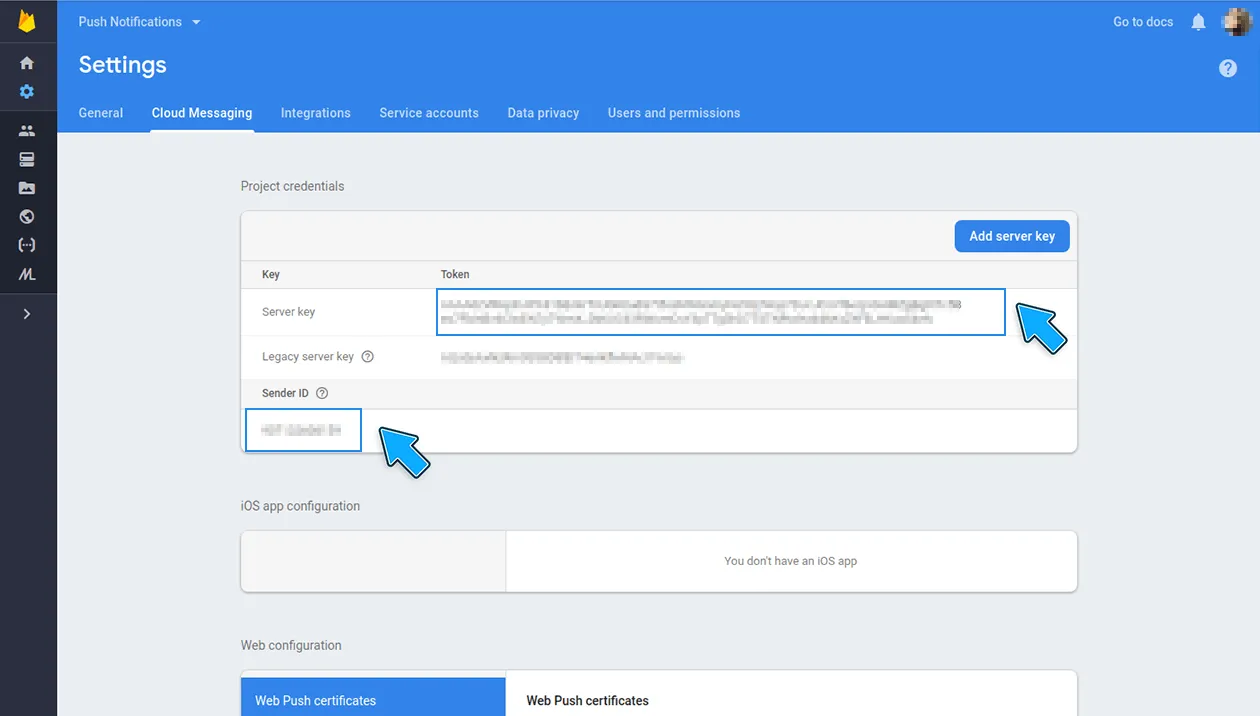
앱을 생성한 후 Firebase 콘솔을 종료하기 전에 google-services.json 파일을 다운로드하여 저장하고, “Cloud Messaging” 탭에서 프로젝트 설정으로 이동하여 다음 키를 가져오세요:
- 서버 키;
- 발신자 ID.
2 - Back4App에서 푸시 알림 활성화하기
Firebase 프로젝트를 Back4App과 연결하고 대시보드 및 클라우드 코드를 통해 푸시 알림을 전송할 수 있도록 하려면 다음 단계를 따르세요:
- “안드로이드 푸시 알림” 블록을 찾아 설정 > 편집을 클릭하세요. “안드로이드 푸시 알림” 블록은 다음과 같습니다:
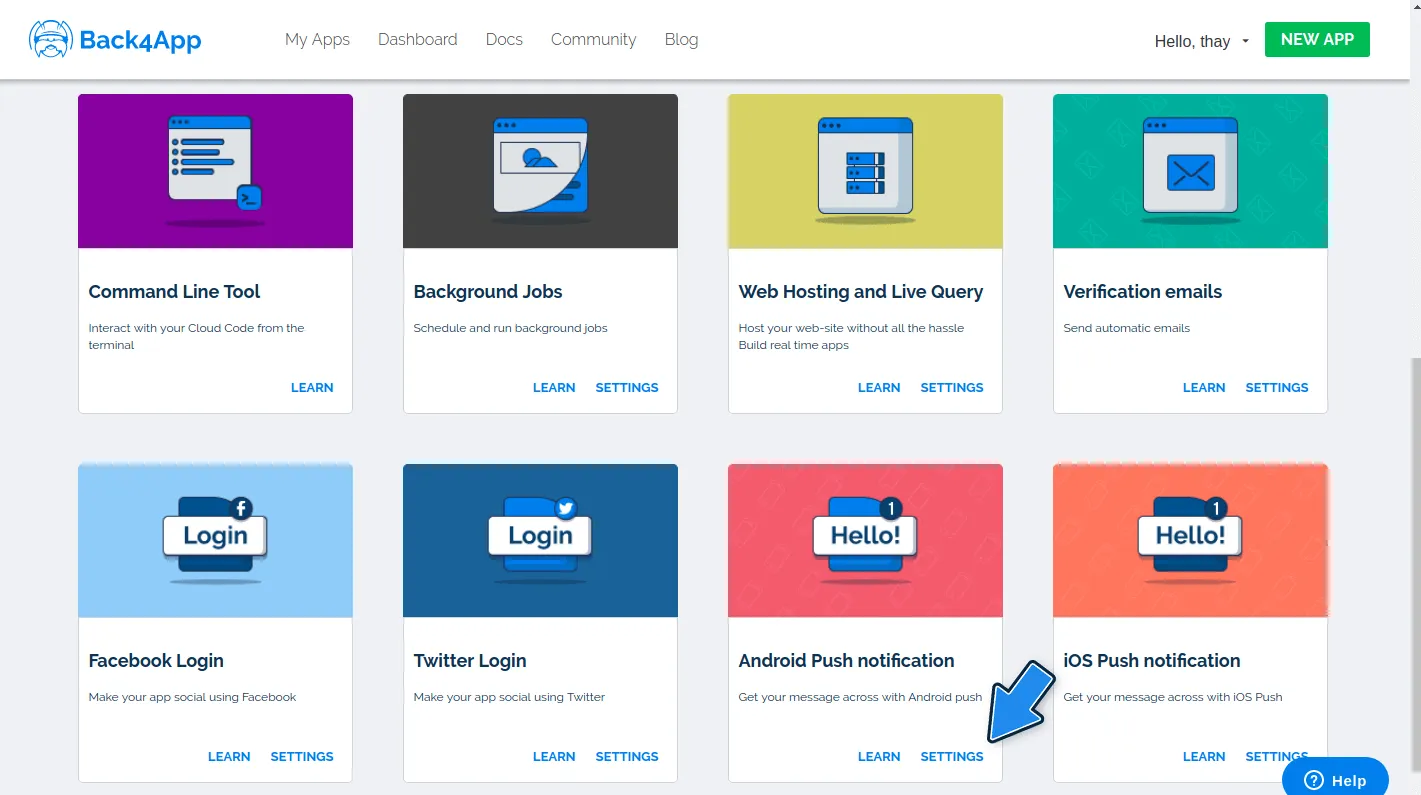
3. Firebase서버 키를API 키 필드에 추가하고, 발신자 ID를GCM 발신자 ID 필드에 추가하세요.
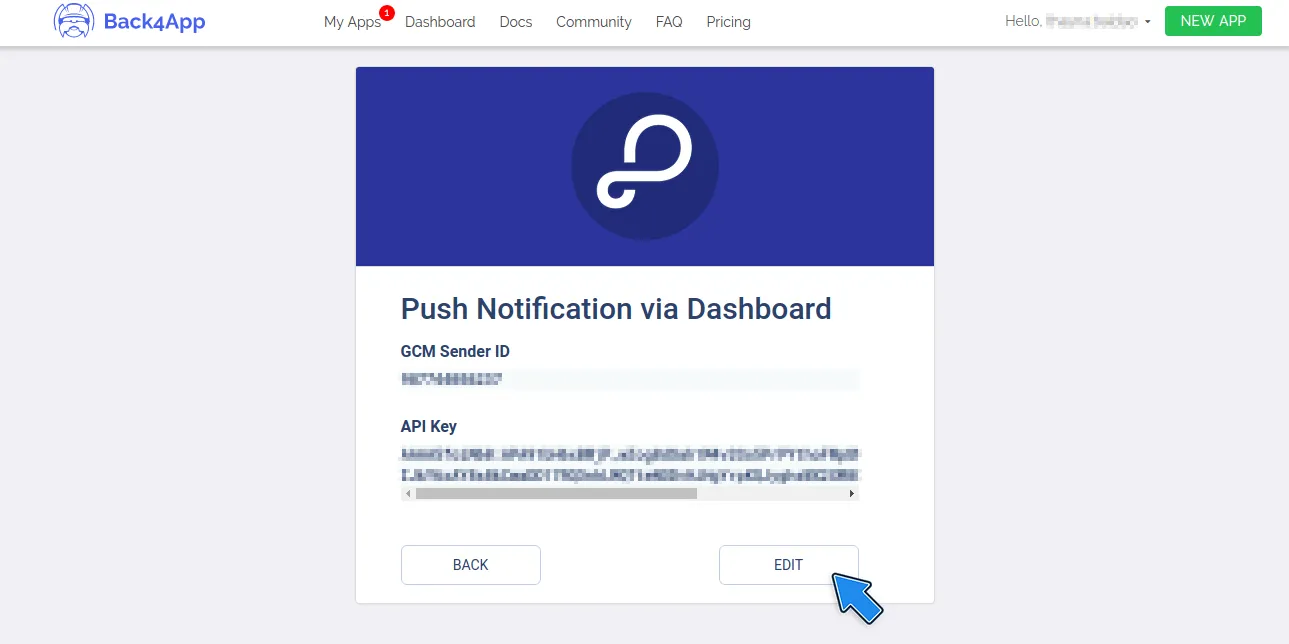
4. 저장하고 완료하세요.
3 - 의존성 설치 및 설정
당신의 React Native 프로젝트에서 react-native-push-notification 라이브러리를 설치합시다. 이 라이브러리는 애플리케이션을 Firebase와 통합하고 수신된 알림을 처리할 수 있게 해줍니다. 프로젝트 루트 디렉토리에서 다음 명령어를 실행하세요:
설치한 후, android/app/src/main/AndroidManifest.xml, android/build.gradle 및 android/app/build.gradle에 라이브러리 문서를 따라 몇 가지 구성을 추가해야 합니다.
또한 AndroidManifest.xml 파일에 애플리케이션의 기본 알림 채널 ID를 포함하는 meta-data를 추가해야 합니다(예를 들어 guideChannel을 사용합시다). 이름을 지시문에 직접 추가하거나 strings.xml 파일에 포함할 수 있습니다. 또한 프로젝트의 google-services.json 파일을 android/app 디렉토리에 배치하세요.
1	 <meta-data
2	      android:name="com.google.firebase.messaging.default_notification_channel_id"
3	      android:value="guideChannel" />
4	  <!-- OR -->
5	  <meta-data
6	      android:name="com.google.firebase.messaging.default_notification_channel_id"
7	      android:value="@string/default_notification_channel_id" />
다음 단계에서는 이 라이브러리를 사용하는 방법과 Parse와 결합하는 방법을 배울 것입니다.
4 - 푸시 알림 처리
푸시 알림과 관련된 새로운 메서드를 포함하는 파일을 생성해 보겠습니다. 파일 이름은 PushNotificationMethods.js (또는 PushNotificationMethods.tsx)로 하고, 다음 함수를 추가합니다. 이 함수는 react-native-push-notification, 알림 채널을 생성하고, 또한 Parse가 우리 기기의 푸시 구성을 인식하도록 설정하는 역할을 합니다:
1	import PushNotification from 'react-native-push-notification';
2	import Parse from 'parse/react-native';
3
4	const channelId = 'guideChannel';
5
6	export async function configurePushNotifications() {
7	  // Initialize PushNotification
8	  await PushNotification.configure({
9	    // (required) Called when a remote is received or opened, or local notification is opened
10	    onNotification: function (notification) {
11	      // process the notification
12	      console.log('NOTIFICATION:', notification);
13	      // If notification is remote and has data, trigger local notification to show popup.
14	      // This is needed for Parse sent notifications because Firebase doesn't trigger popup
15	      // notifications with data by itself
16	      if (
17	        notification.data !== undefined &&
18	        notification.data.data !== undefined
19	      ) {
20	        try {
21	          // Notification data comes as a stringified JSON, so parsing is needed
22	          const notificationData = JSON.parse(notification.data.data);
23	          // JSON Parse notifications from the dashboard and Cloud Code
24	          // should contain the default `title` and `message` parameters
25	          let title = 'Notification Title';
26	          if (notificationData.title !== undefined) {
27	            title = notificationData.title;
28	          }
29	          let message = 'Noticiation Message';
30	          if (notificationData.message !== undefined) {
31	            message = notificationData.message;
32	          }
33	          // Text Parse notifications from the dashboard only have an `alert` parameter
34	          if (notificationData.alert !== undefined) {
35	            message = notificationData.alert;
36	          }
37	          PushNotification.localNotification({
38	            channelId: channelId,
39	            title: title,
40	            message: message,
41	          });
42	        } catch (error) {
43	          console.log(`Error triggering local notification ${error}`);
44	        }
45	      }
46	    },
47
48	    onRegister: async function (token) {
49	      console.log(`Registered with device token ${token.token}`);
50	      let deviceToken = token.token;
51
52	      // Create the notification channel, required for Android notifications
53	      await PushNotification.createChannel({
54	        channelId: channelId,
55	        channelName: 'Guide channel',
56	      });
57	      console.log('Notification channel created!');
58
59	      // Create a Parse Installation, that will link our application's push notification
60	      // to the Parse server
61	      try {
62	        const installationId = await Parse._getInstallationId();
63	        const Installation = new Parse.Installation();
64	        // Make sure to change any needed value from the following
65	        Installation.set('deviceType', 'android');
66	        Installation.set('GCMSenderId', 'YOUR_GCM_SENDER_ID');
67	        Installation.set('pushType', 'gcm');
68	        Installation.set('appIdentifier', 'YOUR_APP_IDENTIFIER(PACKAGE_NAME)');
69	        Installation.set('parseVersion', '3.2.0');
70	        Installation.set('appName', 'Back4AppGuidePushNotifications');
71	        Installation.set('appVersion', '1.0');
72	        Installation.set('localeIdentifier', 'pt-BR');
73	        Installation.set('badge', 0); // Set initial notification badge number
74	        Installation.set('timeZone', 'America/Sao_Paulo');
75	        Installation.set('installationId', installationId);
76	        Installation.set('channels', [channelId]);
77	        Installation.set('deviceToken', deviceToken);
78	        await Installation.save();
79	        console.log(`Created new Parse Installation ${Installation}`);
80	      } catch (error) {
81	        console.log(error.message);
82	      }
83	    },
84	    popInitialNotification: true,
85	    requestPermissions: true,
86	  });
87	}
오픈 소스 문서 에 대한 더 많은 정보는 Parse.Installation 클래스는 여기에서 확인할 수 있습니다.
이벤트 핸들러 onNotification 메서드는 원격 알림을 수신한 후 앱에서 로컬 알림을 트리거하는 코드를 포함하고 있습니다. Parse는 Firebase가 데이터로 팝업 알림을 자동으로 트리거하지 않기 때문에 이 코드를 요구합니다. 이에 대한 더 많은 정보와 Android 알림 유형은 여기에서 읽을 수 있습니다.
이 configurePushNotifications 메서드를 App.js (또는 App.tsx) 파일에서 Parse를 초기화한 후에 App 콘텐츠를 선언하기 전에 호출하세요.
1	// Other imports
2	// ...
3	import {configurePushNotifications} from './src/PushNotificationMethods';
4
5	// Your Parse initialization configuration goes here
6	// ...
7
8	// Initialize PushNotifications
9	configurePushNotifications();
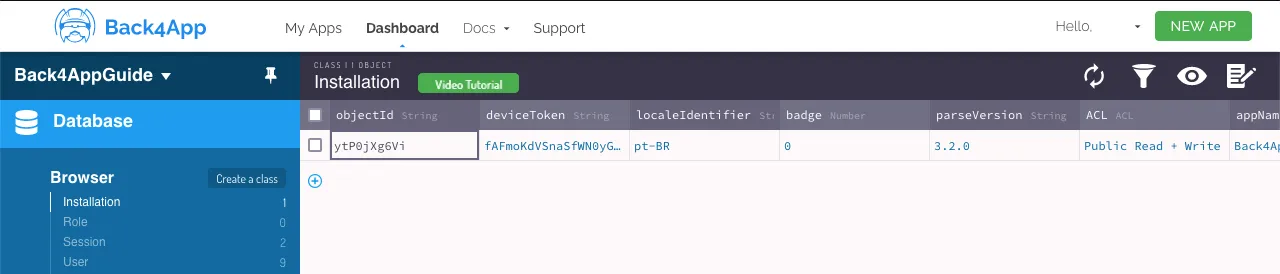
애플리케이션을 빌드하고 실행하세요. 이제 앱의 Back4App 대시보드에서 앱에 해당하는 항목이 있는 설치 테이블을 볼 수 있습니다.
5 - 대시보드를 통한 푸시 알림 전송
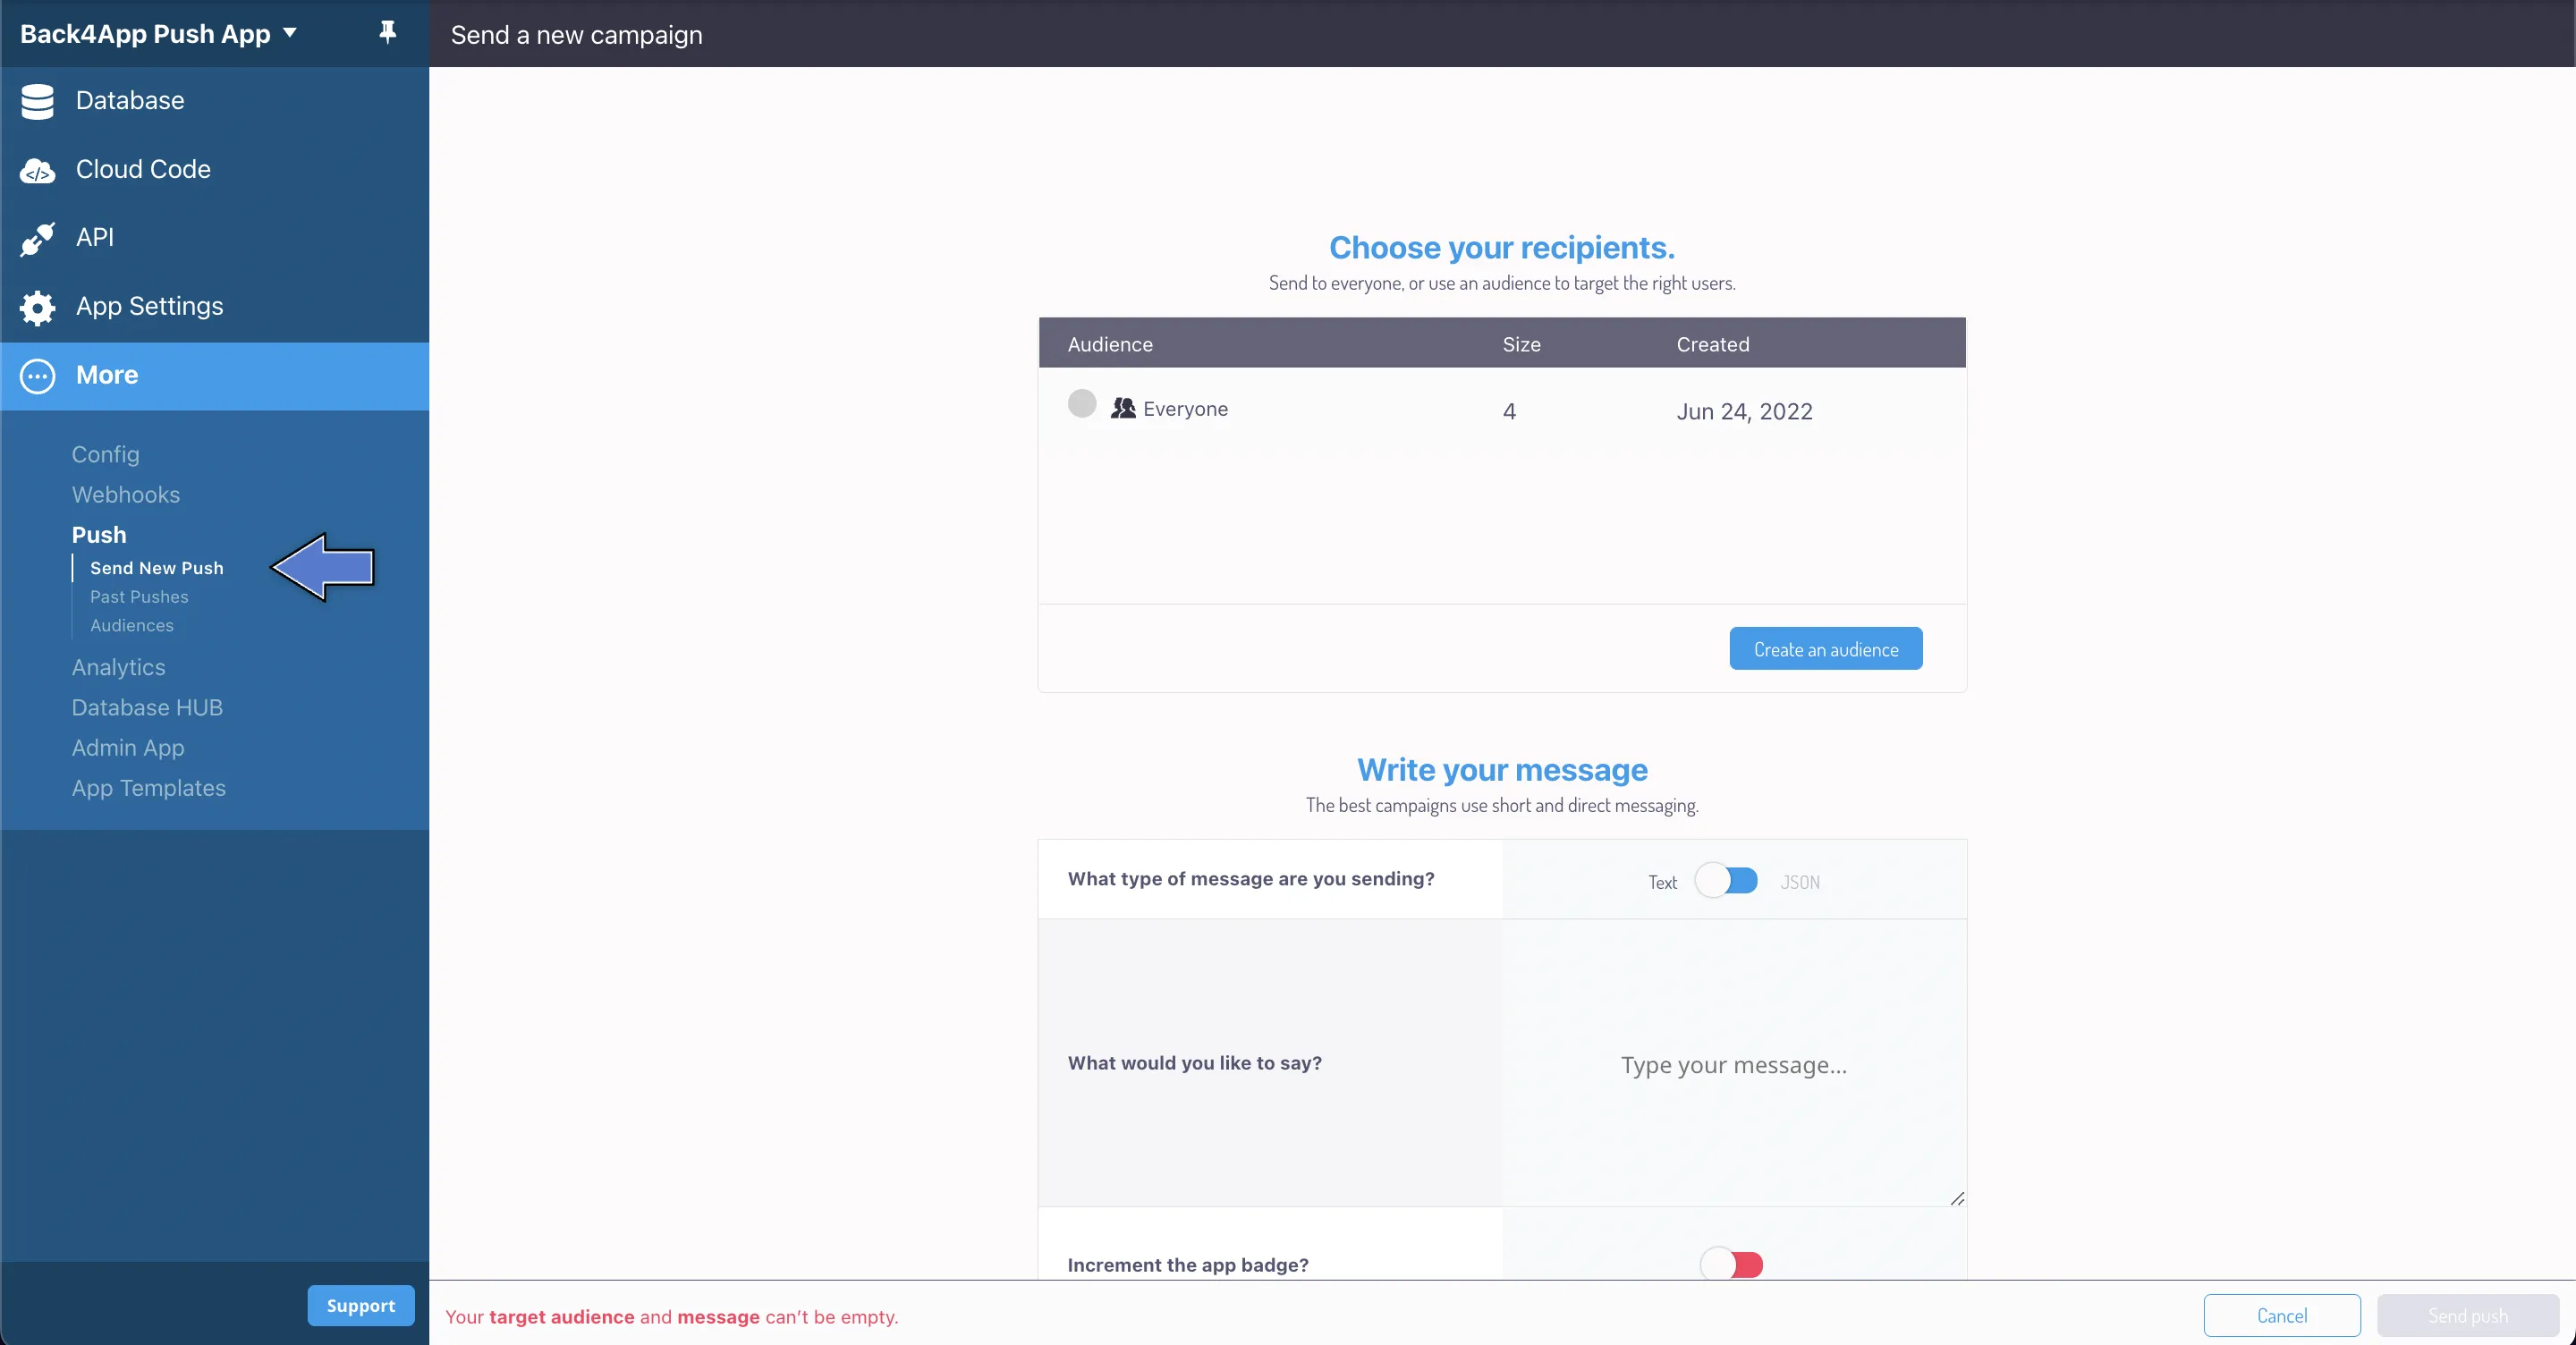
이제 앱에 첫 번째 푸시 알림을 보낼 준비가 되었습니다. Back4App의 대시보드를 통해 푸시 메시지를 보내려면 아래 단계를 따르세요:
- 푸시 > 새 푸시 전송을 클릭하고 푸시 알림을 위한 대상을 만드세요.
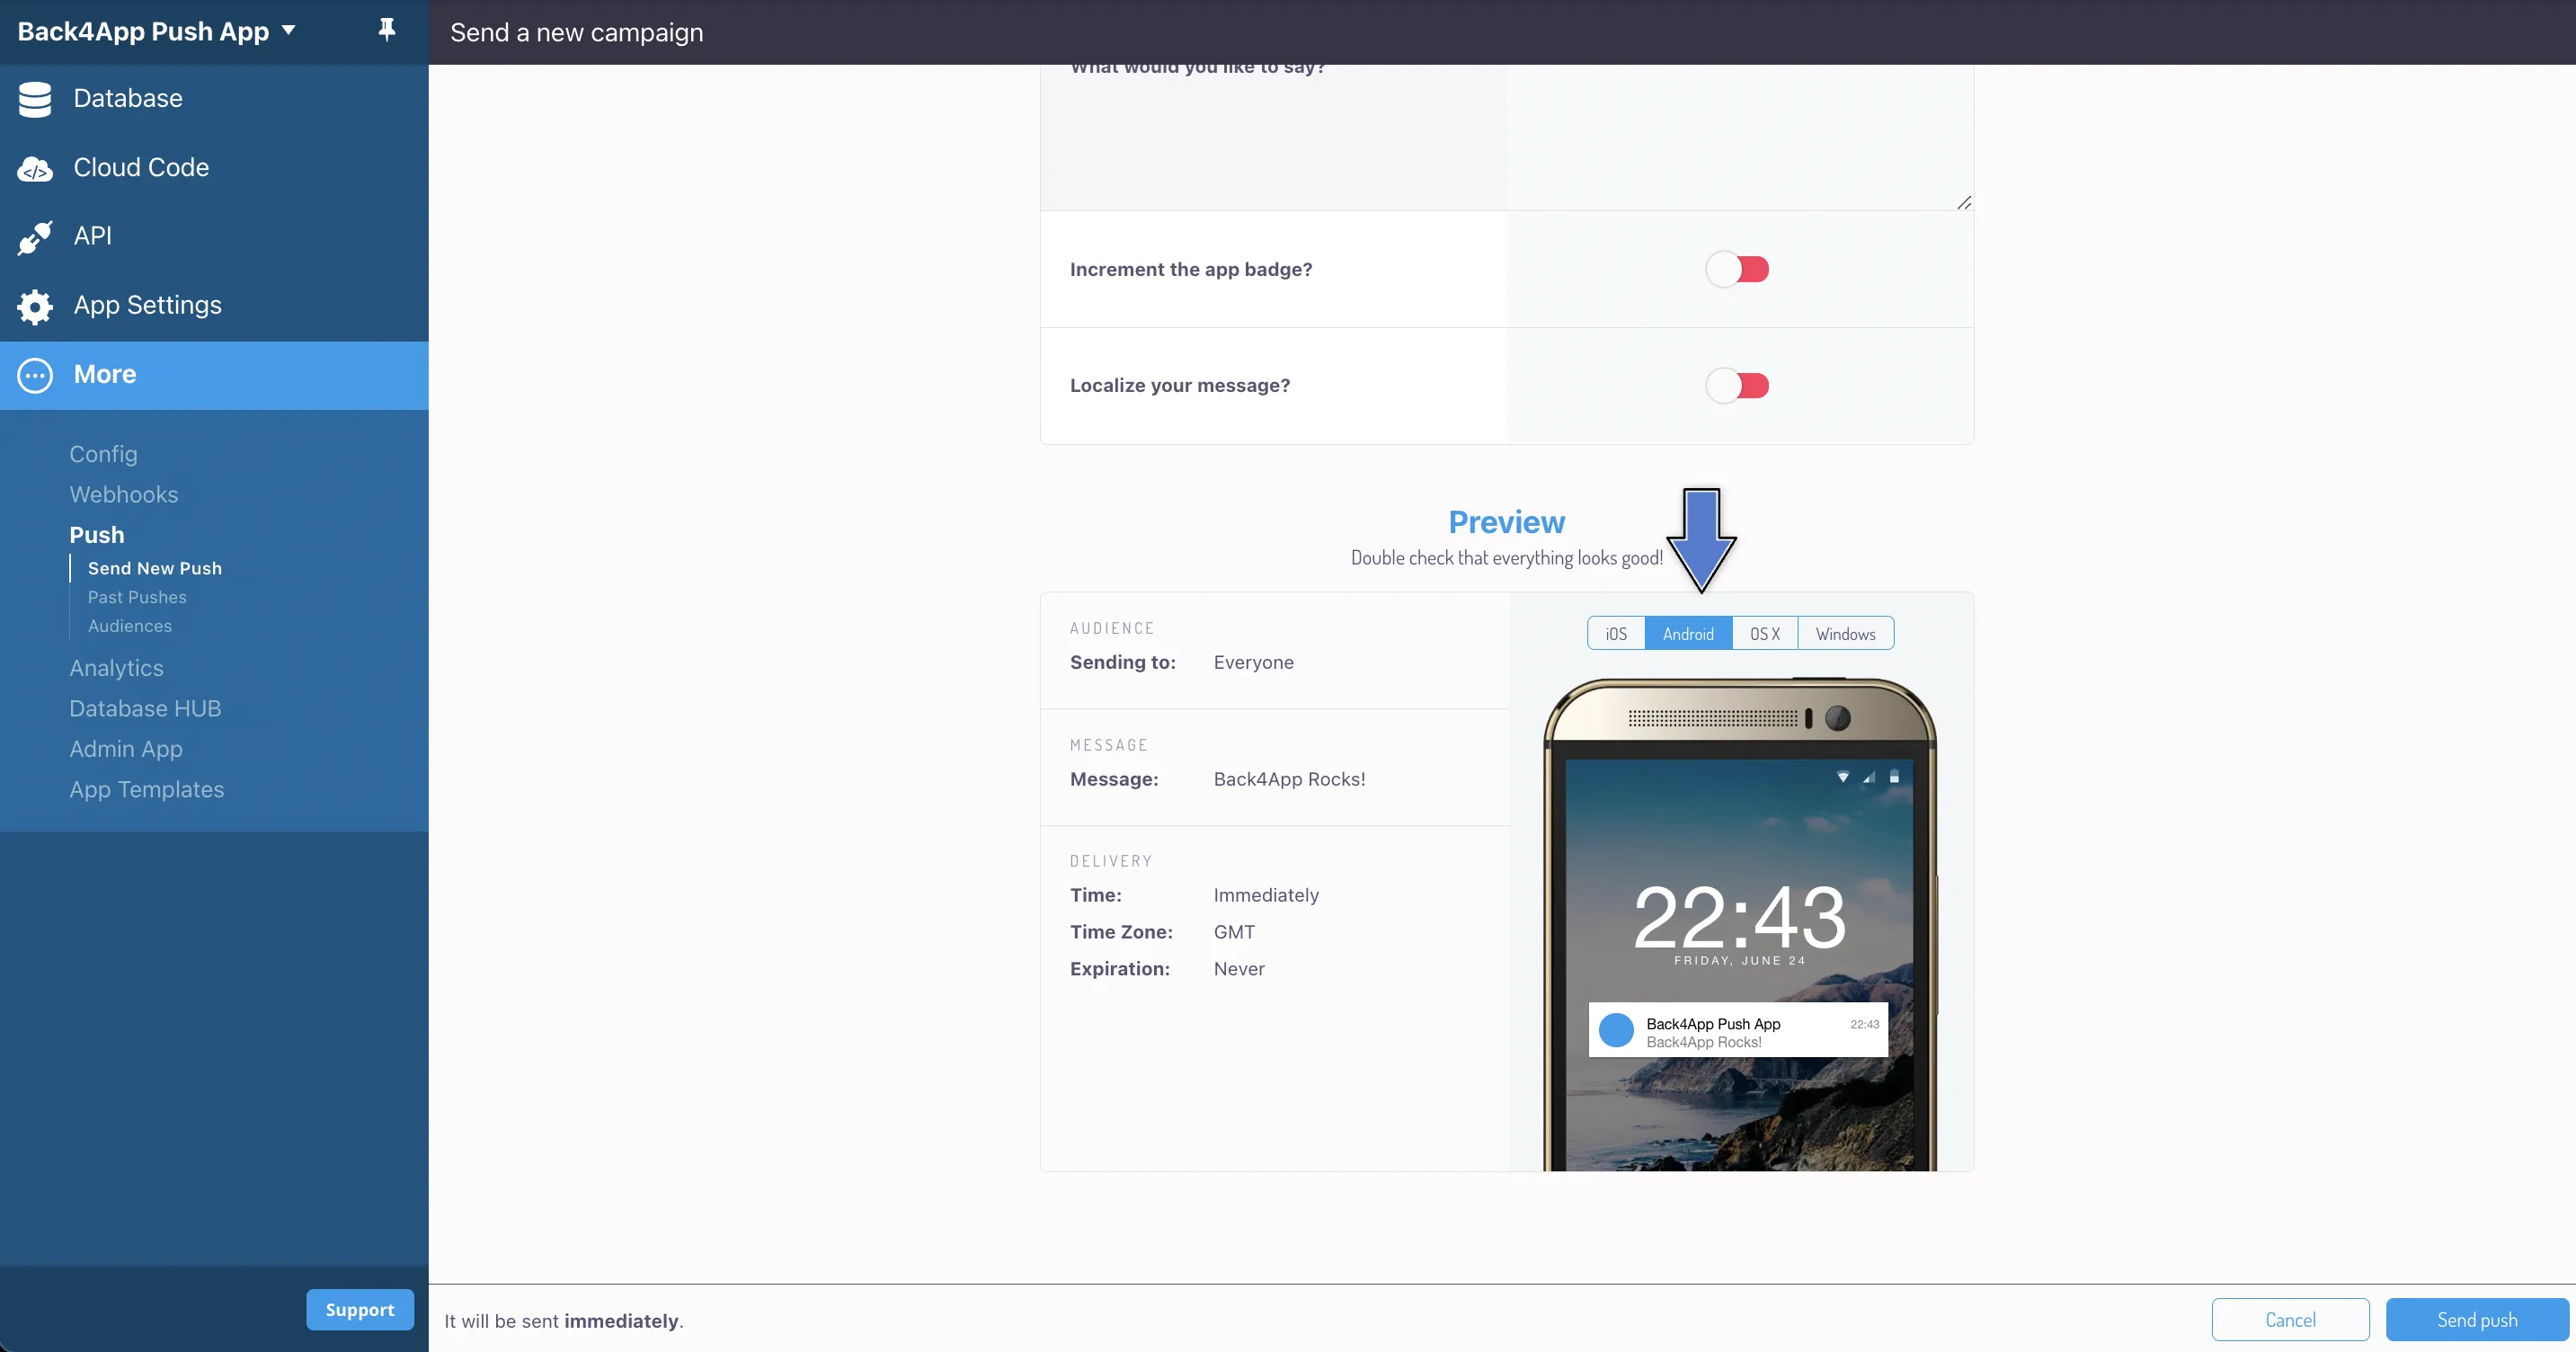
3. 메시지를 작성하고 안드로이드 옵션을 클릭하여 미리보기를 확인하세요.
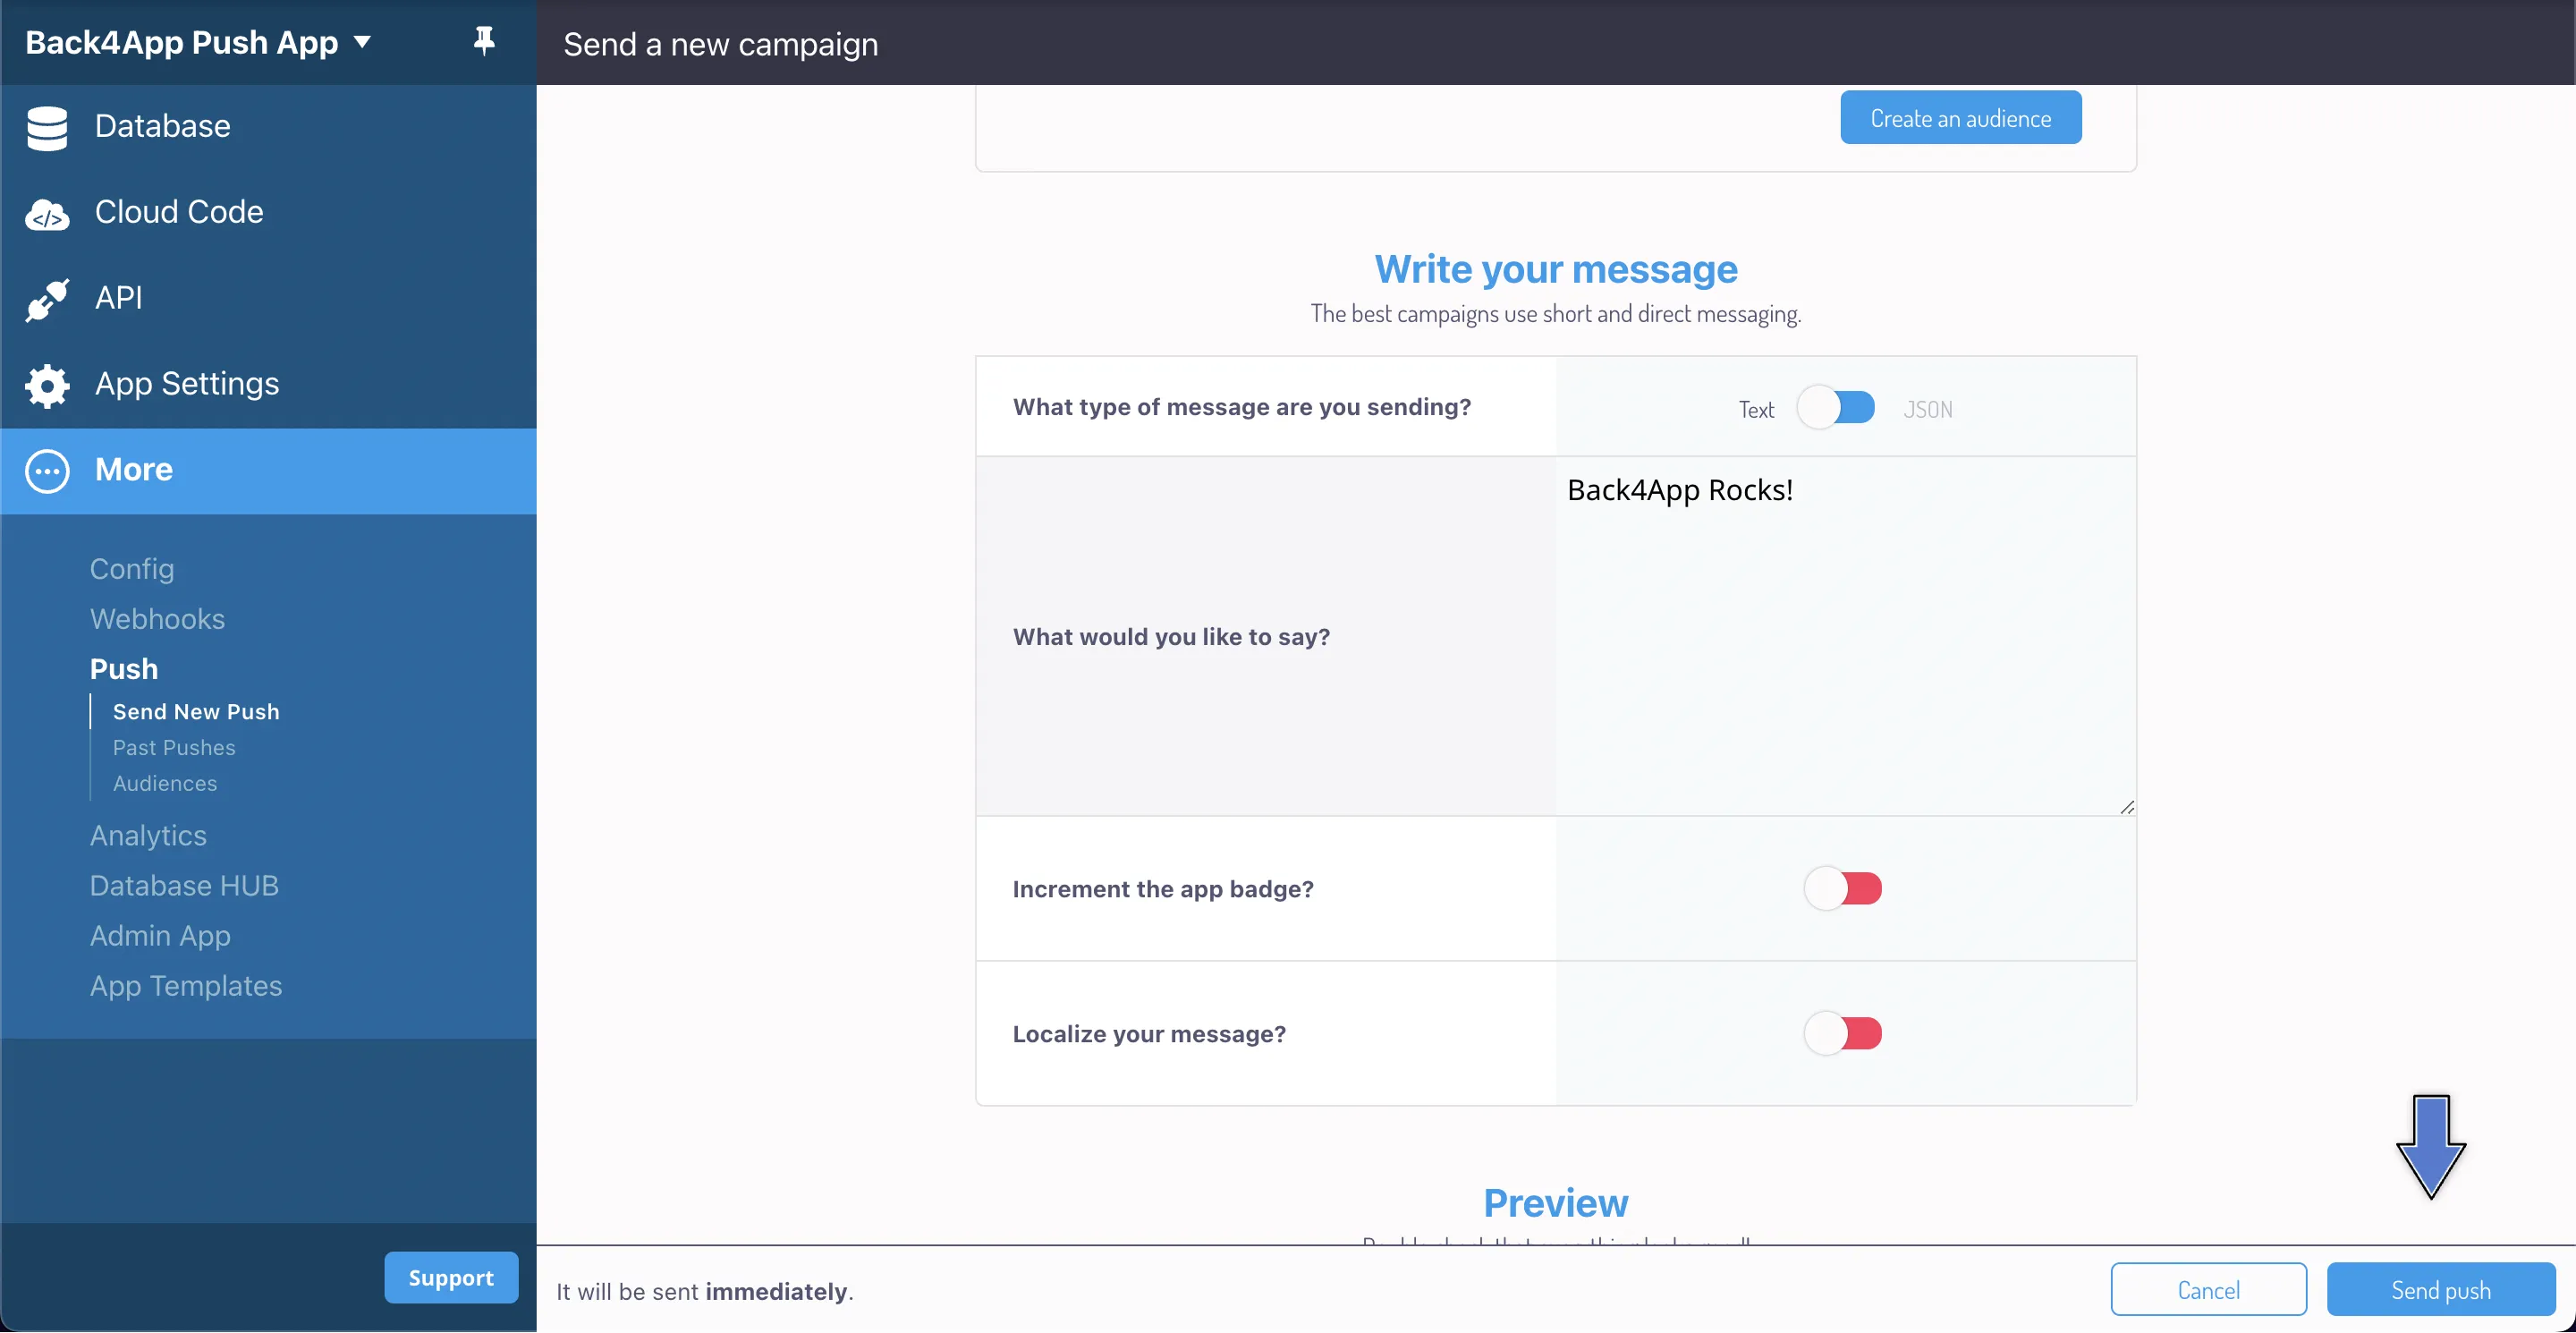
4. 푸시 알림을 이미 검토했으며 전송하려면 푸시 전송을 클릭하십시오.
푸시 알림에 대한 다른 옵션을 Parse 대시보드에서 탐색할 수 있습니다. 거기에서 이전 푸시를 확인하고 대상을 확인할 수 있습니다.
6 - 클라우드 코드를 통한 푸시 알림 전송
클라우드 함수 시작 가이드, 재사용 가능한 메서드를 프론트 엔드에서 분리하고 마스터 키를 통해 모든 백엔드 리소스를 완전히 제어할 수 있습니다.
푸시 메시지를 전송하기 위해 클라우드 코드 함수를 사용해 보겠습니다. 먼저 sendPush라는 클라우드 함수를 생성하여 Parse.Push.send 메서드를 호출합니다. 알림을 받을 사용자를 선택하는 방법은 두 가지가 있습니다: Parse.Installation 클래스를 쿼리하거나 알림 채널 이름을 통해 선택하는 것입니다. Android 앱에서는 사용자를 구분하기 위해 채널을 사용하는 것이 더 일반적이므로 이를 사용하겠습니다. 진행하기 전에 이 함수를 Back4App에 배포해야 합니다.
오픈 소스 문서 오픈 소스 문서를 확인하여 전송 메서드에 대한 자세한 내용을 확인하십시오.
1	Parse.Cloud.define('sendPush', async (request) => {
2	  try {
3	    await Parse.Push.send({
4	      channels: [ 'guideChannel' ],
5	      data: {
6	        message: 'Test message',
7	        title: 'Back4App Guide Notification'
8	      }
9	    }, { useMasterKey: true });
10	    return true;
11	  } catch (error) {
12	    return `Error: ${error}`
13	  }
14	});
이제 React Native 앱에서 함수를 호출해 보겠습니다. 이 함수를 PushNotificationMethods.js (또는 PushNotificationMethods.tsx) 파일에 추가하고 애플리케이션의 메인 화면 내 버튼에서 호출하세요:
1	export async function sendNotification() {
2	  try {
3	    await Parse.Cloud.run('sendPush');
4	    console.log('Success!');
5	  } catch (error: any) {
6	    console.log(`Error: ${error}`);
7	  }
8	}
사용자가 스스로 푸시 알림을 트리거할 수 있도록 허용하는 경우는 일반적이지 않다는 점에 유의하세요. 여기서는 Parse와 푸시 알림 전송을 통합하는 것이 얼마나 간단한지를 보여주기 위해 사용했습니다.
결론
이 가이드의 끝에서, Android에서 React Native 애플리케이션에 Parse를 사용하여 푸시 알림을 보내는 방법을 배웠습니다. 다음 가이드에서는 iOS에서 푸시 알림을 보내는 방법을 배울 것입니다.