클라우드 코드로 React Native에 OTP 로그인 기능 구현
클라우드 기능을 사용한 React Native의 OTP 인증
소개
이 가이드에서는 Parse Cloud Code 기능을 사용하여 React Native 앱에 Twilio Verify API를 통합하여 OTP 로그인 기능을 활성화하는 방법을 배웁니다. Cloud Code 기능은 민감한 데이터를 처리하고 애플리케이션 외부의 다른 API를 사용할 수 있게 해주기 때문에 이러한 작업에 적합한 장소입니다.
이 가이드에서는 OTP 통합을 사용하여 React Native 구성 요소를 구현하는 방법도 확인하여 이전 가이드의 사용자 이메일 확인 예제를 개선합니다.
언제든지 이 튜토리얼로 구축된 전체 Android 프로젝트에 접근할 수 있습니다. 우리의 Github 저장소에서 확인하세요.
전제 조건
이 튜토리얼을 완료하려면 다음이 필요합니다:
목표
Parse Cloud Code 함수를 사용하여 Twilio Verify API를 통합하고 React Native 앱에서 사용합니다.
1 - Twilio Verify 설정
Twilio는 현재 다양한 회사에서 사용되는 잘 알려진 2FA 토큰 및 OTP 서비스 제공업체입니다. Verify API는 개발자가 전화, 이메일을 확인하고 번거로움 없이 비밀번호 없는 로그인을 수행할 수 있도록 돕기 위해 간소화된 API 세트입니다. 이 가이드에서는 SMS 및 이메일 확인 방법을 사용하여 애플리케이션에 OTP 기능을 활성화합니다. 공식 Verify 문서, 따라서 어떤 단계가 혼란스러워지면 참조하십시오.
Twilio 및 SendGrid 계정을 생성한 후(자동화된 이메일에 사용자 토큰을 포함하여 보내기 위해 SendGrid가 필요합니다), 각 서비스 대시보드에서 검색할 수 있는 다음 식별자를 적어두십시오:
- Twilio의 계정 SID 및 인증 토큰;
- SendGrid ID 및 간단한 이메일 템플릿 ID.
이제 Twilio Verify에서 새로운 Verify 서비스를 생성하십시오 대시보드, 이는 OTP 요청 및 검증을 관리할 구성 세트입니다. 여기에서 서비스 SID를 적어두십시오. 원하신다면 Verify 서비스 내에서 새로운 이메일 통합을 생성하여 SendGrid 키를 추가하여 이메일 코드 전송을 활성화할 수도 있습니다 대시보드.
그게 전부입니다. 모든 설정이 완료되었으며 이제 Cloud Code 함수를 생성할 수 있습니다.
2 - Cloud Code Functions를 통한 통합
앞서 논의한 바와 같이, 애플리케이션에서 Cloud Code 함수를 사용하면 코드의 유연성이 크게 향상되어 재사용 가능한 메서드를 앱에서 분리하고 그 동작을 더 잘 제어할 수 있습니다. 우리의 Cloud functions 시작 가이드를 확인하거나 검토할 수 있습니다.
첫 번째 클라우드 함수를 생성해 보겠습니다. 함수 이름은 requestOTP, 이 함수에서는 OTP가 생성되어 사용자가 선택한 방법으로 전송됩니다. 이 함수는 두 개의 매개변수를 받아야 합니다. userData는 이메일 또는 전화번호를 포함하고, verificationType, 어떤 인증 방법을 사용할지를 지정합니다. email 또는 sms.
여기 함수 코드가 있습니다:
1	// Define Twilio keys and require the library helper
2	const accountSid = 'YOUR_TWILIO_ACCOUNT_SID_HERE';
3	const authToken = 'YOUR_TWILIO_AUTH_TOKEN_HERE';
4	const client = require('twilio')(accountSid, authToken);
5
6	// Request OTP
7	Parse.Cloud.define('requestOTP', async (request) => {
8	  const userData = request.params.userData;
9	  const verificationType = request.params.verificationType;
10	  let verification_request = await client.verify
11	    .services('YOUR_TWILIO_VERIFY_SERVICE_ID_HERE')
12	    .verifications.create({ to: userData, channel: verificationType });
13	  return { status: verification_request.status, error: '' };
14	});
상단에서 Twilio API 키를 정의하고 헬퍼 라이브러리를 가져왔음을 주의하세요. Back4App의 Parse Server 구현은 기본적으로 Twilio 라이브러리에 대한 접근을 제공하므로, 서버에 설치할 필요가 없습니다.
두 번째이자 마지막 클라우드 함수는 verifyOTP, 이 함수는 사용자의 토큰을 Twilio의 Verify에서 검증하고 자동으로 로그인하여 세션을 생성하고 그 ID를 애플리케이션으로 반환합니다. 따라서 비밀번호 없이 로그인할 수 있습니다. 네 개의 필수 매개변수가 있으며, 처음 두 개는 이전 함수와 동일하고, userToken, 제공된 인증 토큰을 포함하고, 또한 userInstallationId, 이는 나중에 설명될 것입니다.
1	// Since we need in UUID v4 id for creating a new session, this function
2	// mocks the creation of one without the need to import the `uuidv4` module
3	// For a more robust solution, consider using the uuid module, which uses
4	// higher quality RNG APIs.
5	// Adapted from https://stackoverflow.com/a/2117523
6	function uuidv4() {
7	  return 'xxxxxxxx-xxxx-4xxx-yxxx-xxxxxxxxxxxx'.replace(/[xy]/g, function (c) {
8	    var r = (Math.random() * 16) | 0,
9	      v = c == 'x' ? r : (r & 0x3) | 0x8;
10	    return v.toString(16);
11	  });
12	}
13
14	// Verify OTP
15	Parse.Cloud.define('verifyOTP', async (request) => {
16	  const { userData, verificationType, userToken, userInstallationId } =
17	    request.params;
18	  let verification_check = await client.verify
19	    .services('YOUR_TWILIO_VERIFY_SERVICE_ID_HERE')
20	    .verificationChecks.create({ to: userData, code: userToken });
21	  // Status can be 'approved' if correct or 'pending' if incorrect
22	  if (verification_check.status === 'approved') {
23	    try {
24	      // Get user to login
25	      let user = null;
26	      if (verificationType === 'sms') {
27	        user = await new Parse.Query(Parse.User)
28	          .equalTo('phoneNumber', userData)
29	          .first({ useMasterKey: true });
30	      } else {
31	        user = await new Parse.Query(Parse.User)
32	          .equalTo('email', userData)
33	          .first({ useMasterKey: true });
34	      }
35	      // Create new session for login use in
36	      // Manually create session (without using Parse.Session because of it's update restrictions)
37	      // Adapted from https://stackoverflow.com/a/67432715
38	      let session = new Parse.Object('_Session', {
39	        user: user,
40	        installationId: userInstallationId,
41	        sessionToken: `r:${uuidv4()}`,
42	      });
43	      session = await session.save(undefined, { useMasterKey: true });
44	      return { sessionId: session.get('sessionToken') };
45	    } catch (error) {
46	      console.log(error);
47	      return { error: `${error}` };
48	    }
49	  }
50	  return { error: 'Could not validate your token or account! Try again!' };
51	});
다음 단계로 이동하기 전에 이러한 기능을 Parse 서버에 배포해야 합니다.
3 - React Native에서 OTP 기능 만들기
이제 사용자 이메일 확인의 동일한 프로젝트 예제를 기반으로 하여 새로운 OTP 기능을 활성화하는 몇 가지 변경 사항을 추가해 보겠습니다. 가이드를 계속 진행하기 전에 프로젝트 예제를 다운로드하고 설정하는 것을 권장합니다.
먼저, 사용자가 전화번호를 사용하여 로그인할 수 있도록 새로운 입력 필드를 추가하고 그 값을 UserRegistration.js (또는 UserRegistration.tsx) 파일의 사용자 등록 저장 방법에 추가합니다:
1	import React, {useState} from 'react';
2	import {
3	  Alert,
4	  Image,
5	  Text,
6	  TextInput,
7	  TouchableOpacity,
8	  View,
9	} from 'react-native';
10	import Parse from 'parse/react-native';
11	import {useNavigation} from '@react-navigation/native';
12	import {StackActions} from '@react-navigation/native';
13	import Styles from './Styles';
14
15	export const UserRegistration = () => {
16	  const navigation = useNavigation();
17
18	  const [username, setUsername] = useState('');
19	  const [password, setPassword] = useState('');
20	  const [email, setEmail] = useState('');
21	  const [phoneNumber, setPhoneNumber] = useState('');
22
23	  const doUserSignUp = async function () {
24	    // Note that this values come from state variables that we've declared before
25	    const usernameValue = username;
26	    const passwordValue = password;
27	    const emailValue = email;
28	    const phoneNumberValue = phoneNumber;
29	    try {
30	      // Since the signUp method returns a Promise, we need to call it using await
31	      // Note that now you are setting the user email value as well
32	      let createdUser = await Parse.User.signUp(usernameValue, passwordValue, {
33	        email: emailValue,
34	        phoneNumber: phoneNumberValue,
35	      });
36
37	      // Parse.User.signUp returns the already created ParseUser object if successful
38	      Alert.alert(
39	        'Success!',
40	        `User ${createdUser.get(
41	          'username',
42	        )} was successfully created! Verify your email to login`,
43	      );
44	      // Since email verification is now required, make sure to log out
45	      // the new user, so any Session created is cleared and the user can
46	      // safely log in again after verifying
47	      await Parse.User.logOut();
48	      // Go back to the login page
49	      navigation.dispatch(StackActions.popToTop());
50	      return true;
51	    } catch (error) {
52	      // signUp can fail if any parameter is blank or failed an uniqueness check on the server
53	      Alert.alert('Error!', error.message);
54	      return false;
55	    }
56	  };
57
58	  return (
59	    <View style={Styles.login_wrapper}>
60	      <View style={Styles.form}>
61	        <TextInput
62	          style={Styles.form_input}
63	          value={username}
64	          placeholder={'Username'}
65	          onChangeText={(text) => setUsername(text)}
66	          autoCapitalize={'none'}
67	          keyboardType={'email-address'}
68	        />
69	        <TextInput
70	          style={Styles.form_input}
71	          value={email}
72	          placeholder={'Email'}
73	          onChangeText={(text) => setEmail(text)}
74	          autoCapitalize={'none'}
75	          keyboardType={'email-address'}
76	        />
77	        <TextInput
78	          style={Styles.form_input}
79	          value={phoneNumber}
80	          placeholder={'Phone (international format +15017122661)'}
81	          onChangeText={(text) => setPhoneNumber(text)}
82	          autoCapitalize={'none'}
83	          keyboardType={'phone-pad'}
84	        />
85	        <TextInput
86	          style={Styles.form_input}
87	          value={password}
88	          placeholder={'Password'}
89	          secureTextEntry
90	          onChangeText={(text) => setPassword(text)}
91	        />
92	        <TouchableOpacity onPress={() => doUserSignUp()}>
93	          <View style={Styles.button}>
94	            <Text style={Styles.button_label}>{'Sign Up'}</Text>
95	          </View>
96	        </TouchableOpacity>
97	      </View>
98	      <View style={Styles.login_social}>
99	        <View style={Styles.login_social_separator}>
100	          <View style={Styles.login_social_separator_line} />
101	          <Text style={Styles.login_social_separator_text}>{'or'}</Text>
102	          <View style={Styles.login_social_separator_line} />
103	        </View>
104	        <View style={Styles.login_social_buttons}>
105	          <TouchableOpacity>
106	            <View
107	              style={[
108	                Styles.login_social_button,
109	                Styles.login_social_facebook,
110	              ]}>
111	              <Image
112	                style={Styles.login_social_icon}
113	                source={require('./assets/icon-facebook.png')}
114	              />
115	            </View>
116	          </TouchableOpacity>
117	          <TouchableOpacity>
118	            <View style={Styles.login_social_button}>
119	              <Image
120	                style={Styles.login_social_icon}
121	                source={require('./assets/icon-google.png')}
122	              />
123	            </View>
124	          </TouchableOpacity>
125	          <TouchableOpacity>
126	            <View style={Styles.login_social_button}>
127	              <Image
128	                style={Styles.login_social_icon}
129	                source={require('./assets/icon-apple.png')}
130	              />
131	            </View>
132	          </TouchableOpacity>
133	        </View>
134	      </View>
135	      <>
136	        <TouchableOpacity onPress={() => navigation.navigate('Login')}>
137	          <Text style={Styles.login_footer_text}>
138	            {'Already have an account? '}
139	            <Text style={Styles.login_footer_link}>{'Log In'}</Text>
140	          </Text>
141	        </TouchableOpacity>
142	      </>
143	    </View>
144	  );
145	};
이제 새로운 UserOTP 화면을 생성하여 모든 OTP 프로세스를 처리하겠습니다. 이 화면에는 두 개의 입력 필드가 있으며, 첫 번째 필드는 사용자가 OTP를 받을 수단(이메일 주소 또는 전화번호)을 제공하는 것입니다. 다른 입력 필드는 OTP 요청을 제출하기 전에 숨겨져 있으며, 사용자가 받은 토큰을 포함합니다. 전체 UserOTP.js (또는 UserOTP.tsx) 코드입니다:
1	import React, {FC, ReactElement, useState} from 'react';
2	import {Alert, Text, TextInput, TouchableOpacity, View} from 'react-native';
3	import Parse from 'parse/react-native';
4	import {useNavigation} from '@react-navigation/native';
5	import Styles from './Styles';
6
7	export const UserOTP: FC<{}> = ({}): ReactElement => {
8	  const navigation = useNavigation();
9
10	  const [userData, setUserData] = useState('');
11	  const [userToken, setUserToken] = useState('');
12	  const [tokenRequested, setTokenRequested] = useState(false);
13
14	  const requestOTP = async function (): Promise<boolean> {
15	    // Note that this values come from state variables that we've declared before
16	    const userDataValue: string = userData;
17	    // Check if value is an email if it contains @. Note that in a real
18	    // app you need a much better validator for this field
19	    const verificationType: string =
20	      userDataValue.includes('@') === true ? 'email' : 'sms';
21	    // We need to call it using await
22	    try {
23	      await Parse.Cloud.run('requestOTP', {
24	        userData: userDataValue,
25	        verificationType: verificationType,
26	      });
27	      // Show token input field
28	      setTokenRequested(true);
29	      Alert.alert('Success!', `Token requested via ${verificationType}!`);
30	      return true;
31	    } catch (error) {
32	      Alert.alert('Error!', error.message);
33	      return false;
34	    }
35	  };
36
37	  const verifyOTP = async function (): Promise<Boolean> {
38	    // Note that this values come from state variables that we've declared before
39	    const userDataValue: string = userData;
40	    const userTokenValue: string = userToken;
41	    // Check if value is an email if it contains @. Note that in a real
42	    // app you need a much better validator for this field
43	    const verificationType: string =
44	      userDataValue.includes('@') === true ? 'email' : 'sms';
45	    // We need the installation id to allow cloud code to create
46	    // a new session and login user without password; this is obtained
47	    // using a static method from Parse
48	    const parseInstallationId: string = await Parse._getInstallationId();
49	    // We need to call it using await
50	    try {
51	      // Verify OTP, if successful, returns a sessionId
52	      let response: object = await Parse.Cloud.run('verifyOTP', {
53	        userData: userDataValue,
54	        verificationType: verificationType,
55	        userToken: userTokenValue,
56	        parseInstallationId: parseInstallationId,
57	      });
58	      if (response.sessionId !== undefined) {
59	        // Use generated sessionId to become a user,
60	        // logging in without needing to inform password and username
61	        await Parse.User.become(response.sessionId);
62	        const loggedInUser: Parse.User = await Parse.User.currentAsync();
63	        Alert.alert(
64	          'Success!',
65	          `User ${loggedInUser.get('username')} has successfully signed in!`,
66	        );
67	        // Navigation.navigate takes the user to the home screen
68	        navigation.navigate('Home');
69	        return true;
70	      } else {
71	        throw response;
72	      }
73	    } catch (error) {
74	      Alert.alert('Error!', error.message);
75	      return false;
76	    }
77	  };
78
79	  return (
80	    <View style={Styles.login_wrapper}>
81	      {tokenRequested === false ? (
82	        <View style={Styles.form}>
83	          <TextInput
84	            style={Styles.form_input}
85	            value={userData}
86	            placeholder={'Email or mobile phone number'}
87	            onChangeText={(text) => setUserData(text)}
88	            autoCapitalize={'none'}
89	            keyboardType={'email-address'}
90	          />
91	          <TouchableOpacity onPress={() => requestOTP()}>
92	            <View style={Styles.button}>
93	              <Text style={Styles.button_label}>{'Request OTP'}</Text>
94	            </View>
95	          </TouchableOpacity>
96	        </View>
97	      ) : (
98	        <View style={Styles.form}>
99	          <Text>{'Inform the received token to proceed'}</Text>
100	          <TextInput
101	            style={Styles.form_input}
102	            value={userToken}
103	            placeholder={'Token (6 digits)'}
104	            onChangeText={(text) => setUserToken(text)}
105	            autoCapitalize={'none'}
106	            keyboardType={'default'}
107	          />
108	          <TouchableOpacity onPress={() => verifyOTP()}>
109	            <View style={Styles.button}>
110	              <Text style={Styles.button_label}>{'Verify'}</Text>
111	            </View>
112	          </TouchableOpacity>
113	          <TouchableOpacity onPress={() => requestOTP()}>
114	            <View style={Styles.button}>
115	              <Text style={Styles.button_label}>{'Resend token'}</Text>
116	            </View>
117	          </TouchableOpacity>
118	        </View>
119	      )}
120	    </View>
121	  );
122	};
자세히 살펴보세요 requestOTP 및 verifyOTP 함수는 각각의 클라우드 코드 함수를 호출하고 그 응답을 검증하는 역할을 합니다. 그들이 어떻게 작동하는지에 대한 더 많은 세부정보는 코드 주석에서 확인할 수 있습니다.
새 화면을 만든 후, App.js에 가져오고 선언하세요 (또는 App.tsx). 그 후, UserLogin.js (또는 UserLogin.tsx) 파일에 새 버튼을 추가하여 사용자가 OTP 화면으로 이동할 수 있도록 합니다.
4 - 새로운 OTP 기능 테스트
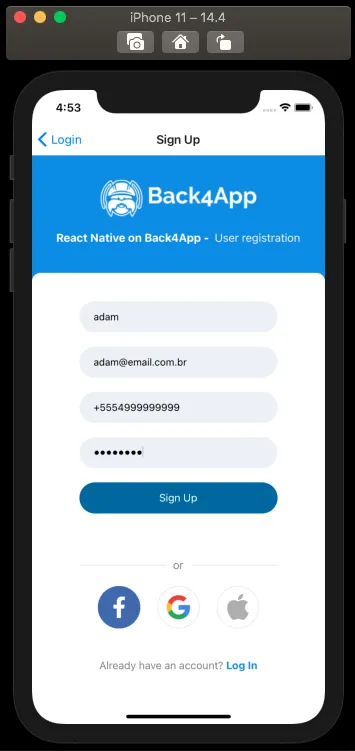
이제 앱의 변경 사항을 테스트해 보겠습니다. 먼저, 유효한 이메일과 전화번호를 포함한 새 사용자를 등록하세요. 전화번호에는 국제 표기법(E.164) 형식(예: +14155552671)을 사용해야 합니다.
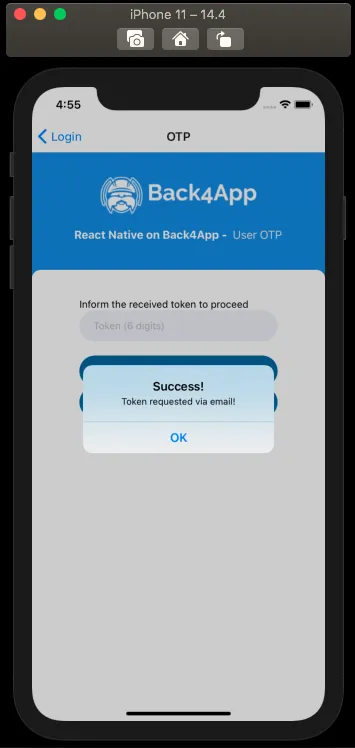
이제 로그인 화면에서 OTP 화면으로 이동하고 이전과 동일한 이메일 또는 전화번호를 입력하세요. 요청 버튼을 클릭하면 화면에서 활성 입력이 변경되는 메시지를 받아야 합니다.
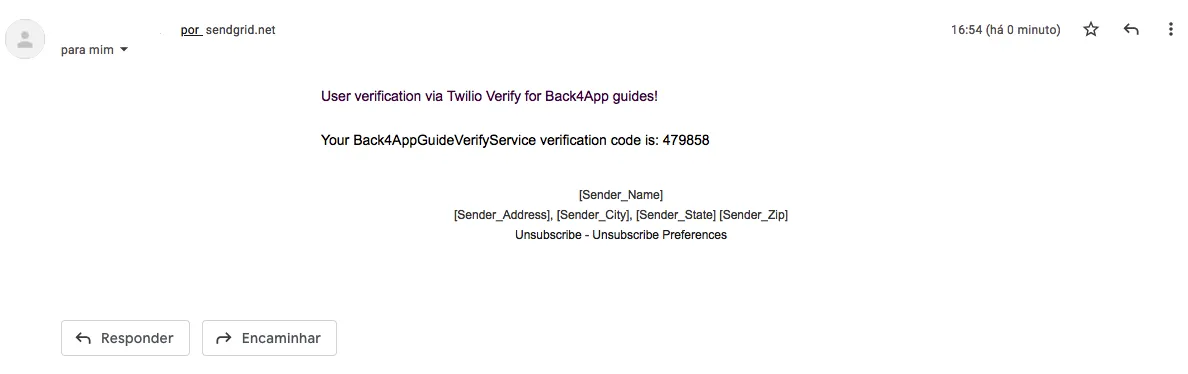
이메일 주소를 입력했다면 OTP 토큰이 포함된 이메일을 받아야 하고, 전화번호를 입력했다면 모바일 전화로 SMS 문자 메시지를 받게 됩니다. 이메일에는 SendGrid 템플릿 설정에 따라 다음과 같은 메시지가 포함되어야 합니다.
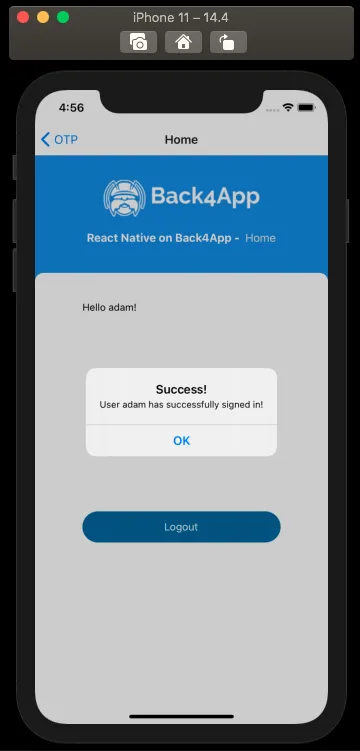
OTP 토큰을 입력하고 확인을 클릭하세요. 모든 것이 잘 진행되었다면 이제 다음 메시지와 함께 홈 화면에 있어야 합니다:
결론
이 가이드의 끝에서, React Native 애플리케이션에 타사 서비스를 통합하기 위해 Parse Cloud Code 함수를 사용하는 방법을 배웠습니다. 다음 가이드에서는 Parse에서 사용자와 작업하는 방법을 배울 것입니다.