Install Parse SDK
将 Parse SDK 安装到您的 JavaScript 项目
介绍
在本节中,您将学习如何将 Parse JavaScript SDK 安装到您的 HTML 项目中。
有关 Parse SDK 的更多信息,请访问 Parse JavaScript SDK API 参考 和 Parse JavaScript SDK 开源文档.
先决条件
要完成本教程,您需要:
- 在 Back4App 创建的应用程序。
Parse JavaScript SDK 支持 Firefox 23+、Chrome 17+、Safari 5+ 和 IE 10。
IE 9 仅支持使用 HTTPS 托管的应用程序。
1 - 安装 SDK
要在您的 Web 应用程序中启用 Parse JavaScript SDK,请创建一个新的 index.html 文件或使用您的主 HTML 文件,并在其 <head> 标签中添加以下脚本:
<!-- This is the minified production version of Parse JS -->
<script type="text/javascript" src="https://unpkg.com/parse/dist/parse.min.js"></script>
2 - 连接你的 Parse 应用
初始化你的 Parse 应用
在使用任何 Parse 功能之前,你需要调用 Parse.Initialize 方法来设置认证令牌并将你的页面连接到 Back4App 服务器。
在你的 index.html 文件中,在底部创建一个 <script> 标签,并添加以下代码:
<script>
  // Initialize Parse
  Parse.initialize("YOUR_PARSE_APP_ID", "YOUR_PARSE_JS_KEY"); //PASTE HERE YOUR Back4App APPLICATION ID AND YOUR JavaScript KEY
  Parse.serverURL = "https://parseapi.back4app.com/";
</script>
请注意,强烈建议创建和导入一个单独的 JavaScript 文件,而不是在你的 HTML 文件中使用内联 JS 代码,但为了简单起见,我们将在这里使用后者。
找到你的应用 ID 和客户端密钥
- 前往 Back4App 网站上的应用仪表板。
- 导航到应用设置:点击 服务器设置 > 核心设置 块> 设置.
- 返回到你的 Parse.Initialize 函数并粘贴你的 applicationId 和 javaScriptKey 在那里。
3 - 测试你的连接
创建测试代码
使用以下代码测试你的初始设置,该代码创建一个新的用户类对象。将其添加到 <script> 标签中,紧接着 Parse.initialize 方法之后:
// Create a new User
async function createParseUser() {
  // Creates a new Parse "User" object, which is created by default in your Parse app
  let user = new Parse.User();
  // Set the input values to the new "User" object
  user.set("username", document.getElementById("username").value);
  user.set("email", document.getElementById("email").value);
  user.set("password", document.getElementById("password").value);
  try {
    // Call the save method, which returns the saved object if successful
    user = await user.save();
    if (user !== null) {
      // Notify the success by getting the attributes from the "User" object, by using the get method (the id attribute needs to be accessed directly, though)
      alert(
        `New object created with success! ObjectId: ${
          user.id
        }, ${user.get("username")}`
      );
    }
  } catch (error) {
    alert(`Error: ${error.message}`);
  }

 // Add on click listener to call the create parse user function
 document.getElementById("createButton").addEventListener("click", async function () {
   createParseUser();
});
您还需要创建输入字段以将数据传递给您的 JavaScript 函数,因此将这些普通元素添加到您的 <body> HTML 文件的部分:
<h1>JS SDK</h1>
<input id="username" type="text" placeholder="Username"/>
<input id="email" type="email" placeholder="Email"/>
<input id="password" type="password" placeholder="Password" />
<button id="createButton">Create User</button>
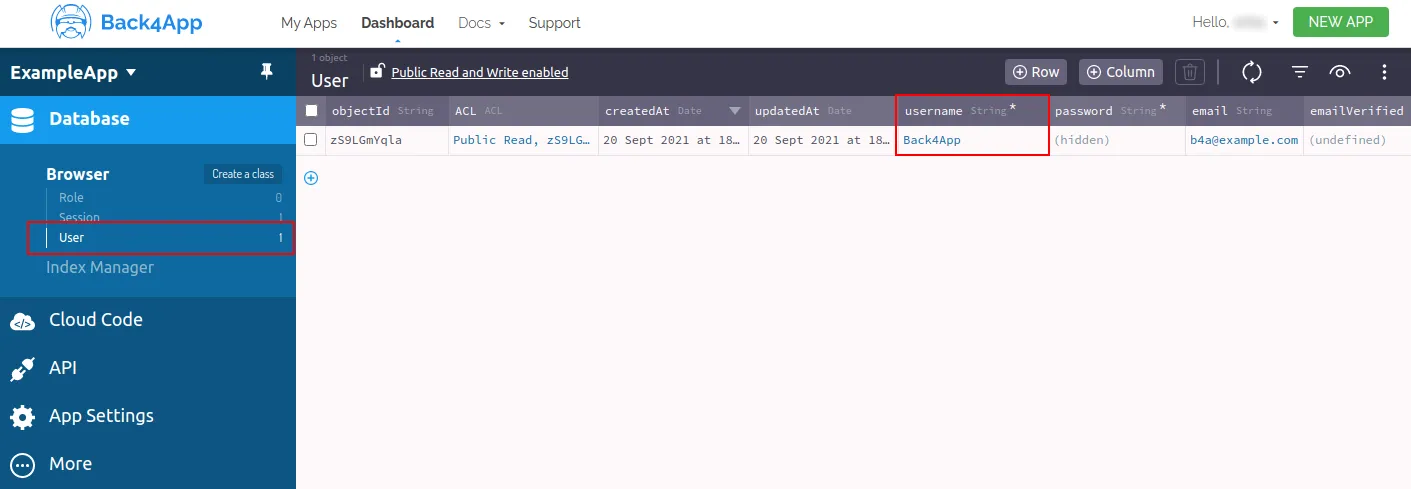
继续按照以下步骤测试此示例应用程序:
- 在您的网络浏览器中打开您的 HTML 文件。
- 填写输入字段并点击;
- 将显示一个警报框,显示新创建的用户对象的 ID。
- 在 Back4App 登录。
- 找到您的应用程序并点击仪表板。
- 点击 核心。
- 转到 浏览器。
- 点击 用户 类。
- 在那检查您的新对象。
完成这些步骤后,您应该会看到类似这样的内容:
这是完整的应用代码:
<!DOCTYPE html>
<html>
  <head>
    <meta charset="utf-8" />
    <!-- This is the minified production version of parse js -->
    <script
      type="text/javascript"
      src="https://unpkg.com/parse/dist/parse.min.js"
    ></script>
  </head>
  <body>
    <h1>JS SDK</h1>
    <input id="username" type="text" placeholder="Username" />
    <input id="email" type="email" placeholder="Email" />
    <input id="password" type="password" placeholder="Password" />
    <button id="createButton">Create User</button>
  </body>
  <script>
    // Initialize Parse
    Parse.initialize("YOUR_PARSE_APP_ID", "YOUR_PARSE_JS_KEY"); //PASTE HERE YOUR Back4App APPLICATION ID AND YOUR JavaScript KEY
    Parse.serverURL = "https://parseapi.back4app.com/";

    // Create a new User
    async function createParseUser() {
      // Creates a new Parse "User" object, which is created by default in your Parse app
      let user = new Parse.User();
      // Set the input values to the new "User" object
      user.set("username", document.getElementById("username").value);
      user.set("email", document.getElementById("email").value);
      user.set("password", document.getElementById("password").value);
      try {
        // Call the save method, which returns the saved object if successful
        user = await user.save();
        if (user !== null) {
          // Notify the success by getting the attributes from the "User" object, by using the get method (the id attribute needs to be accessed directly, though)
          alert(
            `New object created with success! ObjectId: ${
              user.id
            }, ${user.get("username")}`
          );
        }
      } catch (error) {
        alert(`Error: ${error.message}`);
      }
    }

    // Add on click listener to call the create parse user function
    document.getElementById("createButton").addEventListener("click", async function () {
      createParseUser();
    });
  </script>
</html>
完成!
到此为止,您已经学习了如何开始使用 JavaScript 网络应用。
通过阅读 Parse 开源文档以获取 JavaScript SDK 来了解更多信息。