React Native에서 Parse로 사용자 쿼리 구현하는 방법
리액트 네이티브에서 Parse로 사용자 쿼리하기
소개
일부 리액트 네이티브 앱은 애플리케이션 사용자를 직접 관리해야 하거나 적어도 특정 하위 집합을 나열할 수 있어야 합니다. Parse는 강력한 쿼리 도구를 제공하며, 예를 들어 소셜 미디어 앱의 사용자에 대해서도 사용할 수 있습니다. 이 가이드에서는 Parse.Query를 사용하여 Parse JS SDK를 이용한 리액트 네이티브 앱에서 현실적인 사용자 쿼리를 수행하는 방법을 배웁니다.
전제 조건
이 튜토리얼을 완료하려면 다음이 필요합니다:
목표
리액트 네이티브 앱을 위한 사용자 쿼리 기능을 Parse를 사용하여 구축하는 것입니다.
1 - Parse.Query 클래스 이해하기
모든 Parse 쿼리 작업은 Parse.Query 객체 유형을 사용하며, 이는 앱 전반에 걸쳐 데이터베이스에서 특정 데이터를 검색하는 데 도움이 됩니다. Parse.Query는 검색 메서드(예: Parse.Query.find 또는 Parse.Query.get 호출 후에만 해결된다는 것을 아는 것이 중요합니다. 따라서 쿼리를 설정하고 실제로 호출되기 전에 여러 수정자를 연결할 수 있습니다.
새로운 Parse.Query, 생성하려면 원하는 Parse.Object 서브클래스를 매개변수로 전달해야 하며, 이는 쿼리 결과를 포함할 것입니다. 이 가이드 사용 사례의 예( Parse.User)는 아래에서 볼 수 있습니다.
1   // This will create your query
2   const parseQuery = new Parse.Query(Parse.User);
3   // The query will resolve only after calling this method
5   const queryResult = await parseQuery.find();
다음에서 Parse.Query 클래스에 대해 더 읽을 수 있습니다. 공식 문서에서 여기.
2 - 관련 사용자 쿼리 수행하기
이제 앱에서 사용자를 관리하거나 표시할 때 수행해야 할 몇 가지 관련 쿼리를 살펴보겠습니다. 우선, 검색 값이 포함된 사용자 이름을 검색하는 텍스트 검색 쿼리를 수행해 보겠습니다.
1	const doUserQuery = async function (): Promise<Boolean> {
2	  // This value comes from a state variable
3	  const usernameSearchValue: string = usernameSearch;
4	  // This will create your user query
5	  const parseQuery: Parse.Query = new Parse.Query(Parse.User);
6	  // Several query functions can be set to your Parse,Query, they will
7	  // only resolve when calling "find", for example
8	  if (usernameSearchValue !== '') {
9	    // "contains" will retrieve users whose username contain the searched value, case-sensitive
10	    parseQuery.contains('username', usernameSearchValue);
11	    //
12	    // or
13	    //
14	    // for case-insensitive string search, use "matches", that will take into account
15	    // an regexp for matching, in this case use only "i", which is the regexp modifier
16	    // for case-insensitive
17	    parseQuery.matches('username', usernameSearchValue, 'i');
18	  }
19	  // Only after calling "find" all query conditions will resolve
20	  return await parseQuery
21	    .find()
22	    .then(async (queriedUsers: [Parse.User]) => {
23	      // Set the query results to an state variable to retrieve it on your JSX
24	      // Be aware that empty or invalid queries return as an empty array
25	      setQueryResults(queriedUsers);
26	      return true;
27	    })
28	    .catch((error: object) => {
29	      // Error can be caused by lack of Internet connection, but in most
30	      // cases "find" will return as an empty array on "then"
31	      Alert.alert('Error!', error.message);
32	      setQueryResults([]);
33	      return false;
34	    });
35	};
문자열을 검색하는 방법은 최소한 두 가지가 있으며, 각각은 특정한 응용 프로그램과 장점이 있습니다. 대부분의 경우, 대소문자를 구분하지 않는 결과를 보장하고 코드에서 예기치 않은 동작을 피하기 위해 Parse.Query.matches를 사용하고 싶을 것입니다.
이 쿼리를 수행한 후, 앱의 사용자 목록은 다음과 같은 내용을 보여야 합니다:
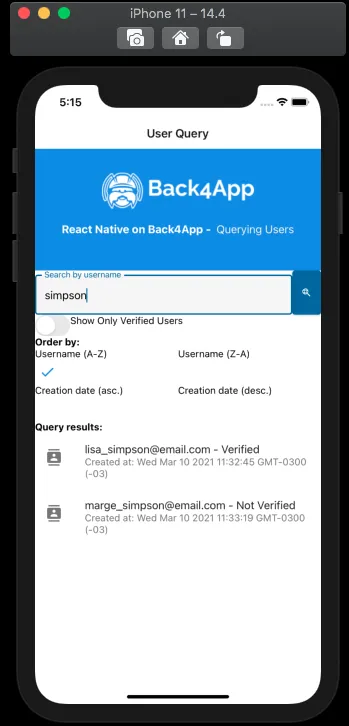
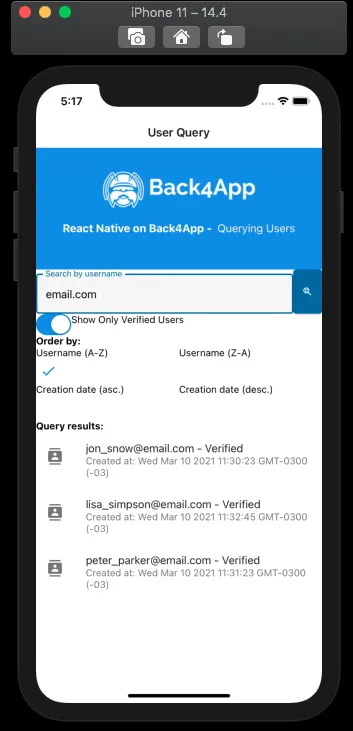
문자열 쿼리 외에도, 부울 필드와 마찬가지로 정확한 값을 포함하는 객체를 검색하고 싶을 때 “정확한” 쿼리를 수행할 수 있습니다. 다음 예제는 emailVerified 필드를 통해 이메일로 확인된 사용자를 검색하는 방법을 보여줍니다.
1	const doUserQuery = async function () {
2	  // This value comes from a state variable
3	  const showOnlyVerifiedValue: boolean = showOnlyVerified;
4	  // This will create your user query
5	  const parseQuery = new Parse.Query(Parse.User);
6	  // Several query functions can be set to your Parse,Query, they will
7	  // only resolve when calling "find", for example
8	  if (showOnlyVerifiedValue === true) {
9	    // "equalTo" will retrieve users whose "emailVerified" value is exactly "true"
10	    parseQuery.equalTo('emailVerified', true);
11	  }
12	  // Only after calling "find" all query conditions will resolve
13	  return await parseQuery
14	    .find()
15	    .then(async (queriedUsers) => {
16	      // Set the query results to an state variable to retrieve it on your JSX
17	      // Be aware that empty or invalid queries return as an empty array
18	      setQueryResults(queriedUsers);
19	      return true;
20	    })
21	    .catch((error) => {
22	      // Error can be caused by lack of Internet connection, but in most
23	      // cases "find" will return as an empty array on "then"
24	      Alert.alert('Error!', error.message);
25	      setQueryResults([]);
26	      return false;
27	    });
28	};
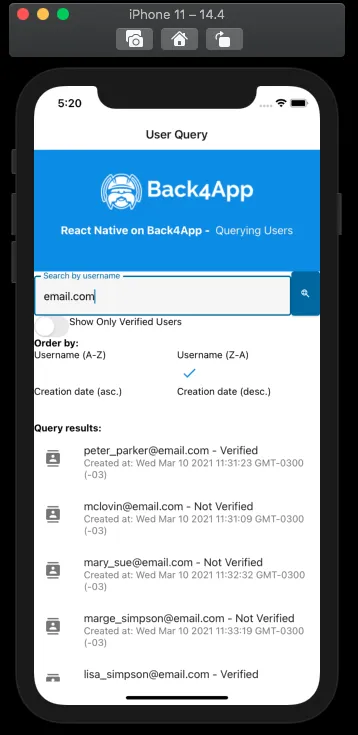
이제 귀하의 앱은 사용자 목록을 다음과 같이 업데이트해야 합니다:
또 다른 일반적인 예는 쿼리에 정렬을 적용하는 것입니다. 이는 두 가지 방법으로 수행할 수 있습니다. 하나는 Parse.Query.ascending/Parse.Query.descending 또는 Parse.Query.addAscending/Parse.Query.addDescending입니다. 첫 번째 경우는 다른 모든 정렬을 무시하고 쿼리가 사용할 유일한 정렬이 되며, 후자는 기존 정렬과 연결되어 여러 개의 정렬을 가능하게 합니다.
1	const doUserQuery = async function () {
2	  // This value comes from a state variable
3	  const orderByValue = orderBy;
4	  // This will create your user query
5	  const parseQuery = new Parse.Query(Parse.User);
6	  // Several query functions can be set to your Parse,Query, they will
7	  // only resolve when calling "find", for example
8	  // For list ordering, you can use "addAscending" or "addDescending", passing as parameter
9	  // which object field should be the one to order by
10	  // Note that "usernameAsc", "usernameDesc" and so on are made up string values applied to a filter in
11	  // our example app, so change it by what is suitable to you
12	  if (orderByValue === 'usernameAsc') {
13	    parseQuery.ascending('username');
14	    //
15	    // or
16	    //
17	    parseQuery.addAscending('username');
18	  } else if (orderByValue === 'usernameDesc') {
19	    parseQuery.descending('username');
20	    //
21	    // or
22	    //
23	    parseQuery.addDescending('username');
24	  } else if (orderByValue === 'dateAsc') {
25	    parseQuery.ascending('createdAt');
26	    //
27	    // or
28	    //
29	    parseQuery.addAscending('createdAt');
30	  } else if (orderByValue === 'dateDesc') {
31	    parseQuery.descending('createdAt');
32	    //
33	    // or
34	    //
35	    parseQuery.addDescending('createdAt');
36	  }
37	  // Only after calling "find" all query conditions will resolve
38	  return await parseQuery
39	    .find()
40	    .then(async (queriedUsers) => {
41	      // Set the query results to an state variable to retrieve it on your JSX
42	      // Be aware that empty or invalid queries return as an empty array
43	      setQueryResults(queriedUsers);
44	      return true;
45	    })
46	    .catch((error) => {
47	      // Error can be caused by lack of Internet connection, but in most
48	      // cases "find" will return as an empty array on "then"
49	      Alert.alert('Error!', error.message);
50	      setQueryResults([]);
51	      return false;
52	    });
53	};
이제 귀하의 앱은 쿼리를 다음과 같이 정렬해야 합니다:
위에서 언급한 모든 쿼리 제약 조건은 연결하여 단일 쿼리에서 수행할 수 있으며, 이는 서로 함께 작동하는 다양한 필터 및 정렬을 생성하는 앱의 사용성을 향상시킵니다. 다음은 이 가이드에서 사용된 모든 쿼리 메서드를 보여주는 전체 코드입니다:
1	const doUserQuery = async function (): Promise<Boolean> {
2	  // This value comes from a state variable
3	  const usernameSearchValue: string = usernameSearch;
4	  const showOnlyVerifiedValue: boolean = showOnlyVerified;
5	  const orderByValue: string = orderBy;
6	  // This will create your user query
7	  const parseQuery: Parse.Query = new Parse.Query(Parse.User);
8	  // Several query functions can be set to your Parse,Query, they will
9	  // only resolve when calling "find", for example
10	  if (usernameSearchValue !== '') {
11	    // "contains" will retrieve users whose username contain the searched value, case-sensitive
12	    parseQuery.contains('username', usernameSearchValue);
13	    //
14	    // or
15	    //
16	    // for case-insensitive string search, use "matches", that will take into account
17	    // an regexp for matching, in this case use only "i", which is the regexp modifier
18	    // for case-insensitive
19	    parseQuery.matches('username', usernameSearchValue, 'i');
20	  }
21	  if (showOnlyVerifiedValue === true) {
22	    // "equalTo" will retrieve users whose "emailVerified" value is exactly "true"
23	    parseQuery.equalTo('emailVerified', true);
24	  }
25	  // For list ordering, you can use "addAscending" or "addDescending", passing as parameter
26	  // which object field should be the one to order by
27	  if (orderByValue === 'usernameAsc') {
28	    parseQuery.ascending('username');
29	    //
30	    // or
31	    //
32	    parseQuery.addAscending('username');
33	  } else if (orderByValue === 'usernameDesc') {
34	    parseQuery.descending('username');
35	    //
36	    // or
37	    //
38	    parseQuery.addDescending('username');
39	  } else if (orderByValue === 'dateAsc') {
40	    parseQuery.ascending('createdAt');
41	    //
42	    // or
43	    //
44	    parseQuery.addAscending('createdAt');
45	  } else if (orderByValue === 'dateDesc') {
46	    parseQuery.descending('createdAt');
47	    //
48	    // or
49	    //
50	    parseQuery.addDescending('createdAt');
51	  }
52	  // Only after calling "find" all query conditions will resolve
53	  return await parseQuery
54	    .find()
55	    .then(async (queriedUsers: [Parse.User]) => {
56	      // Set the query results to an state variable to retrieve it on your JSX
57	      // Be aware that empty or invalid queries return as an empty array
58	      setQueryResults(queriedUsers);
59	      return true;
60	    })
61	    .catch((error: object) => {
62	      // Error can be caused by lack of Internet connection, but in most
63	      // cases "find" will return as an empty array on "then"
64	      Alert.alert('Error!', error.message);
65	      setQueryResults([]);
66	      return false;
67	    });
68	};
결론
이 가이드의 끝에서, React Native에서 Parse 사용자에 대한 쿼리를 수행하는 방법을 배웠습니다. 다음 가이드에서는 Parse에서 데이터를 저장하고 읽는 방법을 보여드리겠습니다.