리액트 네이티브 Parse 사용자 로그인 및 로그아웃 구현 가이드
리액트 네이티브의 사용자 로그인 및 로그아웃
소개
지난 가이드에서 Parse에서 사용자 등록을 처리하는 컴포넌트를 구현한 후, 이제 동일한 Parse.User 클래스를 사용하여 사용자를 로그인하고 로그아웃하는 방법을 배우게 됩니다. 또한 react-navigation을 설치하고 구성하는 방법도 배우게 되어, 새로운 화면과 컴포넌트를 통해 사용자를 탐색할 수 있습니다. Parse.User.logIn 메서드는 로컬 스토리지에 유효한 사용자 세션을 저장하므로, currentAsync 와 같은 메서드에 대한 향후 호출이 사용자 데이터를 성공적으로 검색할 수 있습니다. 반면에, logOut 은 이 세션을 디스크에서 지우고 Parse 서버의 연결된 서비스에서 로그아웃합니다.
언제든지 이 튜토리얼로 구축된 전체 Android 프로젝트에 접근할 수 있습니다. GitHub 저장소에서 확인하세요.
전제 조건
이 튜토리얼을 완료하려면 다음이 필요합니다:
목표
React Native 앱에서 Parse를 사용하여 사용자 로그인 및 로그아웃 기능을 구축합니다.
1 - 의존성 설치
어떤 시점에서든 모든 React Native 애플리케이션은 화면 탐색이 필요합니다. 이제 이를 위해 React Native에서 가장 많이 사용되는 라이브러리인 react-navigation을 설치하고 구성하는 방법을 배웁니다.
프로젝트 루트 디렉토리로 이동하여 다음 의존성을 설치합니다:
iOS용으로 개발 중이라면 앱 자동 연결을 완료하기 위해 pods를 설치해야 합니다:
참고: React Native의 0.60+ 버전부터 모든 플랫폼에 대해 자동으로 연결됩니다. 따라서 여전히 이전 버전의 RN을 사용하고 있다면 React Native 문서를 확인하세요 여기.
앱 진입 파일(App.tsx 또는 App.js), 파일의 가장 위에 이 import 라인을 추가하세요. 이제 react-navigation 컨테이너 안으로 컴포넌트를 이동해야 합니다. 이 컨테이너는 앱을 NavigationContainer 안에 캡슐화합니다:
1	import "react-native-gesture-handler";
2	// Your other imports go here
3	import { NavigationContainer } from "@react-navigation/native";
4
5	const App = () => {
6	  return <NavigationContainer>{/* Your app code */}</NavigationContainer>;
7	}
8
9	export default App;
핵심 내비게이션 라이브러리는 스택, 탭, 드로어 등 다양한 추가 내비게이션 모듈을 가지고 있습니다. 스택 내비게이터는 가장 간단한 것이며, 이 가이드에서 사용할 것입니다. 설치를 진행하세요:
2 - 스택 내비게이터 만들기
이제 스택 내비게이터를 생성하고 설정해 보겠습니다. 이 모듈은 앱의 화면 내비게이션을 관리하고 처리합니다. 여기서 react-navigation에 대한 깊은 이해를 제공하는 것이 목표가 아니므로, 더 알고 싶으시면 공식 문서를 방문해 주세요.
당신의 App.js (App.tsx TypeScript를 사용하고 있다면) 파일에서, StackNavigator를 가져오고 사용자 등록 화면을 포함하는 함수를 생성한 다음, 앱 내에 NavigationContainer를 삽입하세요. 당신의 주요 파일은 다음과 같아야 합니다:
1	import 'react-native-gesture-handler';
2	import React from 'react';
3	import {Image, SafeAreaView, StatusBar, Text, View} from 'react-native';
4
5	import AsyncStorage from '@react-native-async-storage/async-storage';
6	import Parse from 'parse/react-native';
7	import {NavigationContainer} from '@react-navigation/native';
8	import {createStackNavigator} from '@react-navigation/stack';
9	import {UserRegistration} from './UserRegistration';
10	import Styles from './Styles';
11
12	// Your Parse initialization configuration goes here
13	Parse.setAsyncStorage(AsyncStorage);
14	const PARSE_APPLICATION_ID: string = 'APPLICATION_ID';
15	const PARSE_HOST_URL: string = 'HOST_URL';
16	const PARSE_JAVASCRIPT_ID: string = 'JAVASCRIPT_ID';
17	Parse.initialize(PARSE_APPLICATION_ID, PARSE_JAVASCRIPT_ID);
18	Parse.serverURL = PARSE_HOST_URL;
19
20	// Wrap your old app screen in a separate function, so you can create a screen
21	// inside the navigator; you can also declare your screens in a separate file,
22	// export and import here to reduce some clutter
23	function UserRegistrationScreen() {
24	  return (
25	    <>
26	      <StatusBar />
27	      <SafeAreaView style={Styles.login_container}>
28	        <View style={Styles.login_header}>
29	          <Image
30	            style={Styles.login_header_logo}
31	            source={require('./assets/logo-back4app.png')}
32	          />
33	          <Text style={Styles.login_header_text}>
34	            <Text style={Styles.login_header_text_bold}>
35	              {'React Native on Back4App - '}
36	            </Text>
37	            {' User registration'}
38	          </Text>
39	        </View>
40	        <UserRegistration />
41	      </SafeAreaView>
42	    </>
43	  );
44	}
45
46	// Create your main navigator here
47	const Stack = createStackNavigator();
48
49	// Add the stack navigator to your NavigationContainer
50	// and in it you can add all your app screens in the order you need
51	// them on your stack
52	const App = () => {
53	  return (
54	    <NavigationContainer>
55	      <Stack.Navigator>
56	        <Stack.Screen name="Sign Up" component={UserRegistrationScreen} />
57	      </Stack.Navigator>
58	    </NavigationContainer>
59	  );
60	};
61
62	export default App;
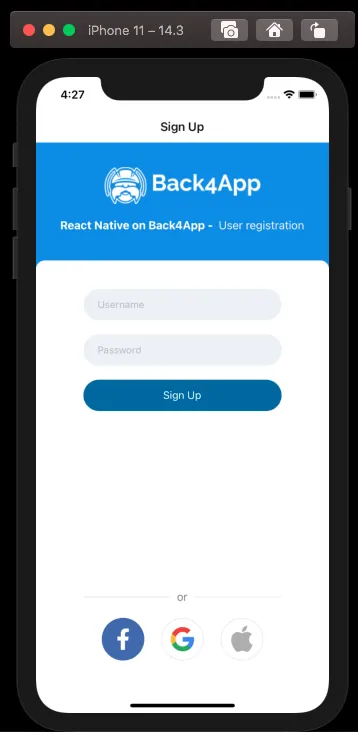
지금 앱을 실행하면 화면 상단에 화면 이름이 포함된 헤더가 나타나는 것을 알 수 있습니다:
3 - 로그인 컴포넌트 만들기
이제 앱에서 UserLogIn 기능 컴포넌트를 만들어 봅시다. 루트 디렉토리에 UserLogIn.js라는 새 파일을 생성하고 (UserLogIn.tsx TypeScript를 사용하고 있다면) 상태 훅을 사용하여 입력 요소를 추가하세요:
1	import React, {FC, ReactElement, useState} from 'react';
2	import {
3	  Image,
4	  Text,
5	  TextInput,
6	  TouchableOpacity,
7	  View,
8	} from 'react-native';
9	import Parse from 'parse/react-native';
10	import Styles from './Styles';
11
12	export const UserLogIn = () => {
13	  const [username, setUsername] = useState("");
14	  const [password, setPassword] = useState("");
15
16	  return (
17	    <View style={Styles.login_wrapper}>
18	      <View style={Styles.form}>
19	        <TextInput
20	          style={Styles.form_input}
21	          value={username}
22	          placeholder={'Username'}
23	          onChangeText={(text) => setUsername(text)}
24	          autoCapitalize={'none'}
25	          keyboardType={'email-address'}
26	        />
27	        <TextInput
28	          style={Styles.form_input}
29	          value={password}
30	          placeholder={'Password'}
31	          secureTextEntry
32	          onChangeText={(text) => setPassword(text)}
33	        />
34	        <TouchableOpacity onPress={() => {}}>
35	          <View style={Styles.button}>
36	            <Text style={Styles.button_label}>{'Sign in'}</Text>
37	          </View>
38	        </TouchableOpacity>
39	      </View>
40	      <View style={Styles.login_social}>
41	        <View style={Styles.login_social_separator}>
42	          <View style={Styles.login_social_separator_line} />
43	          <Text style={Styles.login_social_separator_text}>{'or'}</Text>
44	          <View style={Styles.login_social_separator_line} />
45	        </View>
46	        <View style={Styles.login_social_buttons}>
47	          <TouchableOpacity>
48	            <View
49	              style={[
50	                Styles.login_social_button,
51	                Styles.login_social_facebook,
52	              ]}>
53	              <Image
54	                style={Styles.login_social_icon}
55	                source={require('./assets/icon-facebook.png')}
56	              />
57	            </View>
58	          </TouchableOpacity>
59	          <TouchableOpacity>
60	            <View style={Styles.login_social_button}>
61	              <Image
62	                style={Styles.login_social_icon}
63	                source={require('./assets/icon-google.png')}
64	              />
65	            </View>
66	          </TouchableOpacity>
67	          <TouchableOpacity>
68	            <View style={Styles.login_social_button}>
69	              <Image
70	                style={Styles.login_social_icon}
71	                source={require('./assets/icon-apple.png')}
72	              />
73	            </View>
74	          </TouchableOpacity>
75	        </View>
76	      </View>
77	    </View>
78	  );
79	};
이제 상태 변수를 사용하여 호출할 함수를 구현할 수 있습니다.Parse.User.logIn메서드:
1	const doUserLogIn = async function () {
2	  // Note that these values come from state variables that we've declared before
3	  const usernameValue = username;
4	  const passwordValue = password;
5	  return await Parse.User.logIn(usernameValue, passwordValue)
6	    .then(async (loggedInUser) => {
7	      // logIn returns the corresponding ParseUser object
8	      Alert.alert(
9	        'Success!',
10	        `User ${loggedInUser.get('username')} has successfully signed in!`,
11	      );
12	      // To verify that this is in fact the current user, currentAsync can be used
13	      const currentUser = await Parse.User.currentAsync();
14	      console.log(loggedInUser === currentUser);
15	      return true;
16	    })
17	    .catch((error) => {
18	      // Error can be caused by wrong parameters or lack of Internet connection
19	      Alert.alert('Error!', error.message);
20	      return false;
21	    });
22	};
이 함수를 UserLogIn 컴포넌트 안에, return 호출 바로 전에 삽입하여 호출하고 테스트할 수 있도록 하세요. 폼의 로그인 버튼 onPress 액션을 () => doUserLogIn()로 업데이트하고 Alert를 react-native. 이제 당신의 컴포넌트는 다음과 같아야 합니다:
1	import React, {FC, ReactElement, useState} from 'react';
2	import {
3	  Alert,
4	  Image,
5	  Text,
6	  TextInput,
7	  TouchableOpacity,
8	  View,
9	} from 'react-native';
10	import Parse from 'parse/react-native';
11	import Styles from './Styles';
12
13	export const UserLogIn: FC<{}> = ({}): ReactElement => {
14	  const [username, setUsername] = useState('');
15	  const [password, setPassword] = useState('');
16
17	  const doUserLogIn = async function (): Promise<boolean> {
18	    // Note that these values come from state variables that we've declared before
19	    const usernameValue: string = username;
20	    const passwordValue: string = password;
21	    return await Parse.User.logIn(usernameValue, passwordValue)
22	      .then(async (loggedInUser: Parse.User) => {
23	        // logIn returns the corresponding ParseUser object
24	        Alert.alert(
25	          'Success!',
26	          `User ${loggedInUser.get('username')} has successfully signed in!`,
27	        );
28	        // To verify that this is in fact the current user, currentAsync can be used
29	        const currentUser: Parse.User = await Parse.User.currentAsync();
30	        console.log(loggedInUser === currentUser);
31	        return true;
32	      })
33	      .catch((error: object) => {
34	        // Error can be caused by wrong parameters or lack of Internet connection
35	        Alert.alert('Error!', error.message);
36	        return false;
37	      });
38	  };
39
40	  return (
41	    <View style={Styles.login_wrapper}>
42	      <View style={Styles.form}>
43	        <TextInput
44	          style={Styles.form_input}
45	          value={username}
46	          placeholder={'Username'}
47	          onChangeText={(text) => setUsername(text)}
48	          autoCapitalize={'none'}
49	          keyboardType={'email-address'}
50	        />
51	        <TextInput
52	          style={Styles.form_input}
53	          value={password}
54	          placeholder={'Password'}
55	          secureTextEntry
56	          onChangeText={(text) => setPassword(text)}
57	        />
58	        <TouchableOpacity onPress={() => doUserLogIn()}>
59	          <View style={Styles.button}>
60	            <Text style={Styles.button_label}>{'Sign in'}</Text>
61	          </View>
62	        </TouchableOpacity>
63	      </View>
64	      <View style={Styles.login_social}>
65	        <View style={Styles.login_social_separator}>
66	          <View style={Styles.login_social_separator_line} />
67	          <Text style={Styles.login_social_separator_text}>{'or'}</Text>
68	          <View style={Styles.login_social_separator_line} />
69	        </View>
70	        <View style={Styles.login_social_buttons}>
71	          <TouchableOpacity>
72	            <View
73	              style={[
74	                Styles.login_social_button,
75	                Styles.login_social_facebook,
76	              ]}>
77	              <Image
78	                style={Styles.login_social_icon}
79	                source={require('./assets/icon-facebook.png')}
80	              />
81	            </View>
82	          </TouchableOpacity>
83	          <TouchableOpacity>
84	            <View style={Styles.login_social_button}>
85	              <Image
86	                style={Styles.login_social_icon}
87	                source={require('./assets/icon-google.png')}
88	              />
89	            </View>
90	          </TouchableOpacity>
91	          <TouchableOpacity>
92	            <View style={Styles.login_social_button}>
93	              <Image
94	                style={Styles.login_social_icon}
95	                source={require('./assets/icon-apple.png')}
96	              />
97	            </View>
98	          </TouchableOpacity>
99	        </View>
100	      </View>
101	    </View>
102	  );
103	};
4 - 로그인 화면 만들기
이제 앱을 위한 새로운 화면을 만들어 보겠습니다. 이 화면은 당신의 UserLogIn 컴포넌트를 사용할 것입니다. 새로운 화면을 당신의 StackNavigator의 첫 번째(또는 상단) 화면으로 추가하세요:
1	// ...
2
3	// Add this new screen function below the UserRegistrationScreen
4	function UserLogInScreen() {
5	  return (
6	    <>
7	      <StatusBar />
8	      <SafeAreaView style={Styles.login_container}>
9	        <View style={Styles.login_header}>
10	          <Image
11	            style={Styles.login_header_logo}
12	            source={require('./assets/logo-back4app.png')}
13	          />
14	          <Text style={Styles.login_header_text}>
15	            <Text style={Styles.login_header_text_bold}>
16	              {'React Native on Back4App - '}
17	            </Text>
18	            {' User login'}
19	          </Text>
20	        </View>
21	        <UserLogIn />
22	      </SafeAreaView>
23	    </>
24	  );
25	}
26
27	// ...
28
29	// Add the screen as the top one at your StackNavigator
30	const App = () => {
31	  return (
32	    <NavigationContainer>
33	      <Stack.Navigator>
34	        <Stack.Screen name="Login" component={UserLogInScreen} />
35	        <Stack.Screen name="Sign Up" component={UserRegistrationScreen} />
36	      </Stack.Navigator>
37	    </NavigationContainer>
38	  );
39	};
40
41	// ...
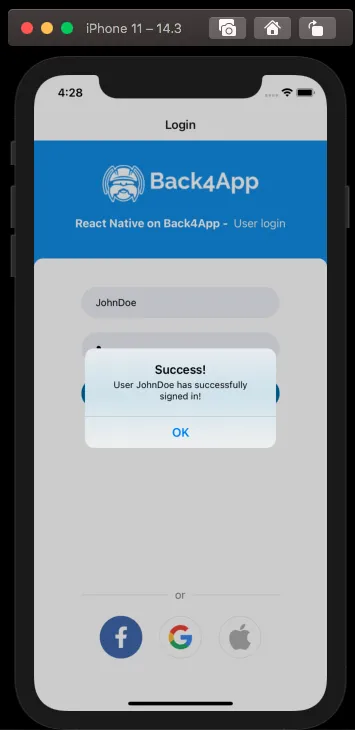
계속 진행하여 화면과 구성 요소를 테스트하세요. 이제 앱이 사용자 등록 화면 대신 사용자 로그인 화면을 표시하는 것을 알 수 있습니다. 이는 StackNavigator 화면 목록에서의 위치 때문입니다. 로그인 후에는 다음과 같은 메시지를 보게 될 것입니다:
5 - 홈 화면 만들기 및 탐색 처리
로그인 후에는 일반적으로 사용자를 앱의 홈 화면으로 안내하고 싶을 것입니다. 앱의 주요 파일에서 이 화면을 만드세요:
1	// ...
2
3	// Add this new screen function below the UserRegistrationScreen
4	function UserLogInScreen() {
5	  return (
6	    <>
7	      <StatusBar />
8	      <SafeAreaView style={Styles.login_container}>
9	        <View style={Styles.login_header}>
10	          <Image
11	            style={Styles.login_header_logo}
12	            source={require('./assets/logo-back4app.png')}
13	          />
14	          <Text style={Styles.login_header_text}>
15	            <Text style={Styles.login_header_text_bold}>
16	              {'React Native on Back4App - '}
17	            </Text>
18	            {' User login'}
19	          </Text>
20	        </View>
21	        <UserLogIn />
22	      </SafeAreaView>
23	    </>
24	  );
25	}
26
27	// ...
28
29	// Add the screen as the top one at your StackNavigator
30	const App = () => {
31	  return (
32	    <NavigationContainer>
33	      <Stack.Navigator>
34	        <Stack.Screen name="Login" component={UserLogInScreen} />
35	        <Stack.Screen name="Sign Up" component={UserRegistrationScreen} />
36	      </Stack.Navigator>
37	    </NavigationContainer>
38	  );
39	};
40
41	// ...
이제 사용자가 로그인한 후에 ‘react-navigation’을 사용하여 사용자를 탐색해야 합니다. 다음 코드를UserLogIn 컴포넌트 안에 추가하세요:
1	// ...
2	// Add this import
3	import {useNavigation} from '@react-navigation/native';
4
5	export const UserLogIn: FC<{}> = ({}): ReactElement => {
6	  // Add this to use useNavigation hook
7	  const navigation = useNavigation();
8
9	  // ...
10
11	  const doUserLogIn = async function (): Promise<boolean> {
12	    const usernameValue: string = username;
13	    const passwordValue: string = password;
14	    return await Parse.User.logIn(usernameValue, passwordValue)
15	      .then(async (loggedInUser: Parse.User) => {
16	        Alert.alert(
17	          'Success!',
18	          `User ${loggedInUser.get('username')} has successfully signed in!`,
19	        );
20	        const currentUser: Parse.User = await Parse.User.currentAsync();
21	        console.log(loggedInUser === currentUser);
22	        // Add this to navigate your home screen; Navigation.navigate takes
23	        // the user to the screen named after the one passed as parameter
24	        navigation.navigate('Home');
25	        return true;
26	      })
27	      .catch((error: object) => {
28	        Alert.alert('Error!', error.message);
29	        return false;
30	      });
31	  };
32
33	// ...
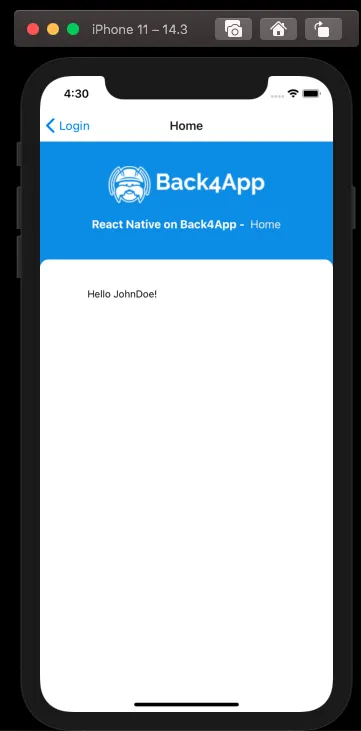
로그인 후 새 HomeScreen으로 리디렉션됩니다. 이 HelloUser 컴포넌트를 추가하여 현재 사용자 이름을 표시할 수 있습니다:
1	import React, {FC, ReactElement, useEffect, useState} from 'react';
2	import {Text} from 'react-native';
3	import Parse from 'parse/react-native';
4	import Styles from './Styles';
5
6	export const HelloUser: FC<{}> = ({}): ReactElement => {
7	  // State variable that will hold username value
8	  const [username, setUsername] = useState('');
9
10	  // useEffect is called after the component is initially rendered and
11	  // after every other render
12	  useEffect(() => {
13	    // Since the async method Parse.User.currentAsync is needed to
14	    // retrieve the current user data, you need to declare an async
15	    // function here and call it afterwards
16	    async function getCurrentUser() {
17	      // This condition ensures that username is updated only if needed
18	      if (username === '') {
19	        const currentUser = await Parse.User.currentAsync();
20	        if (currentUser !== null) {
21	          setUsername(currentUser.getUsername());
22	        }
23	      }
24	    }
25	    getCurrentUser();
26	  }, [username]);
27
28	  // Note the condition operator here, so the "Hello" text is only
29	  // rendered if there is an username value
30	  return (
31	    <View style={Styles.login_wrapper}>
32	      <View style={Styles.form}>
33	        {username !== '' && <Text>{`Hello ${username}!`}</Text>}
34	      </View>
35	    </View>
36	  );
37	};
참고: React의 useEffect 훅을 더 잘 살펴볼 수 있습니다 여기.
이 컴포넌트를 HomeScreen 안에서 호출한 후, 당신의 앱은 다음과 같아야 합니다:
6 - 로그아웃 컴포넌트 만들기
이 UserLogOut 컴포넌트는 로그인보다 간단합니다. 왜냐하면 Parse.User.logOut 메서드는 인수를 받지 않으며, currentUser 데이터를 자동으로 로컬에 저장된 것을 지웁니다. 이 컴포넌트를 앱 루트 디렉토리에 만드세요:
1	import React, {FC, ReactElement} from 'react';
2	import {Alert, Text, TouchableOpacity, View} from 'react-native';
3	import Parse from 'parse/react-native';
4	import {useNavigation} from '@react-navigation/native';
5	import {StackActions} from '@react-navigation/native';
6	import Styles from './Styles';
7
8	export const UserLogOut: FC<{}> = ({}): ReactElement => {
9	  const navigation = useNavigation();
10
11	  const doUserLogOut = async function (): Promise<boolean> {
12	    return await Parse.User.logOut()
13	      .then(async () => {
14	        // To verify that current user is now empty, currentAsync can be used
15	        const currentUser: Parse.User = await Parse.User.currentAsync();
16	        if (currentUser === null) {
17	          Alert.alert('Success!', 'No user is logged in anymore!');
18	        }
19	        // Navigation dispatch calls a navigation action, and popToTop will take
20	        // the user back to the very first screen of the stack
21	        navigation.dispatch(StackActions.popToTop());
22	        return true;
23	      })
24	      .catch((error: object) => {
25	        Alert.alert('Error!', error.message);
26	        return false;
27	      });
28	  };
29
30	  return (
31	    <View style={Styles.login_wrapper}>
32	      <View style={Styles.form}>
33	        <TouchableOpacity onPress={() => doUserLogOut()}>
34	          <View style={Styles.button}>
35	            <Text style={Styles.button_label}>{'Logout'}</Text>
36	          </View>
37	        </TouchableOpacity>
38	      </View>
39	    </View>
40	  );
41	};
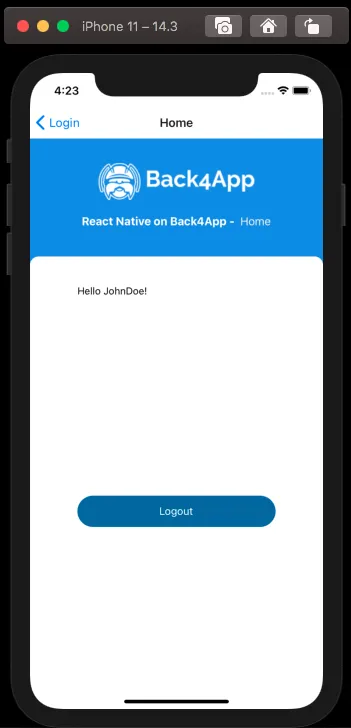
이 새로운 컴포넌트를 HomeScreen에 추가하여 로그인 후 테스트할 수 있습니다. 이제 앱의 홈 화면은 다음과 같이 보일 것입니다:
성공적으로 로그아웃을 수행하면, 다음과 같은 메시지를 보게 되며 UserLogIn 화면으로 리디렉션됩니다. 이 화면은 내비게이션 스택의 첫 번째 화면입니다:
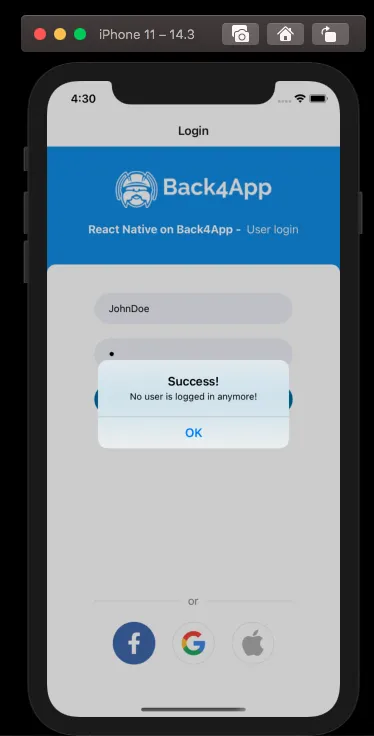
당신의 UserRegistration을 UserLogIn 화면 내의 등록 버튼에 연결하고, HomeScreen으로 리디렉션 패턴을 반복하세요. react-navigation의 문서를 읽어 여러 사용자 정의 옵션을 발견하고 앱 내비게이션의 모든 측면을 제어하는 것을 잊지 마세요.
1	// ...
2
3	export const UserLogIn: FC<{}> = ({}): ReactElement => {
4	  const navigation = useNavigation();
5
6	  const [username, setUsername] = useState('');
7	  const [password, setPassword] = useState('');
8
9	  const doUserLogIn = async function (): Promise<boolean> {
10	    // Note that these values come from state variables that we've declared before
11	    const usernameValue: string = username;
12	    const passwordValue: string = password;
13	    return await Parse.User.logIn(usernameValue, passwordValue)
14	      .then(async (loggedInUser: Parse.User) => {
15	        // logIn returns the corresponding ParseUser object
16	        Alert.alert(
17	          'Success!',
18	          `User ${loggedInUser.get('username')} has successfully signed in!`,
19	        );
20	        // To verify that this is in fact the current user, currentAsync can be used
21	        const currentUser: Parse.User = await Parse.User.currentAsync();
22	        console.log(loggedInUser === currentUser);
23	        // Navigation.navigate takes the user to the screen named after the one
24	        // passed as parameter
25	        navigation.navigate('Home');
26	        return true;
27	      })
28	      .catch((error: object) => {
29	        // Error can be caused by wrong parameters or lack of Internet connection
30	        Alert.alert('Error!', error.message);
31	        return false;
32	      });
33	  };
34
35	  return (
36	    <View style={Styles.login_wrapper}>
37	      <View style={Styles.form}>
38	        <TextInput
39	          style={Styles.form_input}
40	          value={username}
41	          placeholder={'Username'}
42	          onChangeText={(text) => setUsername(text)}
43	          autoCapitalize={'none'}
44	          keyboardType={'email-address'}
45	        />
46	        <TextInput
47	          style={Styles.form_input}
48	          value={password}
49	          placeholder={'Password'}
50	          secureTextEntry
51	          onChangeText={(text) => setPassword(text)}
52	        />
53	        <TouchableOpacity onPress={() => doUserLogIn()}>
54	          <View style={Styles.button}>
55	            <Text style={Styles.button_label}>{'Sign in'}</Text>
56	          </View>
57	        </TouchableOpacity>
58	      </View>
59	      <View style={Styles.login_social}>
60	        <View style={Styles.login_social_separator}>
61	          <View style={Styles.login_social_separator_line} />
62	          <Text style={Styles.login_social_separator_text}>{'or'}</Text>
63	          <View style={Styles.login_social_separator_line} />
64	        </View>
65	        <View style={Styles.login_social_buttons}>
66	          <TouchableOpacity>
67	            <View
68	              style={[
69	                Styles.login_social_button,
70	                Styles.login_social_facebook,
71	              ]}>
72	              <Image
73	                style={Styles.login_social_icon}
74	                source={require('./assets/icon-facebook.png')}
75	              />
76	            </View>
77	          </TouchableOpacity>
78	          <TouchableOpacity>
79	            <View style={Styles.login_social_button}>
80	              <Image
81	                style={Styles.login_social_icon}
82	                source={require('./assets/icon-google.png')}
83	              />
84	            </View>
85	          </TouchableOpacity>
86	          <TouchableOpacity>
87	            <View style={Styles.login_social_button}>
88	              <Image
89	                style={Styles.login_social_icon}
90	                source={require('./assets/icon-apple.png')}
91	              />
92	            </View>
93	          </TouchableOpacity>
94	        </View>
95	      </View>
96	      <>
97	        <TouchableOpacity onPress={() => navigation.navigate('Sign Up')}>
98	          <Text style={Styles.login_footer_text}>
99	            {"Don't have an account? "}
100	            <Text style={Styles.login_footer_link}>{'Sign up'}</Text>
101	          </Text>
102	        </TouchableOpacity>
103	      </>
104	    </View>
105	  );
106	};
107
108	// ...
1 // ...
2
3 export const UserRegistration: FC<{}> = ({}): ReactElement => {
4 const navigation = useNavigation();
5
6 const [username, setUsername] = useState('');
7 const [password, setPassword] = useState('');
8
9 const doUserSignUp = async function (): Promise<boolean> {
10 // Note that these values come from state variables that we've declared before
11 const usernameValue: string = username;
12 const passwordValue: string = password;
13 // Since the signUp method returns a Promise, we need to call it using await
14 return await Parse.User.signUp(usernameValue, passwordValue)
15 .then((createdUser: Parse.User) => {
16 // Parse.User.signUp returns the already created ParseUser object if successful
17 Alert.alert(
18 'Success!',
19 `User ${createdUser.get('username')} was successfully created!`,
20 );
21 // Navigation.navigate takes the user to the screen named after the one
22 // passed as parameter
23 navigation.navigate('Home');
24 return true;
25 })
26 .catch((error: object) => {
27 // signUp can fail if any parameter is blank or failed an uniqueness check on the server
28 Alert.alert('Error!', error.message);
29 return false;
30 });
31 };
32
33 return (
34 <View style={Styles.login_wrapper}>
35 <View style={Styles.form}>
36 <TextInput
37 style={Styles.form_input}
38 value={username}
39 placeholder={'Username'}
40 onChangeText={(text) => setUsername(text)}
41 autoCapitalize={'none'}
42 keyboardType={'email-address'}
43 />
44 <TextInput
45 style={Styles.form_input}
46 value={password}
47 placeholder={'Password'}
48 secureTextEntry
49 onChangeText={(text) => setPassword(text)}
50 />
51 <TouchableOpacity onPress={() => doUserSignUp()}>
52 <View style={Styles.button}>
53 <Text style={Styles.button_label}>{'Sign Up'}</Text>
54 </View>
55 </TouchableOpacity>
56 </View>
57 <View style={Styles.login_social}>
58 <View style={Styles.login_social_separator}>
59 <View style={Styles.login_social_separator_line} />
60 <Text style={Styles.login_social_separator_text}>{'or'}</Text>
61 <View style={Styles.login_social_separator_line} />
62 </View>
63 <View style={Styles.login_social_buttons}>
64 <TouchableOpacity>
65 <View
66 style={[
67 Styles.login_social_button,
68 Styles.login_social_facebook,
69 ]}>
70 <Image
71 style={Styles.login_social_icon}
72 source={require('./assets/icon-facebook.png')}
73 />
74 </View>
75 </TouchableOpacity>
76 <TouchableOpacity>
77 <View style={Styles.login_social_button}>
78 <Image
79 style={Styles.login_social_icon}
80 source={require('./assets/icon-google.png')}
81 />
82 </View>
83 </TouchableOpacity>
84 <TouchableOpacity>
85 <View style={Styles.login_social_button}>
86 <Image
87 style={Styles.login_social_icon}
88 source={require('./assets/icon-apple.png')}
89 />
90 </View>
91 </TouchableOpacity>
92 </View>
93 </View>
94 <>
95 <TouchableOpacity onPress={() => navigation.navigate('Login')}>
96 <Text style={Styles.login_footer_text}>
97 {'Already have an account? '}
98 <Text style={Styles.login_footer_link}>{'Log In'}</Text>
99 </Text>
100 </TouchableOpacity>
101 </>
102 </View>
103 );
104 };
105
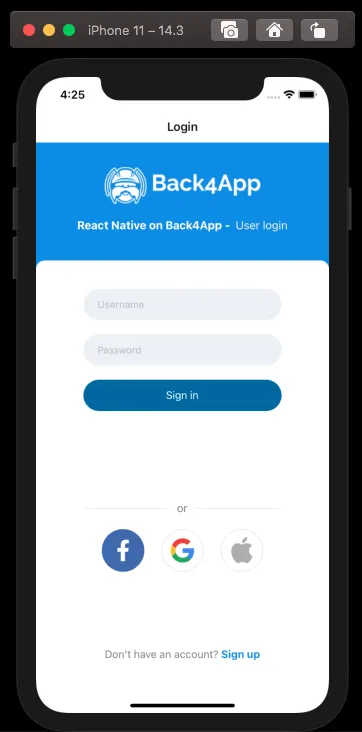
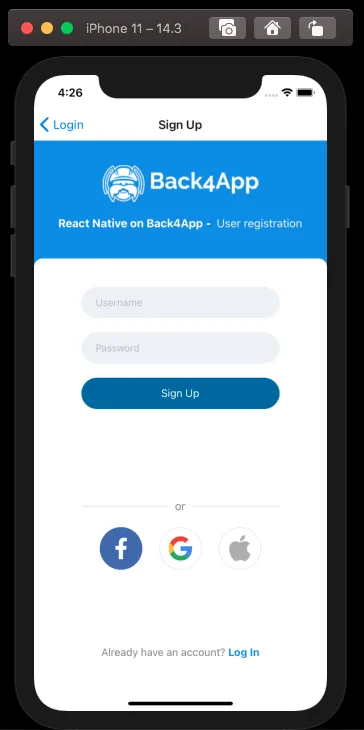
106 // ...이제 로그인 및 등록 화면은 다음과 같아야 합니다:
결론
이 가이드의 끝에서, 당신은 React Native에서 Parse 사용자를 로그인하고 로그아웃하는 방법과 react-navigation을 사용하여 애플리케이션을 통해 사용자를 탐색하는 방법을 배웠습니다. 다음 가이드에서는 유용한 사용자 쿼리를 수행하는 방법을 보여드릴 것입니다.