React Native의 Parse에서 Facebook FBSDK로 사용자 로그인
리액트 네이티브 페이스북 로그인
소개
지난 튜토리얼에서는 Parse.User 클래스를 사용하여 앱에 사용자 로그인/로그아웃 기능을 추가했습니다. 이제는 Facebook FBSDK 로그인을 사용하여 Facebook에서 사용자 데이터를 가져오고, 로그인하거나 가입하거나 기존 사용자와 연결하는 방법을 배울 것입니다. 이를 위해 react-native-fbsdk 라이브러리를 설치하고 구성할 것입니다.
Parse.User.linkWith 메서드는 각기 다른 제공자가 요청하는 올바른 매개변수를 전달하는 한, 모든 서드파티 인증 방법을 사용하여 사용자를 가입시키고 로그인시키는 역할을 합니다. 새로운 또는 기존의 Parse.User 데이터에 연결한 후, Parse는 장치에 유효한 사용자 세션을 저장합니다. 이후 currentAsync와 같은 메서드를 호출하면 일반 로그인과 마찬가지로 사용자 데이터를 성공적으로 가져올 수 있습니다.
언제든지 이 튜토리얼로 구축된 전체 Android 프로젝트에 접근할 수 있습니다. GitHub 저장소에서 확인하세요.
전제 조건
이 튜토리얼을 완료하려면 다음이 필요합니다:
목표
React Native 앱에서 Parse를 사용하여 Facebook FBSDK 로그인을 통한 사용자 로그인 기능을 구축합니다.
1 - 의존성 설치
React Native에서 Facebook 로그인을 추가하는 가장 인기 있는 방법은 react-native-fbsdk를 사용하는 것입니다. 이 라이브러리 구성은 개발 환경, 대상 플랫폼 및 선호도에 따라 다르므로, 공식 문서를 따라 설정하세요.
참고: iOS용으로 개발하는 경우, 프로젝트에 Swift 파일을 지원하는 브리징 헤더가 포함되어 있는지 확인하세요. 또한, Facebook 앱 ID를 info.plist 파일에 추가하는 위치와 Pods 파일이 올바르게 생성되었는지 주의 깊게 확인하세요.
2 - Parse와 함께 FBSDK 로그인 사용하기
이제 UserLogIn 컴포넌트 내에 Facebook FBSDK 인증 모달을 호출하는 새로운 메서드를 생성해 보겠습니다. LoginManager.logInWithPermissions, 사용자 이메일에만 접근할 수 있는 권한을 요청합니다. 사용자가 Facebook으로 성공적으로 로그인하면, AccessToken.getCurrentAccessToken을 호출하여 Facebook에서 사용자 액세스 토큰을 가져올 수 있습니다. 그 후, 여전히 사용자 id와 email을 GraphRequest를 통해 FBSDK GraphRequestManager로부터 가져와야 합니다.
1	const doUserLogInFacebook = async function () {
2	  try {
3	    // Login using the Facebook login dialog asking form email permission
4	    return await LoginManager.logInWithPermissions(['email']).then(
5	      (loginResult) => {
6	        if (loginResult.isCancelled) {
7	          console.log('Login cancelled');
8	          return false;
9	        } else {
10	          // Retrieve access token from FBSDK to be able to linkWith Parse
11	          AccessToken.getCurrentAccessToken().then((data) => {
12	            const facebookAccessToken = data.accessToken;
13	            // Callback that will be called after FBSDK successfuly retrieves user email and id from FB
14	            const responseEmailCallback = async (
15	              error,
16	              emailResult,
17	            ) => {
18	              if (error) {
19	                console.log('Error fetching data: ' + error.toString());
20	              } else {
21	                // Format authData to provide correctly for Facebook linkWith on Parse
22	                const facebookId = emailResult.id;
23	                const facebookEmail = emailResult.email;
24	                const authData = {
25	                  id: facebookId,
26	                  access_token: facebookAccessToken,
27	                };
28	                // Log in or sign up on Parse using this Facebook credentials
29	                let userToLogin = new Parse.User();
30	                // Set username and email to match provider email
31	                userToLogin.set('username', facebookEmail);
32	                userToLogin.set('email', facebookEmail);
33	                return await userToLogin
34	                  .linkWith('facebook', {
35	                    authData: authData,
36	                  })
37	                  .then(async (loggedInUser) => {
38	                    // logIn returns the corresponding ParseUser object
39	                    Alert.alert(
40	                      'Success!',
41	                      `User ${loggedInUser.get(
42	                        'username',
43	                      )} has successfully signed in!`,
44	                    );
45	                    // To verify that this is in fact the current user, currentAsync can be used
46	                    const currentUser = await Parse.User.currentAsync();
47	                    console.log(loggedInUser === currentUser);
48	                    // Navigation.navigate takes the user to the screen named after the one
49	                    // passed as parameter
50	                    navigation.navigate('Home');
51	                    return true;
52	                  })
53	                  .catch(async (error) => {
54	                    // Error can be caused by wrong parameters or lack of Internet connection
55	                    Alert.alert('Error!', error.message);
56	                    return false;
57	                  });
58	              }
59	            };
60
61	            // Formats a FBSDK GraphRequest to retrieve user email and id
62	            const emailRequest = new GraphRequest(
63	              '/me',
64	              {
65	                accessToken: facebookAccessToken,
66	                parameters: {
67	                  fields: {
68	                    string: 'email',
69	                  },
70	                },
71	              },
72	              responseEmailCallback,
73	            );
74
75	            // Start the graph request, which will call the callback after finished
76	            new GraphRequestManager().addRequest(emailRequest).start();
77
78	            return true;
79	          });
80	        }
81	      },
82	      (error) => {
83	        console.log('Login fail with error: ' + error);
84	        return false;
85	      },
86	    );
87	  } catch (error) {
88	    Alert.alert('Error!', error.code);
89	    return false;
90	  }
91	};
참고로, GraphRequest가 성공한 후, 이 함수는 Parse.User.linkWith를 사용하여 새로운 Parse.User 객체로 새로운 사용자를 등록하거나 이전 사용자를 이러한 자격 증명으로 로그인합니다. 이때 Facebook 인증 데이터를 적절히 전달합니다.
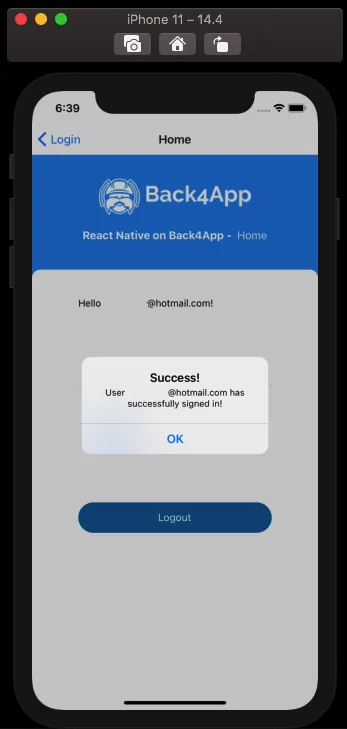
이 함수를 UserSignIn 컴포넌트에 추가하고 Facebook 버튼의 onPress 매개변수에 할당하세요. 새로운 함수를 테스트해 보세요. 사용자가 성공적으로 로그인한 후 홈 화면으로 리디렉션되는 것을 볼 수 있습니다.
3 - 사용자 로그인 및 세션 생성 확인
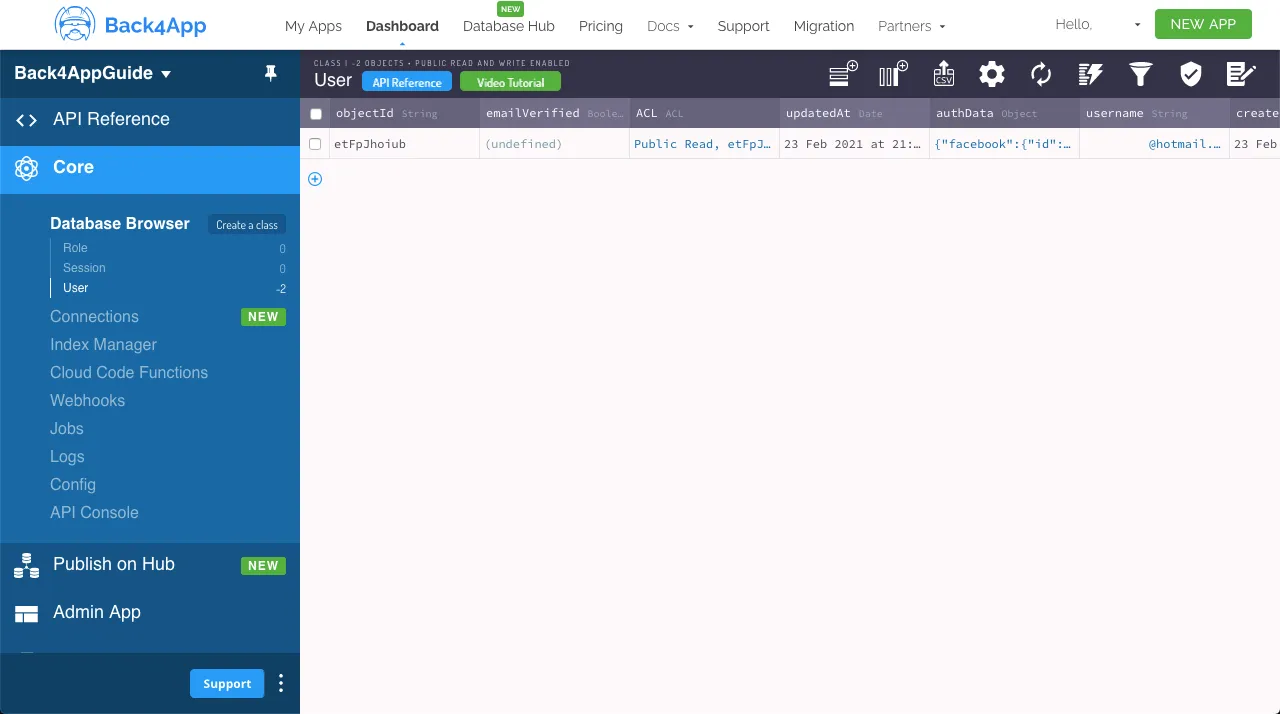
Facebook 로그인 작업이 성공했는지 확인하려면 Parse 대시보드를 확인하고 새로운 User를 확인하세요 (만약 Facebook 인증 데이터가 다른 사용자에게 속하지 않았다면), Facebook authData 매개변수를 포함하고 있습니다.
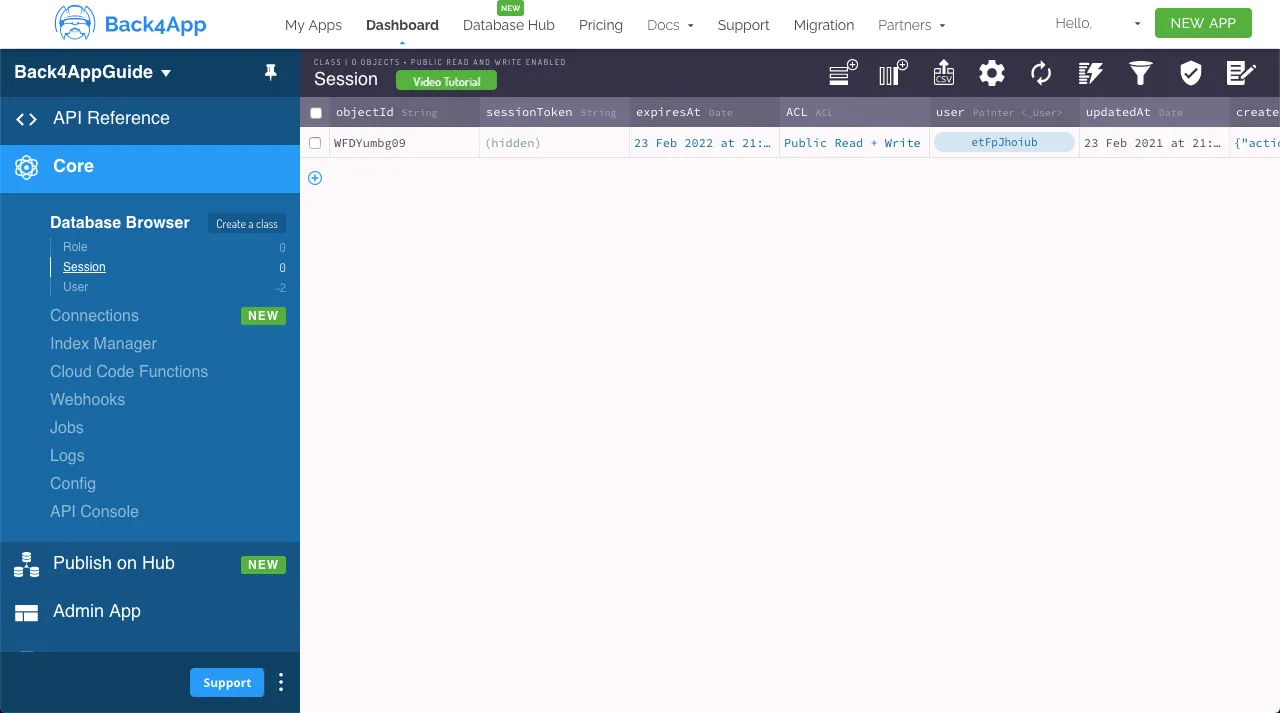
대시보드에서 유효한 세션이 생성되었는지 확인할 수도 있으며, 해당 User 객체에 대한 포인터를 포함하고 있습니다.
4 - 기존 사용자를 FBSDK 로그인에 연결하기
또 다른 linkWith 가능한 사용법은 기존 사용자를 다른 인증 제공자, 이 경우에는 Facebook과 연결하는 것입니다. linkWith를 호출하는 이 기능을 추가하세요. UserLogIn에서 했던 것과 같은 방식으로 HelloUser 컴포넌트나 직접 홈 화면에 추가하세요. 여기서 유일한 차이점은 빈 Parse.User에서 메서드를 호출하는 대신, 로그인한 사용자 객체에서 사용한다는 것입니다.
1	const doUserLinkFacebook = async function (): Promise<boolean> {
2	  try {
3	    // Login using the Facebook login dialog asking form email permission
4	    return await LoginManager.logInWithPermissions(['email']).then(
5	      (loginResult: object) => {
6	        if (loginResult.isCancelled) {
7	          console.log('Login cancelled');
8	          return false;
9	        } else {
10	          // Retrieve access token from FBSDK to be able to linkWith Parse
11	          AccessToken.getCurrentAccessToken().then((data: object) => {
12	            const facebookAccessToken = data.accessToken;
13	            // Callback that will be called after FBSDK successfuly retrieves user email and id from FB
14	            const responseEmailCallback = async (
15	              error: string,
16	              emailResult: object,
17	            ) => {
18	              if (error) {
19	                console.log('Error fetching data: ' + error.toString());
20	              } else {
21	                // Format authData to provide correctly for Facebook linkWith on Parse
22	                const facebookId: string = emailResult.id;
23	                const authData: object = {
24	                  id: facebookId,
25	                  access_token: facebookAccessToken,
26	                };
27	                let currentUser: Parse.User = await Parse.User.currentAsync();
28	                return await currentUser
29	                  .linkWith('facebook', {
30	                    authData: authData,
31	                  })
32	                  .then(async (loggedInUser: Parse.User) => {
33	                    // logIn returns the corresponding ParseUser object
34	                    Alert.alert(
35	                      'Success!',
36	                      `User ${loggedInUser.get(
37	                        'username',
38	                      )} has successfully linked his Facebook account!`,
39	                    );
40	                    // To verify that this is in fact the current user, currentAsync can be used
41	                    currentUser = await Parse.User.currentAsync();
42	                    console.log(loggedInUser === currentUser);
43	                    return true;
44	                  })
45	                  .catch(async (linkWithError: object) => {
46	                    // Error can be caused by wrong parameters or lack of Internet connection
47	                    Alert.alert('Error!', linkWithError.message);
48	                    return false;
49	                  });
50	              }
51	            };
52
53	            // Formats a FBSDK GraphRequest to retrieve user email and id
54	            const emailRequest = new GraphRequest(
55	              '/me',
56	              {
57	                accessToken: facebookAccessToken,
58	                parameters: {
59	                  fields: {
60	                    string: 'email',
61	                  },
62	                },
63	              },
64	              responseEmailCallback,
65	            );
66
67	            // Start the graph request, which will call the callback after finished
68	            new GraphRequestManager().addRequest(emailRequest).start();
69
70	            return true;
71	          });
72	        }
73	      },
74	      (error: string) => {
75	        console.log('Login fail with error: ' + error);
76	        return false;
77	      },
78	    );
79	  } catch (error: object) {
80	    Alert.alert('Error!', error.code);
81	    return false;
82	  }
83	};
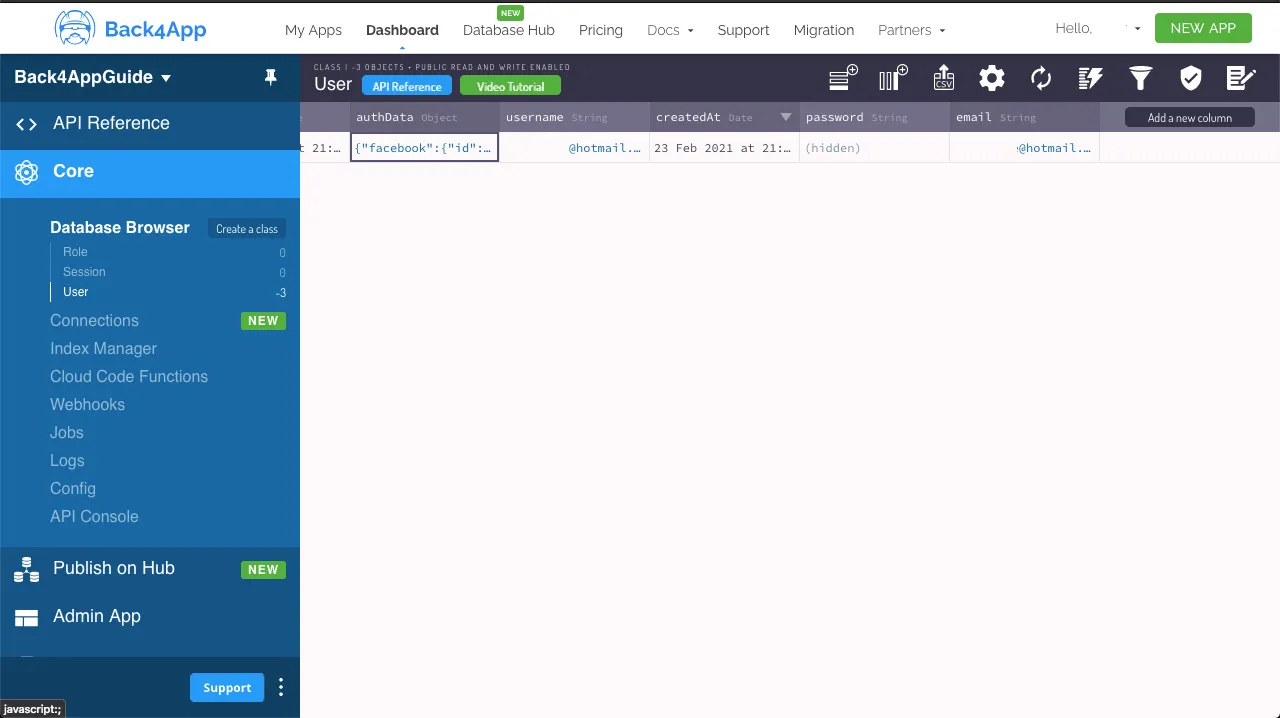
이 기능을 Facebook 버튼 onPress 매개변수에 할당하세요. 새로운 기능을 테스트하고, Parse.User 객체의 authData 값이 새로운 인증 제공자 데이터로 업데이트될 것임을 주의하세요. 사용자가 실제로 Parse 서버 대시보드에서 업데이트되었는지 확인하세요.
결론
이 가이드의 끝에서, 당신은 Facebook FBSDK 로그인을 사용하여 React Native에서 Parse 사용자를 로그인하거나 가입하는 방법을 배웠습니다 react-native-fbsdk. 다음 가이드에서는 유용한 사용자 쿼리를 수행하는 방법을 보여드리겠습니다.