Basic Operations
리액트 네이티브 CRUD 튜토리얼
소개
Parse에 데이터를 저장하는 것은 Parse.Object 클래스에 기반합니다. 각 Parse.Object는 JSON 호환 데이터의 키-값 쌍을 포함합니다. 이 데이터는 스키마가 없으므로 각 Parse.Object에 어떤 키가 존재하는지 미리 지정할 필요가 없습니다. 원하는 키-값 쌍을 설정하면, 우리의 백엔드가 이를 저장합니다.
또한 애플리케이션의 필요에 따라 데이터 유형을 지정하고 숫자, 부울, 문자열, 날짜 및 시간, 목록, GeoPointers, 그리고 객체, 저장하기 전에 JSON으로 인코딩합니다. Parse는 또한 포인터 및 관계와 같은 유형을 사용하여 관계형 데이터를 저장하고 쿼리하는 것을 지원합니다.
이 가이드에서는 CRUD 예제 앱을 통해 기본 데이터 작업을 수행하는 방법을 배우게 되며, 이를 통해 React Native에서 Parse 서버 데이터베이스에서 데이터를 생성, 읽기, 업데이트 및 삭제하는 방법을 보여줍니다. 먼저 각 CRUD 작업에 대한 구성 요소 함수를 생성하고, 나중에 전체 화면 레이아웃에서 이를 사용하여 할 일 목록 앱을 만들 것입니다.
전제 조건
이 튜토리얼을 완료하려면 다음이 필요합니다:
- Back4App에 연결된 React Native 앱을 생성해야 합니다.
목표
Parse를 사용하여 React Native에서 기본 CRUD 애플리케이션을 구축하는 것입니다.
1 - 데이터 객체 생성하기
Parse 데이터베이스에서 데이터를 관리하는 첫 번째 단계는 데이터가 있는 것입니다. 이제 createTodo 함수를 만들어 보겠습니다. 이 함수는 “Todo” 서브클래스를 가진 새로운 Parse.Object의 인스턴스를 생성합니다. Todo는 작업을 설명하는 제목(string)과 작업이 완료되었는지를 나타내는 done(boolean) 필드를 가집니다.
1	const createTodo = async function () {
2	  // This value comes from a state variable
3	  const newTodoTitleValue = newTodoTitle;
4	  // Creates a new Todo parse object instance
5	  let Todo = new Parse.Object('Todo');
6	  Todo.set('title', newTodoTitleValue);
7	  Todo.set('done', false);
8	  // After setting the todo values, save it on the server
9	  try {
10	    await Todo.save();
11	    // Success
12	    Alert.alert('Success!', 'Todo created!');
13	    // Refresh todos list to show the new one (you will create this function later)
14	    readTodos();
15	    return true;
16	  } catch (error) {
17	    // Error can be caused by lack of Internet connection
18	    Alert.alert('Error!', error.message);
19	    return false;
20	  };
21	};
데이터베이스에 Todo 테이블(또는 서브클래스)이 아직 없다면, Parse는 이를 자동으로 생성하고 Parse.Object 인스턴스 내에서 설정된 모든 열을 추가합니다. 이는 Parse.Object.set() 메서드를 사용하여 수행되며, 이 메서드는 두 개의 인수를 받습니다: 필드 이름과 설정할 값입니다.
2 - 데이터 객체 읽기
데이터베이스에 데이터를 생성한 후, 이제 애플리케이션은 서버에서 이를 읽고 사용자에게 보여줄 수 있습니다. 계속해서 readTodos 함수를 생성하세요. 이 함수는 Parse.Query, 결과를 상태 변수에 저장합니다.
1	const readTodos = async function (): Promise<boolean> {
2	  // Reading parse objects is done by using Parse.Query
3	  const parseQuery: Parse.Query = new Parse.Query('Todo');
4	  try {
5	    let todos: Parse.Object[] = await parseQuery.find();
6	    // Be aware that empty or invalid queries return as an empty array
7	    // Set results to state variable
8	    setReadResults(todos);
9	    return true;
10	  } catch (error) {
11	    // Error can be caused by lack of Internet connection
12	    Alert.alert('Error!', error.message);
13	    return false;
14	  };
15	};
Parse.Query 클래스는 매우 강력하며, 많은 제약 조건과 정렬을 쿼리에 적용할 수 있습니다. 지금은 모든 저장된 Todo 객체를 검색하는 이 간단한 쿼리에 집중하겠습니다.
3 - 데이터 객체 업데이트
Parse.Object 인스턴스를 업데이트하는 것은 새 인스턴스를 생성하는 것과 매우 유사합니다. 단, 이 경우에는 이전에 생성된 objectId를 할당한 후 새 값을 설정하고 저장해야 합니다.
1	const updateTodo = async function (todoId, done) {
2	  // Create a new todo parse object instance and set todo id
3	  let Todo = new Parse.Object('Todo');
4	  Todo.set('objectId', todoId);
5	  // Set new done value and save Parse Object changes
6	  Todo.set('done', done);
7	  try {
8	    await Todo.save();
9	    // Success
10	    Alert.alert('Success!', 'Todo updated!');
11	    // Refresh todos list
12	    readTodos();
13	    return true;
14	  } catch (error) {
15	    // Error can be caused by lack of Internet connection
16	    Alert.alert('Error!', error.message);
17	    return false;
18	  };
19	};
이 예제 앱은 할 일 목록을 나타내므로, 업데이트 함수는 추가 인수인 done 값을 받아들이며, 이는 특정 작업이 완료되었는지 여부를 나타냅니다.
4 - 데이터 객체 삭제
데이터 객체를 삭제하려면 .destroy() 메서드를 호출해야 합니다. Parse.Object 인스턴스를 나타냅니다. 이 작업은 되돌릴 수 없으므로 주의하십시오.
1	const deleteTodo = async function (todoId: string): Promise<boolean> {
2	  // Create a new todo parse object instance and set todo id
3	  let Todo: Parse.Object = new Parse.Object('Todo');
4	  Todo.set('objectId', todoId);
5	  // .destroy should be called to delete a parse object
6	  try {
7	    await Todo.destroy();
8	    Alert.alert('Success!', 'Todo deleted!');
9	    // Refresh todos list to remove this one
10	    readTodos();
11	    return true;
12	  } catch (error) {
13	    // Error can be caused by lack of Internet connection
14	    Alert.alert('Error!', error.message);
15	    return false;
16	  };
17	};
이제 이 네 가지 함수를 완전한 컴포넌트에서 사용해 보겠습니다. 이를 통해 모든 CRUD 작업이 제대로 작동하는지 테스트할 수 있습니다.
5 - React Native 컴포넌트에서 CRUD 사용하기
다음은 스타일이 적용된 사용자 인터페이스 요소, 상태 변수 및 CRUD 함수 호출을 포함한 완전한 컴포넌트 코드입니다. 다음 코드를 포함하는 TodoList.js/TodoList.tsx라는 파일에 별도의 컴포넌트를 만들거나, 주 애플리케이션 파일(App.js/App.tsx 또는 index.js)에 추가할 수 있습니다:
1	import React, {FC, ReactElement, useState} from 'react';
2	import {
3	  Alert,
4	  View,
5	  SafeAreaView,
6	  Image,
7	  ScrollView,
8	  StatusBar,
9	  StyleSheet,
10	  TouchableOpacity,
11	} from 'react-native';
12	import Parse from 'parse/react-native';
13	import {
14	  List,
15	  Title,
16	  IconButton,
17	  Text as PaperText,
18	  Button as PaperButton,
19	  TextInput as PaperTextInput,
20	} from 'react-native-paper';
21
22	export const TodoList: FC<{}> = ({}): ReactElement => {
23	  // State variables
24	  const [readResults, setReadResults] = useState<[Parse.Object]>();
25	  const [newTodoTitle, setNewTodoTitle] = useState('');
26
27	  // Functions used by the screen components
28	  const createTodo = async function (): Promise<boolean> {
29	    // This value comes from a state variable
30	    const newTodoTitleValue: string = newTodoTitle;
31	    // Creates a new Todo parse object instance
32	    let Todo: Parse.Object = new Parse.Object('Todo');
33	    Todo.set('title', newTodoTitleValue);
34	    Todo.set('done', false);
35	    // After setting the todo values, save it on the server
36	    try {
37	      await Todo.save();
38	      // Success
39	      Alert.alert('Success!', 'Todo created!');
40	      // Refresh todos list to show the new one (you will create this function later)
41	      readTodos();
42	      return true;
43	    } catch (error) {
44	      // Error can be caused by lack of Internet connection
45	      Alert.alert('Error!', error.message);
46	      return false;
47	    }
48	  };
49
50	  const readTodos = async function (): Promise<boolean> {
51	    // Reading parse objects is done by using Parse.Query
52	    const parseQuery: Parse.Query = new Parse.Query('Todo');
53	    try {
54	      let todos: Parse.Object[] = await parseQuery.find();
55	      // Be aware that empty or invalid queries return as an empty array
56	      // Set results to state variable
57	      setReadResults(todos);
58	      return true;
59	    } catch (error) {
60	      // Error can be caused by lack of Internet connection
61	      Alert.alert('Error!', error.message);
62	      return false;
63	    }
64	  };
65
66	  const updateTodo = async function (
67	    todoId: string,
68	    done: boolean,
69	  ): Promise<boolean> {
70	    // Create a new todo parse object instance and set todo id
71	    let Todo: Parse.Object = new Parse.Object('Todo');
72	    Todo.set('objectId', todoId);
73	    // Set new done value and save Parse Object changes
74	    Todo.set('done', done);
75	    try {
76	      await Todo.save();
77	      // Success
78	      Alert.alert('Success!', 'Todo updated!');
79	      // Refresh todos list
80	      readTodos();
81	      return true;
82	    } catch (error) {
83	      // Error can be caused by lack of Internet connection
84	      Alert.alert('Error!', error.message);
85	      return false;
86	    }
87	  };
88
89	  const deleteTodo = async function (todoId: string): Promise<boolean> {
90	    // Create a new todo parse object instance and set todo id
91	    let Todo: Parse.Object = new Parse.Object('Todo');
92	    Todo.set('objectId', todoId);
93	    // .destroy should be called to delete a parse object
94	    try {
95	      await Todo.destroy();
96	      Alert.alert('Success!', 'Todo deleted!');
97	      // Refresh todos list to remove this one
98	      readTodos();
99	      return true;
100	    } catch (error) {
101	      // Error can be caused by lack of Internet connection
102	      Alert.alert('Error!', error.message);
103	      return false;
104	    }
105	  };
106
107	  return (
108	    <>
109	      <StatusBar backgroundColor="#208AEC" />
110	      <SafeAreaView style={Styles.container}>
111	        <View style={Styles.header}>
112	          <Image
113	            style={Styles.header_logo}
114	            source={ {
115	              uri:
116	                'https://blog.back4app.com/wp-content/uploads/2019/05/back4app-white-logo-500px.png',
117	            } }
118	          />
119	          <PaperText style={Styles.header_text_bold}>
120	            {'React Native on Back4App'}
121	          </PaperText>
122	          <PaperText style={Styles.header_text}>{'Product Creation'}</PaperText>
123	        </View>
124	        <View style={Styles.wrapper}>
125	          <View style={Styles.flex_between}>
126	            <Title>Todo List</Title>
127	            {/* Todo read (refresh) button */}
128	            <IconButton
129	              icon="refresh"
130	              color={'#208AEC'}
131	              size={24}
132	              onPress={() => readTodos()}
133	            />
134	          </View>
135	          <View style={Styles.create_todo_container}>
136	            {/* Todo create text input */}
137	            <PaperTextInput
138	              value={newTodoTitle}
139	              onChangeText={text => setNewTodoTitle(text)}
140	              label="New Todo"
141	              mode="outlined"
142	              style={Styles.create_todo_input}
143	            />
144	            {/* Todo create button */}
145	            <PaperButton
146	              onPress={() => createTodo()}
147	              mode="contained"
148	              icon="plus"
149	              color={'#208AEC'}
150	              style={Styles.create_todo_button}>
151	              {'Add'}
152	            </PaperButton>
153	          </View>
154	          <ScrollView>
155	            {/* Todo read results list */}
156	            {readResults !== null &&
157	              readResults !== undefined &&
158	              readResults.map((todo: Parse.Object) => (
159	                <List.Item
160	                  key={todo.id}
161	                  title={todo.get('title')}
162	                  titleStyle={
163	                    todo.get('done') === true
164	                      ? Styles.todo_text_done
165	                      : Styles.todo_text
166	                  }
167	                  style={Styles.todo_item}
168	                  right={props => (
169	                    <>
170	                      {/* Todo update button */}
171	                      {todo.get('done') !== true && (
172	                        <TouchableOpacity
173	                          onPress={() => updateTodo(todo.id, true)}>
174	                          <List.Icon
175	                            {...props}
176	                            icon="check"
177	                            color={'#4CAF50'}
178	                          />
179	                        </TouchableOpacity>
180	                      )}
181	                      {/* Todo delete button */}
182	                      <TouchableOpacity onPress={() => deleteTodo(todo.id)}>
183	                        <List.Icon {...props} icon="close" color={'#ef5350'} />
184	                      </TouchableOpacity>
185	                    </>
186	                  )}
187	                />
188	              ))}
189	          </ScrollView>
190	        </View>
191	      </SafeAreaView>
192	    </>
193	  );
194	};
195
196	// These define the screen component styles
197	const Styles = StyleSheet.create({
198	  container: {
199	    flex: 1,
200	    backgroundColor: '#FFF',
201	  },
202	  wrapper: {
203	    width: '90%',
204	    alignSelf: 'center',
205	  },
206	  header: {
207	    alignItems: 'center',
208	    paddingTop: 10,
209	    paddingBottom: 20,
210	    backgroundColor: '#208AEC',
211	  },
212	  header_logo: {
213	    width: 170,
214	    height: 40,
215	    marginBottom: 10,
216	    resizeMode: 'contain',
217	  },
218	  header_text_bold: {
219	    color: '#fff',
220	    fontSize: 14,
221	    fontWeight: 'bold',
222	  },
223	  header_text: {
224	    marginTop: 3,
225	    color: '#fff',
226	    fontSize: 14,
227	  },
228	  flex_between: {
229	    flexDirection: 'row',
230	    alignItems: 'center',
231	    justifyContent: 'space-between',
232	  },
233	  create_todo_container: {
234	    flexDirection: 'row',
235	  },
236	  create_todo_input: {
237	    flex: 1,
238	    height: 38,
239	    marginBottom: 16,
240	    backgroundColor: '#FFF',
241	    fontSize: 14,
242	  },
243	  create_todo_button: {
244	    marginTop: 6,
245	    marginLeft: 15,
246	    height: 40,
247	  },
248	  todo_item: {
249	    borderBottomWidth: 1,
250	    borderBottomColor: 'rgba(0, 0, 0, 0.12)',
251	  },
252	  todo_text: {
253	    fontSize: 15,
254	  },
255	  todo_text_done: {
256	    color: 'rgba(0, 0, 0, 0.3)',
257	    fontSize: 15,
258	    textDecorationLine: 'line-through',
구성이 제대로 되어 있다면, 앱을 빌드하고 실행한 후에 다음과 같은 화면을 볼 수 있어야 합니다:
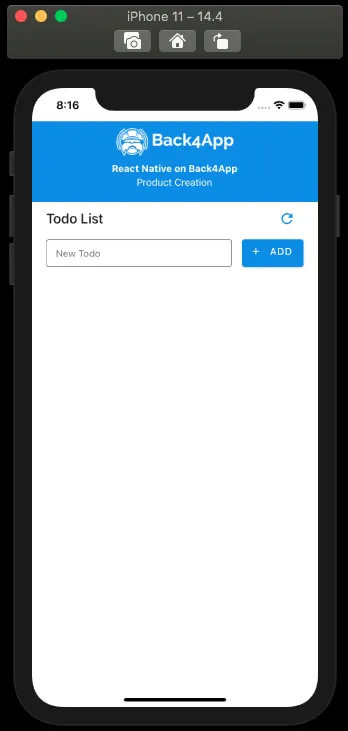
할 일 목록에 추가하려면 입력 상자에 제목을 하나씩 입력하고 추가 버튼을 눌러주세요. 성공적으로 생성된 후에는 createTodo 함수가 readTodos 함수를 트리거하여 작업 목록이 자동으로 새로 고쳐집니다. 이제 다음과 같은 상당한 할 일 목록이 있어야 합니다:
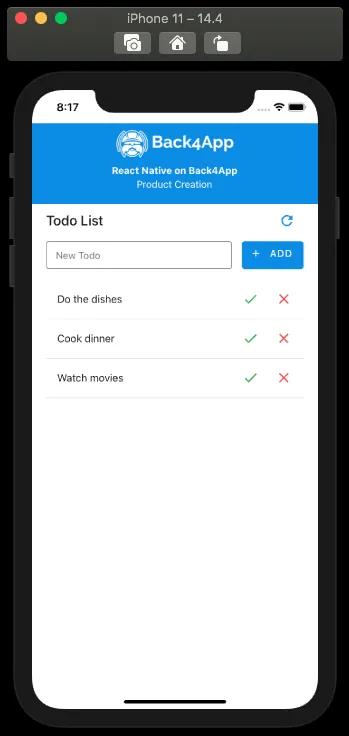
이제 체크마크를 클릭하여 작업을 완료로 표시할 수 있으며, 이로 인해 완료 값이 true로 업데이트되고 왼쪽의 아이콘 상태가 변경됩니다.
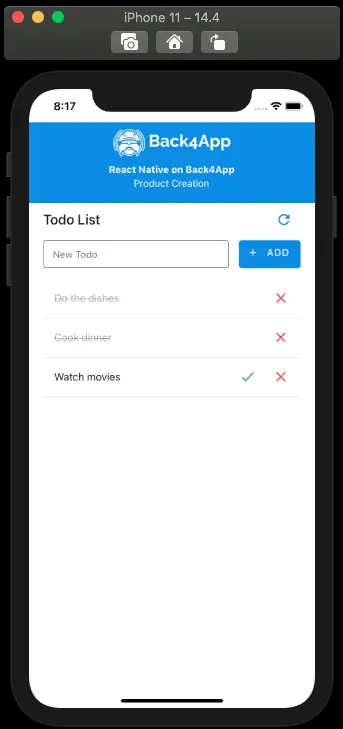
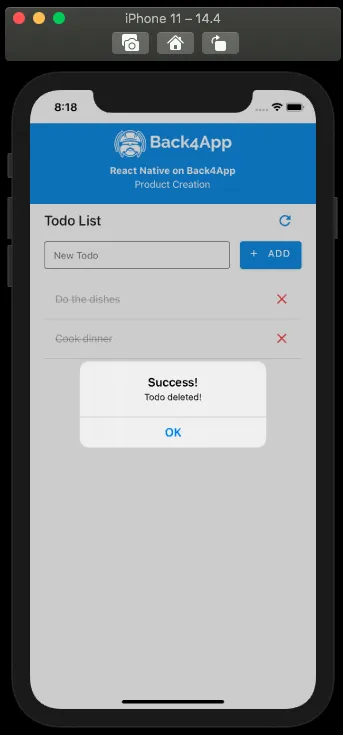
이제 남은 데이터 작업은 삭제 작업으로, 할 일 목록 객체의 가장 오른쪽에 있는 쓰레기통 아이콘을 눌러 수행할 수 있습니다. 객체를 성공적으로 삭제한 후에는 다음과 같은 경고 메시지가 표시됩니다:
결론
이 가이드를 마치면서, React Native에서 Parse의 기본 데이터 작업(CRUD)을 수행하는 방법을 배웠습니다. 다음 가이드에서는 Parse에서 지원하는 데이터 유형과 이를 사용하는 방법을 보여드리겠습니다.