파스와 플러터로 지리 쿼리 수행하기: GeoPoint 활용
플러터 지리 위치를 사용하여 파스에서 지리 쿼리 수행하기
소개
이 가이드에서는 파스의 GeoPoint 데이터 유형과 플러터 지리 위치를 사용하여 파스에서 지리 쿼리를 수행하는 방법에 대해 배웁니다. 지리 쿼리를 수행하고 파스 지리 포인트을 사용하여 레코드를 검색하는 애플리케이션을 만들 것입니다.
이 가이드의 주요 초점이 플러터와 파스에 있기 때문에 플러터 애플리케이션 코드는 설명하지 않겠습니다.
전제 조건
이 튜토리얼을 완료하려면 다음이 필요합니다:
- Back4App에서 생성된 앱입니다.
- Back4app에 연결된 Flutter 앱입니다.
- Android 또는 iOS를 실행하는 장치(또는 가상 장치)입니다.
- 이 가이드 예제를 실행하려면 Geolocator 플러그인을 올바르게 설정해야 합니다. 장치 위치에 접근하기 위해 Android 및 iOS에 대한 권한을 추가하는 것을 잊지 마세요 {: .btn target=”_blank” rel=”nofollow noreferer noopener”} 프로젝트에서. Android 및 iOS 프로젝트 설정에 대한 지침을 주의 깊게 읽으세요.
목표
Back4App 및 Flutter 지리 위치를 사용하여 지오쿼리를 수행합니다.
GeoPoint 데이터 유형
Parse는 실제 세계의 위도 및 경도 좌표를 객체와 연관시킬 수 있도록 합니다. ParseGeoPoint을 ParseObject에 추가하면 객체와 기준점 간의 근접성을 고려하여 쿼리를 수행할 수 있습니다. 이 기능을 통해 다른 사용자와 가장 가까운 사용자를 찾거나 사용자에게 가장 가까운 장소를 쉽게 찾을 수 있습니다.
객체와 점을 연관시키려면 먼저 ParseGeoPoint을 생성해야 합니다. 아래에서 위도가 40.0도이고 경도가 -30.0도인 지오포인트를 찾을 수 있습니다.
이 포인트는 다른 데이터 유형(문자열, 숫자, 날짜 등)과 마찬가지로 객체에 일반 필드로 저장됩니다.
** 참고: 현재 클래스에서 하나의 키만 ParseGeoPoint일 수 있습니다.
1 - QueryBuilder 클래스
모든 Parse 쿼리 작업은 QueryBuilder 객체 유형을 사용하며, 이는 앱 전반에 걸쳐 데이터베이스에서 특정 데이터를 검색하는 데 도움이 됩니다. 새 QueryBuilder를 생성하려면 원하는 ParseObject 하위 클래스를 매개변수로 전달해야 하며, 이는 쿼리 결과를 포함할 것입니다.
알아야 할 중요한 점은 QueryBuilder는 retrieve 메서드를 호출한 후에만 해결된다는 것입니다 query, 따라서 쿼리를 설정하고 실제로 호출되기 전에 여러 수정자를 연결할 수 있습니다. QueryBuilder 클래스에 대한 자세한 내용은 여기에서 공식 문서를 참조하세요.
Back4App에서 JavaScript 콘솔 사용하기
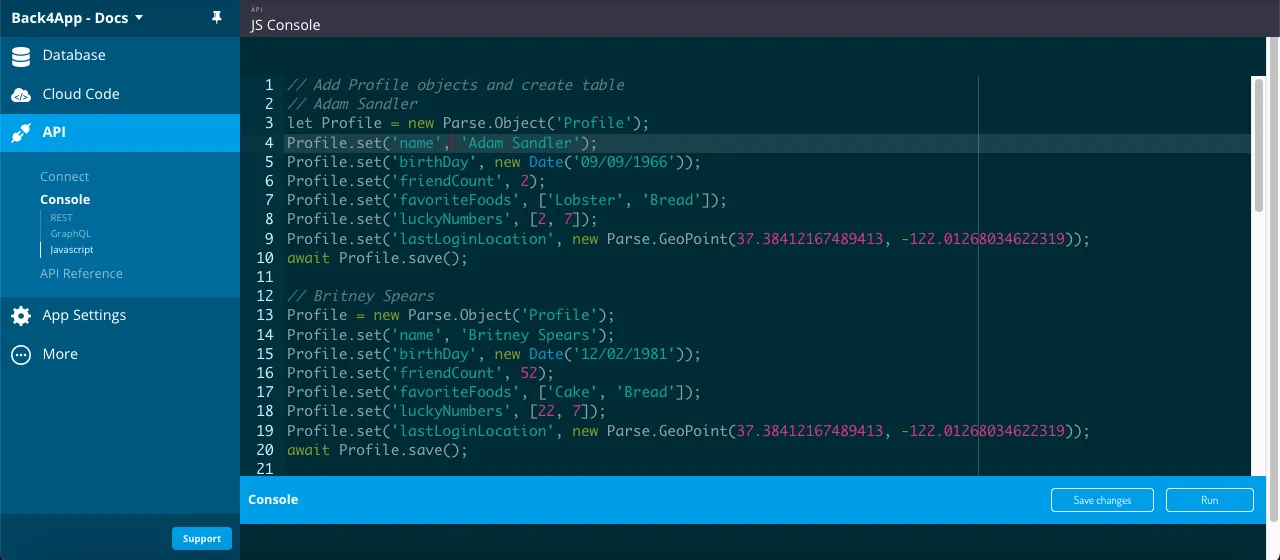
Back4App 애플리케이션의 대시보드 내에서 JavaScript 코드를 직접 실행할 수 있는 매우 유용한 API 콘솔을 찾을 수 있습니다. 이 가이드에서는 Back4App에 데이터 객체를 저장하는 데 사용할 것입니다. 앱의 주요 대시보드에서 Core->API Console->Javascript로 이동하세요.
2 - Back4app에 데이터 저장하기
이 가이드에서 쿼리를 실행하려면 먼저 앱에 데이터를 채워야 합니다. City 클래스를 생성할 것이며, 이는 이 가이드에서 우리의 쿼리의 대상이 될 것입니다. 다음은 Parse.Object 클래스 생성 코드입니다. API 콘솔에서 실행해 보세요:
1   // Add City objects and create table
2   // Note how GeoPoints are created, passing latitude and longitude as arguments
3   // Montevideo
4   City = new Parse.Object('City');
5   City.set('name', 'Montevideo - Uruguay');
6   City.set('location', new Parse.GeoPoint(-34.85553195363169, -56.207280375137955));
7   await City.save();
8
9   // Brasília
10  City = new Parse.Object('City');
11  City.set('name', 'Brasília - Brazil');
12  City.set('location', new Parse.GeoPoint(-15.79485821477289, -47.88391074690196));
13  await City.save();
14
15  // Bogotá
16  City = new Parse.Object('City');
17  City.set('name', 'Bogotá - Colombia');
18  City.set('location', new Parse.GeoPoint(4.69139880891712, -74.06936691331047));
19  await City.save();
20
21  // Mexico City
22  City = new Parse.Object('City');
23  City.set('name', 'Mexico City - Mexico');
24  City.set('location', new Parse.GeoPoint(19.400977162618933, -99.13311378164776));
25  await City.save();
26
27  // Washington, D.C.
28  City = new Parse.Object('City');
29  City.set('name', 'Washington, D.C. - USA');
30  City.set('location', new Parse.GeoPoint(38.930727220189944, -77.04626261880388));
31  await City.save();
32
33  // Ottawa
34  City = new Parse.Object('City');
35  City.set('name', 'Ottawa - Canada');
36  City.set('location', new Parse.GeoPoint(45.41102167733425, -75.695414598736));
37  await City.save();
38
39  // Tokyo
40  City = new Parse.Object('City');
41  City.set('name', 'Tokyo - Japan');
42  City.set('location', new Parse.GeoPoint(35.6897, 139.6922));
43  await City.save();
44
45  // Mumbai
46  City = new Parse.Object('City');
47  City.set('name', 'Mumbai - India');
48  City.set('location', new Parse.GeoPoint(18.9667, 72.8333));
49  await City.save();
50
51  // Shanghai
52  City = new Parse.Object('City');
53  City.set('name', 'Shanghai - China');
54  City.set('location', new Parse.GeoPoint(31.1667, 121.4667));
55  await City.save();
56
57  // New York
58  City = new Parse.Object('City');
59  City.set('name', 'New York - USA');
60  City.set('location', new Parse.GeoPoint(40.6943, -73.9249));
61  await City.save();
62
63  // Moscow
64  City = new Parse.Object('City');
65  City.set('name', 'Moscow - Russia');
66  City.set('location', new Parse.GeoPoint(55.7558, 37.6178));
67  await City.save();
68
69  // Paris
70  City = new Parse.Object('City');
71  City.set('name', 'Paris - France');
72  City.set('location', new Parse.GeoPoint(48.8566, 2.3522));
73  await City.save();
74
75  // Paris
76  City = new Parse.Object('City');
77  City.set('name', 'London - United Kingdom');
78  City.set('location', new Parse.GeoPoint(51.5072, -0.1275));
79  await City.save();
80
81  // Luanda
82  City = new Parse.Object('City');
83  City.set('name', 'Luanda - Angola');
84  City.set('location', new Parse.GeoPoint(-8.8383, 13.2344));
85  await City.save();
86
87  // Johannesburg
88  City = new Parse.Object('City');
89  City.set('name', 'Johannesburg - South Africa');
90  City.set('location', new Parse.GeoPoint(-26.2044, 28.0416));
91  await City.save();
92
93  console.log('Success!');
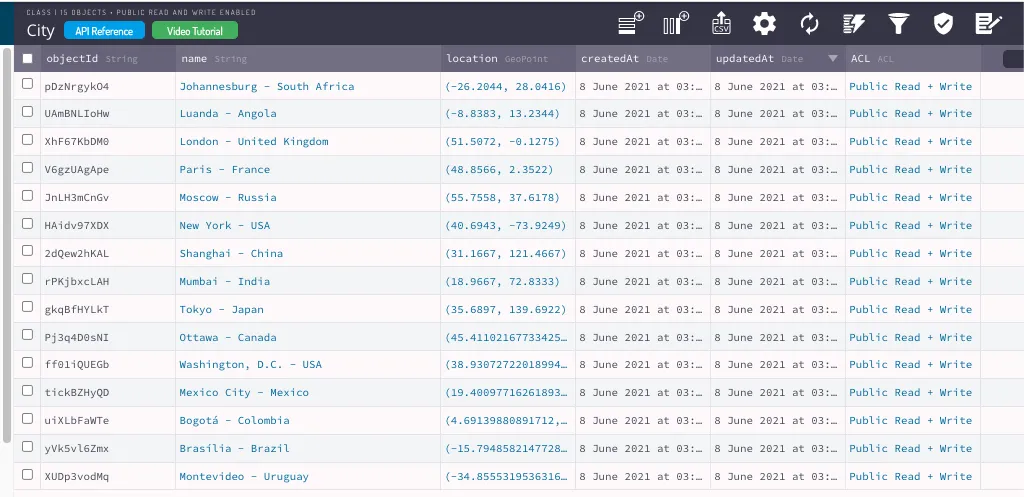
이 코드를 실행한 후, 데이터베이스에 City 클래스가 생성되어야 합니다. 새 클래스는 다음과 같아야 합니다:
이제 모든 QueryBuilder 메서드의 예제를 살펴보고, 그들이 하는 일에 대한 간단한 설명을 추가하겠습니다.
3 - 데이터 쿼리하기
이제 클래스가 채워졌으므로, GeoPoint 쿼리를 수행할 수 있습니다.
시작하겠습니다 도시 결과를 미국 달라스에서 가장 가까운 순으로 정렬하겠습니다 (위도 32.779167, 경도 -96.808891), whereNear 메서드를 사용하여:
1       // Create your query
2       final QueryBuilder<ParseObject> parseQuery =
3           QueryBuilder<ParseObject>(ParseObject('City'));
4
5       // Create our GeoPoint for the query
6       final dallasGeoPoint =
7           ParseGeoPoint(latitude: 32.779167, longitude: -96.808891);
8
9       // `whereNear` will order results based on distance between the GeoPoint
10      // type field from the class and the GeoPoint argument
11      parseQuery.whereNear('location', dallasGeoPoint);
12
13      // The query will resolve only after calling this method, retrieving
14      // an array of `ParseObjects`, if success
15      final ParseResponse apiResponse = await parseQuery.query();
16
17      if (apiResponse.success && apiResponse.results != null) {
18        // Let's show the results
19        for (var o in apiResponse.results! as List<ParseObject>) {
20          print(
21              'City: ${o.get<String>('name')} - Location: ${o.get<ParseGeoPoint>('location')!.latitude}, ${o.get<ParseGeoPoint>('location')!.longitude}');
22        }
23      }
이제 whereWithinKilometers, 메서드를 사용하여 쿼리하겠습니다. 이 메서드는 GeoPoint 필드가 최대 거리 내에 있는 모든 결과를 검색합니다. 달라스를 다시 참조로 사용하고 거리 제한은 3000km가 될 것입니다.
1       // Create your query
2       final QueryBuilder<ParseObject> parseQuery =
3           QueryBuilder<ParseObject>(ParseObject('City'));
4
5       // Create our GeoPoint for the query
6       final dallasGeoPoint =
7           ParseGeoPoint(latitude: 32.779167, longitude: -96.808891);
8
9       // You can also use `withinMiles` and `withinRadians` the same way,
10      // but with different measuring unities
11      parseQuery.whereWithinKilometers('location', dallasGeoPoint, 3000);
12     //parseQuery.whereWithinMiles('location', dallasGeoPoint, 3000);
13
14      // The query will resolve only after calling this method, retrieving
15      // an array of `ParseObjects`, if success
16      final ParseResponse apiResponse = await parseQuery.query();
17
18      if (apiResponse.success && apiResponse.results != null) {
19        // Let's show the results
20        for (var o in apiResponse.results! as List<ParseObject>) {
21          print(
22              'City: ${o.get<String>('name')} - Location: ${o.get<ParseGeoPoint>('location')!.latitude}, ${o.get<ParseGeoPoint>('location')!.longitude}');
23        }
24      }
이제 whereWithinMiles 메서드를 사용하여 쿼리를 수행해 보겠습니다. 이 메서드는 GeoPoint 필드가 최대 거리 내에 있는 모든 결과를 검색합니다. 다시 한 번 댈러스를 참조로 사용하고 거리 제한은 3000마일이 될 것입니다.
1       // Create your query
2       final QueryBuilder<ParseObject> parseQuery =
3           QueryBuilder<ParseObject>(ParseObject('City'));
4
5       // Create our GeoPoint for the query
6       final dallasGeoPoint =
7           ParseGeoPoint(latitude: 32.779167, longitude: -96.808891);
8
9       // You can also use `whereWithinKilometers` and `whereWithinRadians` the same way,
10      parseQuery.whereWithinMiles('location', dallasGeoPoint, 3000);
11
12      // The query will resolve only after calling this method, retrieving
13      // an array of `ParseObjects`, if success
14      final ParseResponse apiResponse = await parseQuery.query();
15
16      if (apiResponse.success && apiResponse.results != null) {
17        // Let's show the results
18        for (var o in apiResponse.results! as List<ParseObject>) {
19          print(
20              'City: ${o.get<String>('name')} - Location: ${o.get<ParseGeoPoint>('location')!.latitude}, ${o.get<ParseGeoPoint>('location')!.longitude}');
21        }
22      }
4 - Flutter에서 쿼리
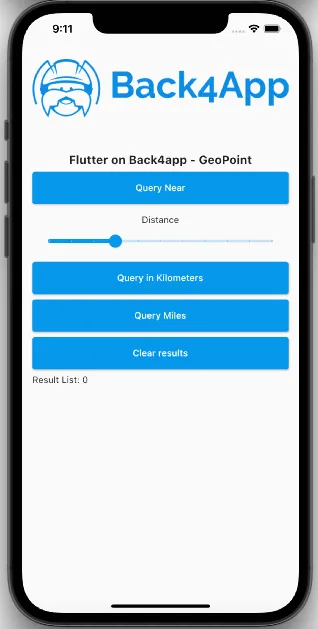
이제 Flutter 앱 내에서 예제 쿼리를 사용해 보겠습니다. 결과를 보여주는 목록과 쿼리를 호출하는 3개의 버튼이 있는 간단한 인터페이스를 갖추고 있습니다.
앱은 또한 Geolocator 플러그인을 사용하여 장치의 현재 위치를 검색합니다(지침을 따르세요). 따라서 쿼리는 실제 데이터를 사용할 것입니다.
Flutter 프로젝트를 열고, main.dart 파일의 모든 코드를 정리하고 다음으로 교체하세요:
1   import 'package:flutter/cupertino.dart';
2   import 'package:flutter/material.dart';
3   import 'package:geolocator/geolocator.dart';
4   import 'package:parse_server_sdk_flutter/parse_server_sdk.dart';
5
6   void main() async {
7     WidgetsFlutterBinding.ensureInitialized();
8
9     final keyApplicationId = 'YOUR_APP_ID_HERE';
10    final keyClientKey = 'YOUR_CLIENT_KEY_HERE';
11
12    final keyParseServerUrl = 'https://parseapi.back4app.com';
13
14    await Parse().initialize(keyApplicationId, keyParseServerUrl,
15        clientKey: keyClientKey, debug: true);
16
17    runApp(MaterialApp(
18      title: 'Flutter - GeoPoint',
19      debugShowCheckedModeBanner: false,
20      home: HomePage(),
21    ));
22  }
23
24  class HomePage extends StatefulWidget {
25    @override
26    _HomePageState createState() => _HomePageState();
27  }
28
29  class _HomePageState extends State<HomePage> {
30    List<ParseObject> results = <ParseObject>[];
31    double selectedDistance = 3000;
32
33    Future<Position> getCurrentPosition() async {
34      bool serviceEnabled;
35      LocationPermission permission;
36
37      // Test if location services are enabled.
38      serviceEnabled = await Geolocator.isLocationServiceEnabled();
39      if (!serviceEnabled) {
40        return Future.error('Location services are disabled.');
41      }
42
43      permission = await Geolocator.checkPermission();
44      if (permission == LocationPermission.denied) {
45        permission = await Geolocator.requestPermission();
46        if (permission == LocationPermission.denied) {
47          return Future.error('Location permissions are denied');
48        }
49      }
50
51      if (permission == LocationPermission.deniedForever) {
52        return Future.error(
53            'Location permissions are permanently denied, we cannot request permissions.');
54      }
55
56      // When we reach here, permissions are granted and we can
57      // continue accessing the position of the device.
58      return await Geolocator.getCurrentPosition();
59    }
60
61    void doQueryNear() async {
62      // Create your query
63      final QueryBuilder<ParseObject> parseQuery =
64          QueryBuilder<ParseObject>(ParseObject('City'));
65
66      // Get current position from device
67      final position = await getCurrentPosition();
68
69      final currentGeoPoint = ParseGeoPoint(
70          latitude: position.latitude, longitude: position.longitude);
71
72      // `whereNear` will order results based on distance between the GeoPoint
73      // type field from the class and the GeoPoint argument
74      parseQuery.whereNear('location', currentGeoPoint);
75
76      // The query will resolve only after calling this method, retrieving
77      // an array of `ParseObjects`, if success
78      final ParseResponse apiResponse = await parseQuery.query();
79
80      if (apiResponse.success && apiResponse.results != null) {
81        // Let's show the results
82        for (var o in apiResponse.results! as List<ParseObject>) {
83          print(
84              'City: ${o.get<String>('name')} - Location: ${o.get<ParseGeoPoint>('location')!.latitude}, ${o.get<ParseGeoPoint>('location')!.longitude}');
85        }
86
87        setState(() {
88          results = apiResponse.results as List<ParseObject>;
89        });
90      } else {
91        setState(() {
92          results.clear();
93        });
94      }
95   }
96
97    void doQueryInKilometers() async {
98      // Create your query
99      final QueryBuilder<ParseObject> parseQuery =
100         QueryBuilder<ParseObject>(ParseObject('City'));
101
102     // Get current position from device
103     final position = await getCurrentPosition();
104
105     final currentGeoPoint = ParseGeoPoint(
106         latitude: position.latitude, longitude: position.longitude);
107
108     // You can also use `whereWithinMiles` and `whereWithinRadians` the same way,
109     // but with different measuring unities
110     parseQuery.whereWithinKilometers(
111         'location', currentGeoPoint, selectedDistance);
112
113     // The query will resolve only after calling this method, retrieving
114     // an array of `ParseObjects`, if success
115     final ParseResponse apiResponse = await parseQuery.query();
116
117     if (apiResponse.success && apiResponse.results != null) {
118       // Let's show the results
119       for (var o in apiResponse.results! as List<ParseObject>) {
120         print(
121             'City: ${o.get<String>('name')} - Location: ${o.get<ParseGeoPoint>('location')!.latitude}, ${o.get<ParseGeoPoint>('location')!.longitude}');
122       }
123
124       setState(() {
125         results = apiResponse.results as List<ParseObject>;
126       });
127     } else {
128       setState(() {
129         results.clear();
130       });
131     }
132   }
133
134   void doQueryInMiles() async {
135     // Create your query
136     final QueryBuilder<ParseObject> parseQuery =
137         QueryBuilder<ParseObject>(ParseObject('City'));
138
139     // Get current position from device
140     final position = await getCurrentPosition();
141
142     final currentGeoPoint = ParseGeoPoint(
143         latitude: position.latitude, longitude: position.longitude);
144
145     // You can also use `whereWithinKilometers` and `whereWithinRadians` the same way,
146     parseQuery.whereWithinMiles('location', currentGeoPoint, selectedDistance);
147
148     // The query will resolve only after calling this method, retrieving
149     // an array of `ParseObjects`, if success
150     final ParseResponse apiResponse = await parseQuery.query();
151
152     if (apiResponse.success && apiResponse.results != null) {
153     // Let's show the results
154       for (var o in apiResponse.results! as List<ParseObject>) {
155         print(
156             'City: ${o.get<String>('name')} - Location: ${o.get<ParseGeoPoint>('location')!.latitude}, ${o.get<ParseGeoPoint>('location')!.longitude}');
157       }
158
159       setState(() {
160         results = apiResponse.results as List<ParseObject>;
161       });
162     } else {
163       setState(() {
164         results.clear();
165       });
166     }
167   }
168
169   void doClearResults() async {
170     setState(() {
171       results = [];
172     });
173   }
174
175   @override
176   Widget build(BuildContext context) {
177     return Scaffold(
178         body: Padding(
179       padding: const EdgeInsets.all(16.0),
180       child: Column(
181         crossAxisAlignment: CrossAxisAlignment.stretch,
182         children: [
183           Container(
184             height: 200,
185             child: Image.network(
186                 'https://blog.back4app.com/wp-content/uploads/2017/11/logo-b4a-1-768x175-1.png'),
187           ),
188           Center(
189             child: const Text('Flutter on Back4app - GeoPoint',
190                 style: TextStyle(fontSize: 18, fontWeight: FontWeight.bold)),
191           ),
192           SizedBox(
193             height: 8,
194           ),
195           Container(
196             height: 50,
197             child: ElevatedButton(
198                 onPressed: doQueryNear,
199                 child: Text('Query Near'),
200                 style: ElevatedButton.styleFrom(primary: Colors.blue)),
201           ),
202           SizedBox(
203             height: 16,
204           ),
205           Center(child: Text('Distance')),
206           Slider(
207             value: selectedDistance,
208             min: 0,
209             max: 10000,
210             divisions: 10,
211             onChanged: (value) {
212               setState(() {
213                 selectedDistance = value;
214               });
215             },
216             label: selectedDistance.toStringAsFixed(0),
217           ),
218           SizedBox(
219             height: 8,
220           ),
221           Container(
222             height: 50,
223             child: ElevatedButton(
224                 onPressed: doQueryInKilometers,
225                 child: Text('Query in Kilometers'),
226                 style: ElevatedButton.styleFrom(primary: Colors.blue)),
227           ),
228           SizedBox(
229             height: 8,
230           ),
231           Container(
232             height: 50,
233             child: ElevatedButton(
234                 onPressed: doQueryInMiles,
235                 child: Text('Query Miles'),
236                 style: ElevatedButton.styleFrom(primary: Colors.blue)),
237           ),
238           SizedBox(
239             height: 8,
240           ),
241           Container(
242             height: 50,
243             child: ElevatedButton(
244                 onPressed: doClearResults,
245                 child: Text('Clear results'),
246                 style: ElevatedButton.styleFrom(primary: Colors.blue)),
247           ),
248           SizedBox(
249             height: 8,
250           ),
251           Text(
252             'Result List: ${results.length}',
253           ),
254           Expanded(
255             child: ListView.builder(
256                 itemCount: results.length,
257                 itemBuilder: (context, index) {
258                   final o = results[index];
259                   return Container(
260                     padding: const EdgeInsets.all(4),
261                     decoration:
262                         BoxDecoration(border: Border.all(color: Colors.black)),
263                     child: Text(
264                         '${o.get<String>('name')} \nLocation: ${o.get<ParseGeoPoint>('location')!.latitude}, ${o.get<ParseGeoPoint>('location')!.longitude}'),
265                   );
266                 }),
267           )
268         ],
269       ),
270     ));
271   }
272 }
애플리케이션 ID와 클라이언트 키 자격 증명을 찾으려면 Back4App 웹사이트로 이동하세요.
코드를 다음과 같이 업데이트하세요 main.dart Back4app의 프로젝트의 ApplicationId와 ClientKey 값으로.
- keyApplicationId = 앱 ID
- keyClientKey = 클라이언트 키
프로젝트를 실행하면 앱이 이미지와 같이 로드됩니다.
결론
이 가이드의 끝에서, 당신은 GeoPoint 데이터 쿼리가 Parse에서 어떻게 작동하는지와 Flutter 앱에서 Back4App에서 이를 수행하는 방법을 배웠습니다.